
A connection via SSL/TLS protects the data traffic by sending packets encrypted. To be able to establish such a connection, you need a certificate from a trustworthy provider, which usually costs over $20 per year. Thanks to the Let’s Encrypt Initiative, such SSL certificates are now available to everyone – free of charge. The big advantage is that the certifier is classified as trustworthy in the common browsers.
In this article, I would like to show how to use Node.JS/Apache web servers etc.. Applications (FTP, etc.) can create a Raspberry Pi SSL certificate.
Preparation
In order to be able to use an SSL/TLS certificate sensibly, a web server or an application should be installed on the Raspberry Pi 3, for which e.g. an HTTP (S) connection is to be established. You can create a Node.JS server.
In addition, I strongly recommend installing a dynamic DNS Server if your Raspberry Pi does not have a static IP address. Internet providers usually only issue a static IP to households for a surcharge. A dynamic IP address changes at least once a day, i.e. another IP address would have to be retrieved.
This problem can be avoided with a dDNS service, since a connection to a (free) domain is established as soon as the dynamic IP address changes. So you can call this domain instead of the changing IP address and the dDNS service takes care of everything else. In addition, your correct domain (if you have one) can also point to this “intermediate domain” via DNS entries.
If you are running an Apache server, you can end it in the following manner. To end a Node.JS server, it is sufficient to kill the application (if necessary, end the background process).
sudo service apache2 stopAlso make sure that in addition to port 80, port 443 in your router (recommendation: FRITZ! Box) is also approved for the internal IP address of the Raspberry Pi.
Creating a Let’s Encrypt SSL Certificate
We use Git to download the certificate creation tool. This is already included on the newer Raspbian versions. If this is not on your operating system (e.g. a Minimal Raspbian version), you can simply install it:
sudo apt-get install git
Now we load the files into our home directory and go to this folder:
cd ~
git clone https://github.com/letsencrypt/letsencrypt
cd letsencrypt
Now you need all domains to which this certificate should apply. If you have, for example, subdomains or your domain is called up with and without “www”, you can specify all of them right away. In my example, I just want to create the SSL certificate for my domain, which I got from NoIP. If there are several domains, first you should enter the main domain.
The command to create the Let’s Encrypt certificate is as follows (replace domains and mail):
./letsencrypt-auto -d FIRST_DOMAIN -d SECOND_DOMAIN --redirect -m YOUR_MAILThe --redirect parameter specifies that normal HTTP connections are automatically forwarded to HTTPS. The email address is necessary for contacting us or if the certificate would have to be restored one day.
Tip: If you are running an Apache server, you can also let the tool make all other settings by adding the --apache parameter.
You will now be asked to read and accept the terms of use.
With the certonly option you can also specify that only the certificates should be created. In the folder “/etc/letsencrypt/live/” there is a new folder with the name of our main domain. There are four key files which are needed. Depending on the application, the installation of the SSL certificates is somewhat different. In Node.JS the certificate must be e.g. loaded by code. You can find out here how the manual setup for Apache2 works.
By the way: If you need help or want to see all other parameters of the tool, you can do this easily with ./letsencrypt-auto --help all
Renewing the SSL Certificate
All Let’s Encrypt certificates have a run-time of 3 months. After this period they have expired and must be renewed. Renewing the Raspberry Pi SSL certificate is very easy (don’t forget to adjust):
./letsencrypt-auto -d FIRST_DOMAIN -d SECOND_DOMAIN --redirect -m YOUR_MAIL --agree-tos --renew-by-defaultHere the parameter --renew-by-default is the decisive factor. The other (additional) parameters are identical to those that we specified when creating them.
Now, however, it is the case that in continuous operation you do not necessarily want to think about updating the certificate every 3 months. Therefore, there is a little trick: If the Raspberry Pi is (almost) always in operation anyway, we can update the certificate earlier, e.g. every month. To run this automatically, we use Cron:
sudo crontab -e
At the end of this file we add the following line (adapted as above):
|
1 |
0 1 2 * * /home/pi/letsencrypt/letsencrypt-auto -d FIRST_DOMAIN -d SECOND_DOMAIN --redirect -m YOUR_MAIL --agree-tos --renew-by-default |
This will start the tool on the 1st of every month at 02:00 and renew our Raspberry Pi SSL certificate.
Testing the Raspberry Pi SSL Certificate
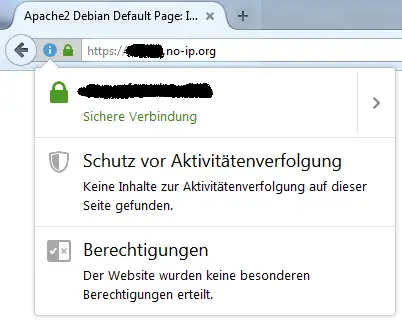
If the dynamic DNS service is running and your web server is started again (sudo /etc/init.d/apache2 start) you can now test in the browser whether your certificate has been recognized. To do this, simply open the domain with https: // at the beginning. With apache2 in particular, it is important that the file /etc/apache2/ports.conf has only one entry that uses port 443 (comment out all others):
<IfModule mod_ssl.c>
      Listen 443
</IfModule>
The certificate should now be displayed in the browser:
Many more details can also be found in the official Let’s Encrypt documentation.
7 Comments
“Let’s Encrypt documentation” link is broken.
“Let’s Encrypt documentation” link is broken.
SORRY
This page does not exist yet.
Appears
ak3ks.bykov@yandex.ru
Yeah, this is broken, says my system is not supported by certbot-auto anymore. Shame.
./letsencrypt-auto does not exist
Agreed. I found it in a subfolder: letsencrypt/letsencrypt-auto-source/letsencrypt-auto
However, that is useless anyway because this one throws errors left and right.
Going with certbot instead, seems to work a little better.
If your cron table entry shows 0 1 2 * *, woudn’t t mean that this would schedule the job for minute 0 of hour 1 on day 2 of each month, meaning on “the 2nd of every month at 01:00”? As opposed to your article which interprets it as “the 1st of every month at 02:00”? Did I get it wrong?