")
As hardly any scales work analogously, it is of course also possible to measure weights with a digital Raspberry Pi scale. This can be used in various applications as the weight value ranges which can be measured are also almost unlimited. Only a sensor and a load cell are required, which are available for different weight ranges.
In this tutorial we are building a simple Raspberry Pi kitchen scale, whose precision is amazingly accurate. Of course, it is also possible to unscrew an existing (person) scale and read it out using a Raspberry Pi.
Accessories for the Raspberry Pi Scale
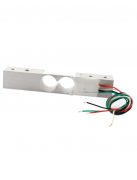
The most important thing to build your own scale is a “load cell”, which is a metal bar with a hole in the center (see picture on the right). This is available for different weight classes (up to 1kg, up to 5kg, up to 50kg, etc.). Even though some have a different form, all are provided with four cables. To read out the values, the HX711 weight sensor is also required. This sensor is available in two versions: red and green. The pressure sensors probably have small differences, but are – theoretically – both compatible. I have used the green HX711. Fixing material is also required.
In summary, the required components are:
- Load Cell (US / UK)
- Green HX711 (US / UK)
- Breadboard
- Jumper wire
- Two boards (the boards should not bend easily, therefore the best is not too thin plywood)
- Longer bolts + matching nuts
Alternatively, you can also take an existing person or kitchen scale and unscrew it. In any cases, a load cell is available and sometimes also a HX711 weighting sensor. With this you could start directly. Since complete scales cost only slightly more than the load cells, this is definitely worth considering.
If someone has screwed his scale and both are present, I would be pleased about a comment with name / manufacturer of the balance.
Raspberry Pi Scale – Assembling
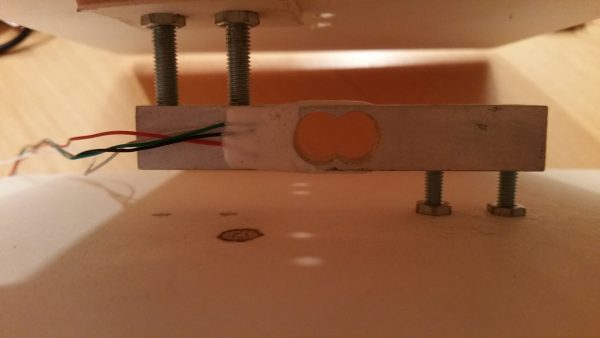
Before the load cell is connected to the HX711 weight sensor, it should be mounted on the two plates. For this I made markings with a ballpoint pen on the wooden boards, where the screws come in. With a drill I drilled the holes and inserted the screws. Between the screw and the load cell, there should be a nut, which serves as a protection to the board (see pictures).
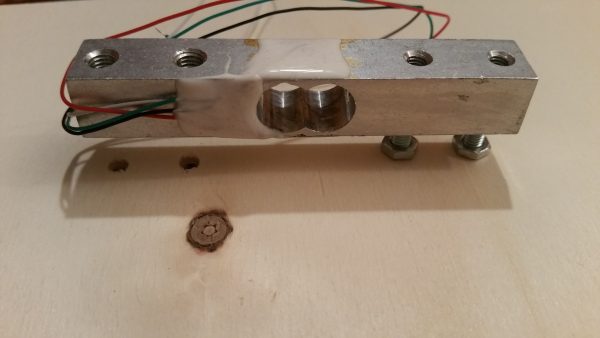
The nuts should be well tightened so that the screws do not slip off the board.
If the construction is complete, we can go to the HX711. The four cables of the Load Cell must be connected to the weight sensor. The green HX711, however, has six connections, of which we only need four for the cables. The connection is as follows:
- Red: E+
- Black: E-
- Green: A-
- White: A+
The pins labeled B+/B- remain empty. Apparently there are versions of the sensor. Where the pins are labeled S+/S- instead of A+/A-.
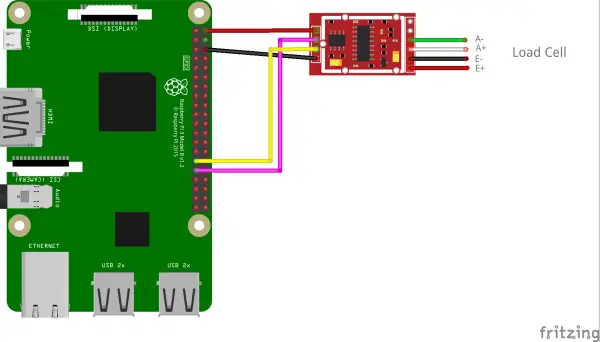
Now you just have to connect the sensor to the Raspberry Pi. Since this also has only four connections, the wiring is quite simple:
- VCC to Raspberry Pi Pin 2 (5V)
- GND to Raspberry Pi Pin 6 (GND)
- DT to Raspberry Pi Pin 29 (GPIO 5)
- SCK to Raspberry Pi Pin 31 (GPIO 6)
Schematically, the connection to a Raspberry Pi 3 then looks as follows:
Of course, you can also change the pin assignments of DT and SCK, e.g. If you have an older model. However, you have to adjust the corresponding pins then synonymous in the code.
Raspberry Pi Weight Sensor Software
To measure the weight and to read out the value we use a Python library. Although there are corresponding C ++ libraries, however, I have no good experience with that. First, we will clone the project:
git clone https://github.com/tatobari/hx711py
It contains an example.py file which shows the function of the library and can also be used. Before that, however, a few adjustments are necessary.
First we will edit this file:
cd hx711py
sudo nano example.py
We are looking for the line in which the reference unit is set and comment it out with a hashtag sign, so that the line looks as follows:
|
1 |
#hx.set_reference_unit(92) |
Save it with CTRL+O and exit with CTRL+X. This reference unit is the divisor, but we must first find it out in the next step. Meanwhile you can run the example (abort with CTRL+C). The values should appear in the range 0 to 200, but this is not important at this point.
sudo python example.py
First Test of our Raspberry Pi Scale
The correct calibration of the weight sensor and the Raspberry Pi balance is crucial. For this we need a comparison object whose weight we know. For example, I have taken two packs of rice (1kg each), since it is recommended to choose an average value of the maximum (my load cell could be used up to 5 kilograms). Place it on the scale and run it again with sudo python example.py. The displayed values can be positive as well as negative. In my case were displayed at 2kg (= 2000 gramm) values around -882000. My reference value is thus -882000 ÷ 2000 = -441.
We then edit the sample file in the same way as above descirbed, remove the comment hashtag and enter this value accordingly. My line now looks as follows:
|
1 |
hx.set_reference_unit(-441) |
After saving and starting the file, the weights should now be displayed as shown in the following video. Since I had the problem that sometimes values below 0 slipped and this should not be possible, I have extended the line, in which the value is read out. This displays no longer negative weights.
|
1 |
val = max(0, int(hx.get_weight(5))) |
In my tests I took a load cell with up to 5kg and calibrated with 2kg. As seen in the video, the measurement is astonishingly accurate. It is important, however, to ensure that the mounted plate does not bend too much (especially the floor plate must be fixed). However, you should be aware that the values outside the range (e.g. above 5kg) will no longer be accurate – a different load cell with its own calibration is required.
How to show text on a LCD display, I have described in this tutorial and in the video also used.
94 Comments
Very nice tutorial, i would like to know if it can measure a weight of 60 grams thank you
Depends on your load cell.
Thanks for your answer, I too would also like to know if this can measure a weight of 120grams thank you
Using a 0-50kg load cell that looks just like yours with same wire colors. About 1 in 5 values is very high or just random. I followed instructions in the code to show the bit/byte info but I do not know what to do with the info that is displayed. Can you advise?
Load cells with bigger range while having a higher maximum weight have a less accurate weight. That being said a 50kg load cell shouldn’t be used for anything lower than 1kg really to be “accurate”… that also being said your load cell can be damage, calibrated wrong, or any number of things
Hey nice tutorial, thanks!
I have 2 questions about this:
1. Does the weight of the plate that is fixed to the top of the load cell factor in to the maximum weight? So if your plate weighs 500g will the maximum amount of weight you should put on it be 4.5kg? Or is it purely relative?
2. Does accuracy of the load cell degrade with increasing maximum load? So will a load cell with a max. weight of 50kg sense a weight difference of 50g as accurately as a load cell with a max. weight of 5kg would?
Hi Daniel,
i haven’t tested both scenarios, so these are just my guesses:
1. Should be absolute (500g plate will decrease the maximum amount)
2. Yes, the nearer you weight is to the boundaries, the less accurate it is. But load cells with higher maximum weights are not as accurate in small regions (bigger “weight steps”).
first thank you for this nice tutorial.
I try monitoring beehives (8) . Every day I receive the internal T° and an external. Now I’d like to have te weight.
Can I connect several load cell (8) to my raspberry?
I’m Looking at Doing Similar. Weight of my behive and other sensors I’ve been looking @ using hivetool.org as the base …
Hi Billynux,
I too am a bee keeper and would like to monitor the internal temp, humidity and weight of my colonies. Do you have a material list you could post or email me at service@heatwavellc.com
Thanks
Phil
@Phil are you interested in buying a solution for doing this or you prefer DIY ?
Funny how many beekeepers end up here. I’m keen to do this as a DIY and will start soon. Just interested to know where in the hive you folks put your internal temp and humidity sensors? Do the bees end up putting propolis and wax over the sensors? ie. do the sensors get “fouled”.
@ A Genchev ….. for now I’m keen on a DIY solution but some of my beekeeping friends might not be. Are there some off the shelf kits one can buy?
I have cloned the file and it seems to have done so but now i can’t open it. It says -bash: cd: hx711: No such file or directory.
what to do?
I have a VNC remote desktop now and can open it.
Is there anyway to get the value from the scale recorded into an array in python , as I am hoping to use something like this to make a very simple fruit sorting machine.
Yes, the example is python code, so you just have to change it the way you need it.
Do you need to copy the code and paste it into python? Or is the “import” calling out that code? I’m looking to use a 10kg load cell to ouput force data on a raspberry pi.
TIA
Hi,
You have powered the HX711 module from 5V, and you are giving it’s Data-Out line directly to the Pi’s GPIO, won’t the 5V level damage the pi ?
It has resitors onboard.
Do you mean the load cell module, or the raspberry pi ?
The HX711 module
Hi, this is a great article, thank you. I’ve two questions, I’d like to use this with the small E shaped load sensors found in kitchen and ‘human’ or bathroom scales. 4 of them are often used to make a total of 200kgs. Am not sure if I should provide a link to where they’re sold or not, so thought best not. They each have 3 wires, red, black, and white. Should these also be wired through an HX 711? and how? And also, is it possible for the Pi to have 4, or even 8, different load cell inputs and hence readings? If so, what would the connections be? I’m afraid I’ve very little experience in this.
I haven’t seen load cells with only 3 wires, but you should be able to use several HX711 (when having enough GPIOs).
Hello Gordon, I have the same question about the load cell with 3 wires. I too am very inexperienced. Did you find a solution?
Load cells with four wires are “differential”, I forget the term for the three wire style of load cell. The voltage differential between the “A” or the “B wires is used to determine the load. I *think* the three wire version determines the load by comparing the A/B wire to ground. Please do not quote me…
I have my free open source implementation for HX711 on my git repo: https://github.com/gandalf15/HX711
Check examples if you want.
Hello @Marcel, i tried your library.
it looks so well, but when i run the example.py only read few values and stop it.
and say this error
statistics.StatisticsError: no median for empty data.
Could you help me?
thanks for your work
When I execute the python 2.7 code, it errors out after pressing enter for the input. Any ideas to resolve it?
Which error?
in example.py
input(‘Put known weight on the scale and then press Enter’)
after pressing enter it throws out error File….at line 1
I am not able to execute the example.py
Pls. help
Is input(..) in line 1?
Just wanted to know how you got the RX711 amplifier part for FRITZING. I’d greatly appreciate it!!
Just google for it 😉 https://github.com/brucetsao/Fritzing/blob/master/HX711%20Weighing%20Sensor%20Module.fzpz
Nice tutorial! Although the directory name is actually “hx711py” not “hx711” so to edit the file you need:
cd hx711py
sudo nano example.py
You are right, thanks for the hint!
I want total code for 40kg load cell for our project please help me
It is the total code – you just need another load cell and have to adjust it.
I cant calibrate it as the weight value doesn’t change when I add a weight to the load cell. It just comes up with random values. what do?
Excellent tutorial. I have everything connected and working, using a reference unit of 8200 for a 5 gram weight. When I place the weight on the scale I get an accurate reading of 5 grams. However I’d like to get a reading to the nearest two decimal places – 4.995, for example. My Python skills are a bit rusty, does anyone know how I might accomplish this?
I also have this issue please help
I am at the calibration stage and have tried 2 different hx711 boards so i know they are not faulty?
when i run example.py:
python ./example.py
I get random numbers that range from -90000 to (+)20000
knowing this isnt right I worked out an average using your calculations which came to 53.3
now when i run it i still get random numbers only smaller random numbers?!:
Monitor:~/fuel/hx711py $ sudo python example.py
195
99
28
765
36
0
77
38
88
208
81
96
91
861
37
100
99
6974
44
1511
0
45
153
316
0
281
285
0
592
0
430
0
138
439
51
0
468
0
233
1669
238
0
0
0
5709
1555
847
1081
0
0
0
0
0
0
0
0
0
^CCleaning…
Bye!
Please Help
Getting a lot of random values when i run the code. the values do no change even if load is applied to the load cell. please do reply.
I had the same problem. Turns out it was a broken load cell- remove it from the plates and you’ll probably see broken wires running between the white bits of the bar. All you can really do is buy a new load cell
can i get java code for the same???
You could translate it to Java.
Hello
When I run the code, I get completely random values, even when nothing is on the board.
The boards I placed on the load cell are not very stable, could it be the reason?
Also, I am using a 50kg load cell.
Please reply.
Hi there,
Just a quick note. I think the wiring schematic provided *might* be incorrect. As an example, I wired up the hx711 as per your instruction, and ran the example script to ensure that I had everything correct and the load cell worked as expected. When run, the output yielded:
“`
~/hx711py $ python example.py
0
18236
18236
18236
18236
18236
18236
18236
18236
“`
No matter what I did, the load cell (I’m using the TAS606, which has a nearly identical wiring scheme from what I can tell) gave the results listed above. After doing a bit of digging and swapping out the wires on the Raspi’s #29 & #31 pins, I received the following:
“`
~/hx711py $ python example.py
-6
-18029
18230
-18171
-15963
-18207
-18029
-18207
“`
Which seemed to indicate a working load cell. Is it possible that the wiring scheme in your tutorial has the pins swapped? I currently have DAT going to #31 and CLK going to #29.
You are correct there is a typo on the wiring schematic. The green wire should be labeled A+ not A-. White is A-.
i have got so many values which varies a lot should i take average
Great article, but I have a question when you state ” since it is recommended to choose an average value of the maximum (my load cell could be used up to 5 kilograms). ” I don’t understand what that means. The average value of the maximum of what? Are you saying the average value of the heaviest item you intend to weigh? Everything work great even small increments like 10g, 20g. Only issue is when I try to weight 4k to 5k items. (I have a 5K load cell btw) that when he accuracy is off. So my question is do I use something close to 5k when I’m getting the reference value? and why did you use 2k for your 5K load cell? Thanks for your time.
I have also similar issue: my output keep on decreasing regardles the weight i apply to it 🙁
Yes, that is creep.
The load cell is deforming and thus the meassured stress decreases.
I experienced the same in my “Ultimate Filament monitor” (that also uses a second load cell for pulling force on the filament and a rotary encoder for odometry of used filament)
You’d need a way to unload the cell and tare again regularly.
I have a problem with this setup. I only get:
0
0
0
0
0
0
Etc.
When i unplug the cables from hx711 i get random values from -100 000 to 100 000.
Any ideas of what’s could be wrong?
me too,how can resolve?
Could this be built to read grains then fire a relay it out of spec.
Like 120-125gr fire relay 1
> 120gr fire relay 2
<125gr fire relay 3
Does anyone has a solution for this issue above? Getting random values like this:
-1641 g
1063 g
-149 g
-149 g
-149 g
-149 g
-149 g
2834 g
-149 g
-4624 g
-149 g
-149 g
1342 g
-3132 g
-149 g
-4624 g
-149 g
-149 g
-4624 g
-5370 g
Regardless how much force I apply. Is the load cell broken?
Thanks!
Great tutorial, thanks a lot. Can the HX711 also be used for permanent measurement? I’d like to put a bottle of liquid on the scale for several years. This bottle will be filled and emptied, so there is a change in the weight. Will that work?
Thanks
Regards
Stefan
@Stefan – I have the same situation, did you ever find a solution?
@Stefan
No, it won’t work. You need to tare very soon before a weight measurement .
Also your load sensor may change it’s characteristics (transfer function) because of the constant weight applied and wind, sun, water, aging.
Btw there are more stable (and expensive) solutions – capacitive load cells, magneto-laser systems, etc.
Hi,
Have a question. How can I use more weight sensor same time with a Pi3 and that measure data at programmed time to a logfile?
Your setup was fantastic. I am looking to take this one step further with some help. I need to be able to generate a 5V signal when it hits a specific weight to switch a valve.
Hi,
Thanks for this tutorial.
I get a strange issue, no matter what I put into the reference unit, the output remains the same.
However, if I input zero, it raises an error (as expected).
Any clue on the problem ?
Thanks in advance,
Cheers from France.
Forget that, the example code was printing hx.read_long() and not the hx.get_weight() value. The second one is actually affected by the reference unit. After un-commenting the hx.tare() at startup, it works like a charm now.
Thanks !
For the record, using cheap generic chinese hx711 and 5kg loadcell, I discovered that the output was horribly unstable until I moved the hx711 power from the 5v supply to the 3.5v supply pin – seems the hx711 works better at lower voltage. Go figure – but worth experimenting for all those with wild fluctuation problems. Now to deal with temperature and drift over time effects on the wheatstone bridge resistors.
sparkfun makes a load cell combiner board to setup 4 of the 3 wire load sensors in a Wheatstone bridge that will allow you to wire it to the HX711 in the same manner as the 4 wire load cell
sparkfun makes a load cell combiner board to setup 4 of the 3 wire load sensors in a Wheatstone bridge that will allow you to wire it to the HX711 in the same manner as the 4 wire load cell .
Would this application work with two HX711’s? I’d like to do a pair of scales for bilateral measurements. I’d be curious how you would approach that!! I’m thinking a second HX711 powered off of pin 4 and another pair of GPIO’s would do the trick. Then you could just do the math on the Pi
How to display measured weight on LCD display…please help
Works really good, but im getting voltage drift (100 in 32768 div), probably would be better with a ratiometric system… Any sugestion to correct this problem by software? Thanks in advance!
me too, could you please help?
The best sample rate I can manage seems to be about 0.5 s. Has anyone had success speeding this up?
This is working great, thanks!
Do you know about any ready code for displaying weight on Initial state or some other dashboard.
I don’t know how to write my own code (I am to old for such things, lol), so I do need tutorials…
/Lars
hi, may I know how does your current code for this looks like? I tried to use the 20kg load sensor but my values are inconsistent and very weird… thank u so much!
Weight are not accurate dear @3kg u r showing around 200gms loss
I would like to use this scale with a series of LEDs. The (val) would be monitored and would be the logic to control one of 6 LEDs (each on its own GPIO). The LEDs would indicate “percentage” of a weight range, so the actual values are not relevant. With a full load on the cell, I am reading about 505000, empty is around 8000. How do I convert this data to a GPIO state for LED control?
few people asked it but didn’t saw any answer, how to connect more than one load cell to a single pi?
@Yosi – just hook the 2nd one up to different pins, and run a second copy of the code with the new pin numbers in it.
So How many can you connect ?
Hi, I am trying the codes now and may i know how can I solve this error:
Traceback (most recent call last):
File “example.py”, line 11, in
import RPi.GPIO as GPIO
ImportError: No module named ‘RPi’
thank you very much!
Super cool tutorial, and it works very good.
There is not too much info about HX711 to RPI, so this is a great help. Even when is not perfect, it’s valuable information, so don’t paid attention to childish and useless replays.
I have a question for you, Do you think there is a chance to export the scale values to a website?
I tried Flask SocketIO, but I don’t know how to call the values out.
Thanks.
1) Can more than one load cells be used in the same weight scale, so that the weight is distributed for more accuracy?
2) Can someone suggest reliable / accurate load cells for max. 50kg with accuracy of +- 50g (or better)?
3) Can someone suggest the optimal placement of one or more load cells for a top weight scale plate of 50x50cm?
Thanks in advance.
I’m using a tensile load cell, I followed your tutorial but regardless of the weight that you install in the load cell, the value shown is 0. Apparently the load cell is good because I checked the resistance of its cables. What could be the problem?
For sparkfun’s new version of the HX711 board, you need to connect both the VCC and VDD pins to the RasPi’s +5V.
The hookup instructions and schematic appear to be for an old version of SparkFun’s HX711 board ( https://www.sparkfun.com/products/retired/13230 ). The new version ( https://www.sparkfun.com/products/13879 ) has separate VCC and VDD pins (voltage supplies for the analog and digital circuitry, respectively). These *both* need to be hooked up to the RasPi’s +5V. If you only connect VCC, then the DAT pin will have a floating voltage, which means the RasPi will not see sensible data. Due to the quirks of the circuitry, it appears to interpret the improper digital signal as one number repeated over and over, which with the auto-taring of the example code results in a perpetual displayed weight of 0.
thank you so, so, so, so much. you saved me a lot of headache
Will this work with Raspberry pi 4b ??
I just used this tutorial with a 5Kg load cell (which came with an HX711 board) with the Raspberry Pi 4b. It works really well. I also successfully added an LCD (as in the video) with the tutorial linked to in the last line of this tutorial.
Hello,
would it be possible to connect the
HX711 board VCC, GND, DT, SCK to a uart to USB adapter (see
https://www.amazon.com/Terminal-Connector-terminals-Pluggable-Converter/dp/B07H53X194/ref=pd_bxgy_2/145-6464520-2106139?pd_rd_w=sLRjm&pf_rd_p=c64372fa-c41c-422e-990d-9e034f73989b&pf_rd_r=677RTEMPX7P2BVPHCFP5&pd_rd_r=5eb2f586-74d8-4d48-af2b-b30350c142a0&pd_rd_wg=S4R1P&pd_rd_i=B07H53X194&psc=1) ?
Hello,
I’m wondering how can I install the correct HX711 because I’m getting the following error :
hx.set_reading_format(“MSB”, “MSB”)
AttributeError: ‘HX711’ object has no attribute ‘set_reading_format’
My second question is it possible to use this HX711 : https://www.robotshop.com/eu/fr/amplificateur-cellule-force-hx711.html?gclid=Cj0KCQjw-NaJBhDsARIsAAja6dND02ygF0lhFjIgFbMZVXD17ldPzmzd7EKpSBGLxpqhJ5ufT20zlh0aAuc_EALw_wcB
Thank you in advance.
Hello,
As part of a college project, I’m trying to come up with a device that stores pills, and if it still feels their weight past a certain point, reminds the user to take their pills. The weight sensor would have to be precise enough to detect just a few miligrams of pressure, but I’m not sure if that’s feasible while still keeping the device at a size that allows the user to take it with them when they go out. Any advice on this matter would be greatly appreciated.
I am interested in the same project. How did yours turn out?
Are you handing the case of multi-cell pill box (morning, noon, evening, and night)?
hello I got I slight problem it shows only 1 or -1 I dk what’s the issue