")
As a further feature, we now want our little robot to follow the sound of our voice. If the mode is activated, the robot should automatically navigate in the direction from which the call was made.
There are also small analog sound detection sensors, which are read out via an MCP3008 ADC converter and then the Raspberry Pi robot steers accordingly in this direction.
As with most of the previous tutorials on the Raspberry Pi robot, you can skip these or adapt them if you want your robot to have different functionality.
Required Hardware Parts
If you want to recreate this tutorial, you will need the following components:
- 3 x sound sensors (for the front, right and left)
- MCP3008 ADC
- Jumper cables
Otherwise, hot glue continues to make assembly easier.
Construction and Wiring
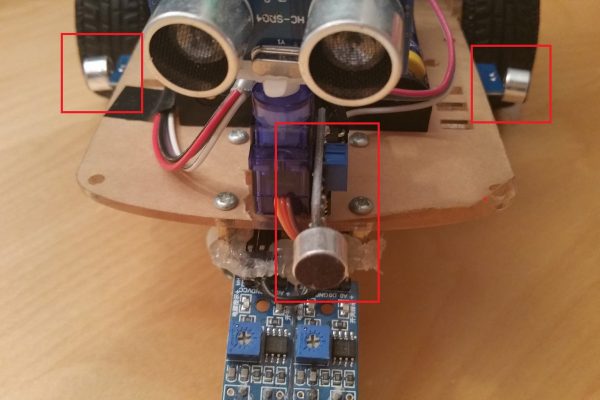
First, we connect the sensors. To do this, three jumper cables must be connected per sensor. If your sensors have 4 pins, you only have to connect VCC, GND and A0. Now the modules can simply be glued to the body. Before you finally fix it (with hot glue or similar), you should first find the best position (more on that later). I connected a sensor in the front, as well as one on the right and one on the left. Other sound detectors, e.g. to be attached at the rear or in a 45° position.
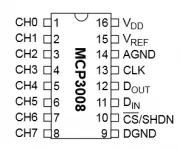
Next up is the MCP3008. Communication takes place via SPI, we only get the 3.3V voltage from another, free pin:
| RaspberryPi | MCP3008 |
|---|---|
| Pin 17 (3.3V) | Pin 16 (VDD) |
| Pin 17 (3.3V) | Pin 15 (VREF) |
| Pin 25 (GND) | Pin 14 (AGND) |
| Pin 23 (SCLK) | Pin 13 (CLK) |
| Pin 21 (MISO) | Pin 12 (DOUT) |
| Pin 19 (MOSI) | Pin 11 (DIN) |
| Pin 24 (CE0) | Pin 10 (CS/SHDN) |
| Pin 25 (GND) | Pin 9 (DGND) |
On the other side are the 8 channels to which analog sensors (data or A0 pin) can be connected. We connect the front sensor to CH0, the right sensor to CH1 and the left to CH2. The VCC pin of all three modules is also connected to 3.3V and GND to a GND connection of the Raspberry Pi.
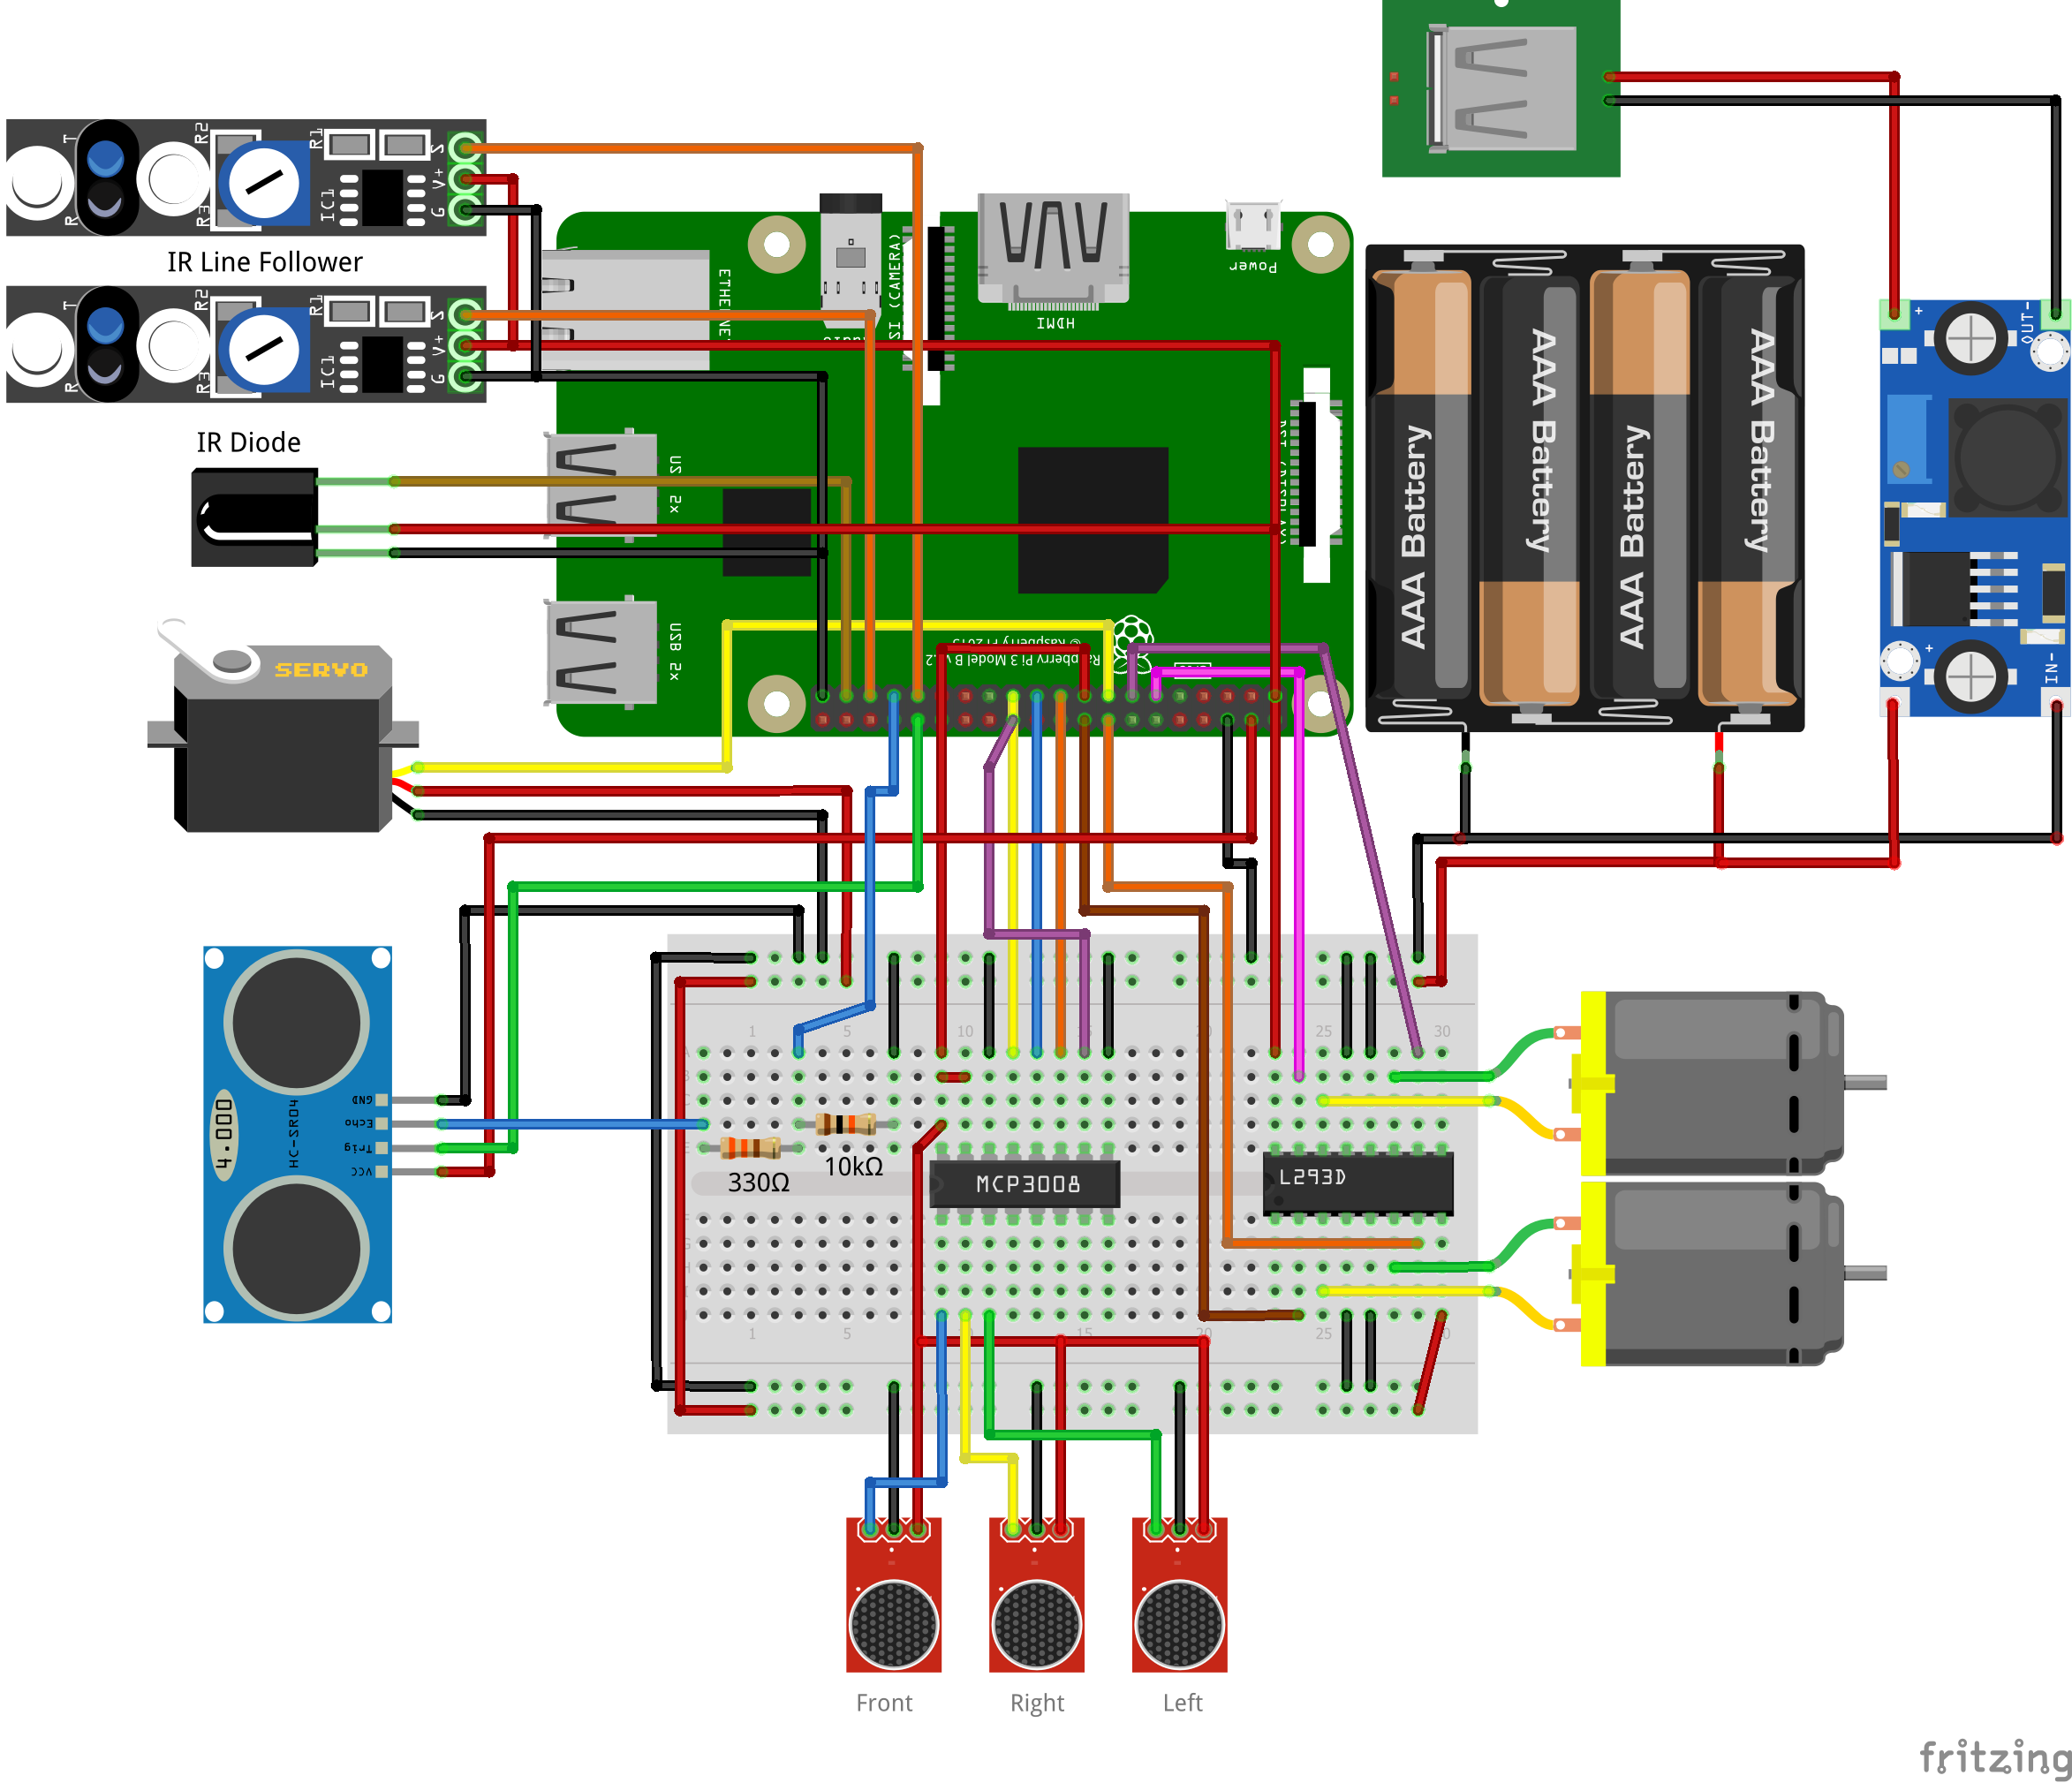
The structure (including our previous connected modules) looks like this:
MCP3008 ADC Converter
The Raspberry Pi cannot easily read out any analog values. Therefore an ADC like the MCP3008 is necessary. In a previous tutorial, I described how an ADC works, including the necessary installations. If an analog-to-digital converter has never been used, we recommend reading this tutorial. Otherwise, you can simply continue here.
So we create a new file in the folder with our other Python Robot files, which contains a class for the analog-to-digital converter:
sudo nano MCP3008.py
|
1 2 3 4 5 6 7 8 9 10 11 12 13 14 15 16 17 18 19 20 21 |
from spidev import SpiDev class MCP3008: def __init__(self, bus = 0, device = 0): self.bus, self.device = bus, device self.spi = SpiDev() self.open() self.spi.max_speed_hz = 1000000 # 1MHz def open(self): self.spi.open(self.bus, self.device) self.spi.max_speed_hz = 1000000 # 1MHz def read(self, channel = 0): adc = self.spi.xfer2([1, (8 + channel) << 4, 0]) data = ((adc[1] & 3) << 8) + adc[2] return data def close(self): self.spi.close() |
Now you only have to save (CTRL + O) and exit the editor (CTRL + X).
Expanding the Code
In our robot.py file, we first import the created file:
|
1 |
from MCP3008 import MCP3008 |
At the end of the class, another function must also be created, which can be used to respond to voice recognition. So let’s add the following code:
|
1 2 3 4 5 6 7 8 9 10 11 12 13 14 15 16 17 18 19 20 21 22 23 24 25 26 27 28 29 |
def followVoice(self): adc = MCP3008() while True: front = adc.read(0) right = adc.read(1) left = adc.read(2) # tiny values are invalid => map them to 1023 if front < 10: front = 1023; # motors make noise of about 150, if motor is running if right < 50: right = 1023; if left < 50: left = 1023; if front < 1000 and right > 1000 and left > 1000: self.motor.forwardRight() elif front > 1000 and right < 1000 and left > 1000: self.motor.forwardLeft() elif front > 1000 and right > 1000 and left < 1000: self.motor.forwardRight() elif front < 1000 and right < 1000 and left > 1000: # front / right self.motor.forwardLeft() time.sleep(self.motor.SEC_PER_TURN / 360.0 * 45) elif front < 1000 and right > 1000 and left < 1000: # front / left self.motor.forwardRight() time.sleep(self.motor.SEC_PER_TURN / 360.0 * 45) else: self.motor.stop() time.sleep(0.1) |
You can experiment with the threshold values (the volume at which the reaction occurs). Since the motors are quite loud, I set the threshold for the side microphones higher. As soon as you have found a good position (or adjust the threshold values accordingly), the sound detectors can also be attached to the body.
If the file is expanded accordingly, we can run a small test. To do this, we open the Python console (sudo python) and enter the following code:
|
1 2 3 4 5 6 7 8 9 10 |
from robot import Robot import time try: r=Robot() r.followVoice() except Exception as e: print(e) finally: r.motor.stop() |
Unfortunately, the noise sensors are not too precise, which is why following the voice does not always work optimally – as a gimmick, it is certainly a nice thing.
With the help of the infrared control, which we created before, we can e.g. specify a button that turns on the voice follow mode.
With a real microphone, you could even make the Raspberry Pi robot respond to voice commands. Only certain code words would have to be reacted to (forwards, right, left, stop, etc.) and the corresponding actions called.
In the next part, we let the robot be controlled remotely via Xbox 360 controller/joystick.
1 Comment
Why do you title this “follow their own voice”? They don’t follow their OWN voice — they follow someone else’s voice.