
In an increasing number of cities, the trend is towards organic or even self-grown fruits and vegetables. Perhaps a deterrent cause is the time spent on plant care. Therefore, this project involves the creation of an automated Raspberry Pi greenhouse, which reduces the work to a minimum.
By automatic watering, airing and exposure, only harvesting must be carried out manually at the end. All actions (such as irrigation) are controlled by sensors in order to provide an optimal result. Due to the low space consumption (about 1/2 m²) it is also suitable for the urban balcony.
Shopping List

Since the Raspberry Pi greenhouse should work as autonomously as possible, everything necessary is to be automated. Therefore, a lot of accessories is necessary. For a balcony it is best to use the following accessories:
- Cold Frame, e.g. 100×60 cm (US | UK)
- Flower boxes
- Raspberry Pi (US | UK)
- 12V DC power supply (US | UK)
- DC Power Jack Adapter (US | UK)
- 12V submersible pump / water pump for the pond (US | UK)
- 10L or 20L bucket with cover
- some 7mm hoses (1.5-2m)
- RTC module DS1307 (US | UK)
- MCP3008 ADC (US | UK)
- Several soil moisture sensors (30-40cm each) (US | UK)
- Servo motor (US | UK)
- Light sensor (US | UK)
- 10kΩ Resistor (US | UK)
- 12V LED (US | UK)
- Reed relay (min 2) (US | UK)
- Waterproof housing (or similar) (US | UK)
- Insulation tape
- Jumper cable (US | UK)
- Mini Breadboard (or perfboard for soldering)
- Seeds (best low-growing plants: )
- Potting compost + possibly fertilizers
I use two of the water pumps, since I have sown in two flower boxes. You can vary the number of sensors for soil moisture.
Of course you can adapt the parts to your project. If you have a bigger cold frame / greenhouse, for example, you can adjust / optimize the code below for your purposes.
If you want to use the GPIOs below for the power supply, you will also need this:
Contents
- Installation of the required libraries
- Power supply via GPIOs
- Components
- Raspberry Pi Greenhouse Activation
- Possible extensions
Installation of the required libraries
It is best to take a freshly installed Raspbian Jessie and open a terminal (for example via SSH). First we update everything and install a few packages:
sudo apt-get update --yes && sudo apt-get upgrade --yes
sudo apt-get install build-essential python-dev python-pip python-smbus python-openssl git --yes
The process may take some time. You can start building the hotbed.
Now enter sudo raspi-config and select “Interfacing Options” -> “SPI” and activate it. Same with “I2C”. Reboot.
We then install the necessary libraries.
- SpiDev:
git clone https://github.com/doceme/py-spidev
cd py-spidev
sudo python setup.py install
cd ..
- Adafruits Library for the DHT11 / DHT22 (alternatively directly from GitHub):
sudo pip install adafruit_python_dht
Power supply via GPIOs
In principle, you have two ways to connect the Raspberry Pi with power. One option is usually via the Micro USB port. The disadvantage, however, is that you normally need two sockets.
Therefore I show first how to power the Raspberry Pi over the GPIOs. Caution is advised, as a too high voltage can destroy the Pi! If you feel unsafe, choose the power supply via USB cable.
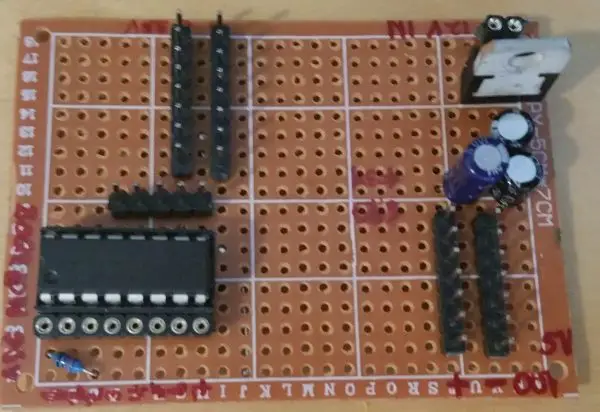
The L7805 voltage regulator (datasheet) can reduce voltages from 7 to 25V to 5V. However, two capacitors are still required. The connection is as follows:
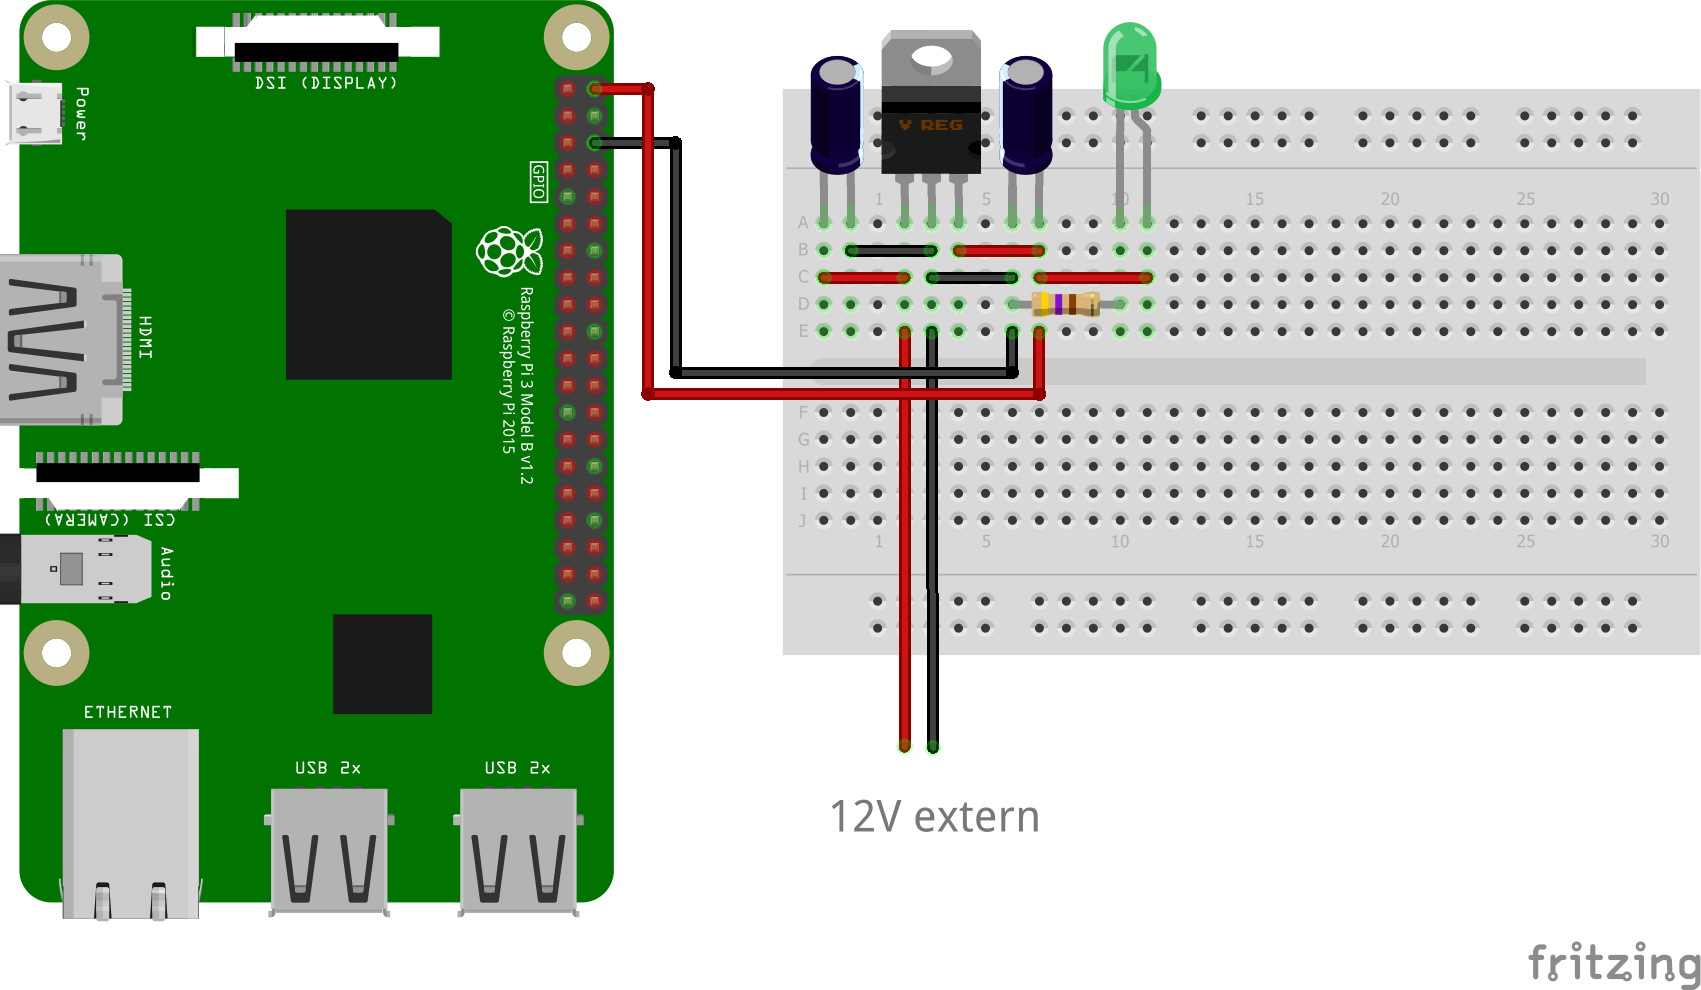 Before you connect it to the Raspberry Pi, you can measure the voltage with a multimeter.
Details can be found here.
Raspberry Pi Greenhouse – Components
First of all, you can either follow each step and thus expand the program code or, as described at the end of the tutorial, download the code from the Github repository and then adjust it.
This tutorial should be as customizable as possible, since everybody has other conditions. Therefore, the next part is divided into different, individual sections. So if you want to omit certain components (for example, no real time clock or no lighting), you can omit this part or adjust it accordingly.
First, however, the settings of the GPIOs etc. In a new folder (mkdir Raspberry-Pi-Greenhouse && cd Raspberry-Pi-Greenhouse) we create a file (sudo nano greenhouse.py) with the following content:
|
24 25 26 27 28 29 30 31 32 33 34 35 36 37 38 39 40 41 42 43 44 45 46 47 48 49 50 51 52 53 54 55 56 57 58 59 60 61 62 63 64 |
import RPi.GPIO as GPIO import Adafruit_DHT from MCP3008 import MCP3008 import SDL_DS1307 import time ################################################################## ##################### CUSTOMIZEABLE SETTINGS ##################### ################################################################## SETTINGS = { "LIGHT_GPIO": 17, # GPIO Number (BCM) for the Relay "LIGHT_FROM": 10, # from which time the light can be turned on (hour) "LIGHT_UNTIL": 20, # until which time (hour) "LIGHT_CHANNEL": 0, # of MCP3008 "LIGHT_THRESHOLD": 500, # if the analog Threshold is below any of those, the light will turn on "DHT_GPIO": 27, # GPIO Number (BCM) of the DHT Sensor "DHT_SENSOR": Adafruit_DHT.DHT22, # DHT11 or DHT22 "TEMP_THRESHOLD": 23.0, # in Celcius. Above this value, the window will be opened by the servo "SERVO_GPIO": 22, # GPIO Number (BCM), which opens the window "SERVO_OPEN_ANGLE": 90.0, # degree, how much the servo will open the window "PLANTS": [ { "NAME": "Tomaten", "MOISTURE_CHANNELS": [1, 2], # of MCP3008 "MOISTURE_THRESHOLD": 450, # if the average analog value of all sensors is above of this threshold, the Pump will turn on "WATER_PUMP_GPIO": 23, # GPIO Number (BCM) for the Relais "WATERING_TIME": 10, # Seconds, how long the pump should be turned on }, { "NAME": "Salat", "MOISTURE_CHANNELS": [3, 4], "MOISTURE_THRESHOLD": 450, "WATER_PUMP_GPIO": 24, "WATERING_TIME": 12, }, ] } ################################################################## ################# END OF CUSTOMIZEABLE SETTINGS ################## ################################################################## |
If you want other GPIOs or other settings, you can adjust this here.
In the following sections, we extend the functions (if desired). You can find the pinout of the GPIOs in this picture.
Preparation for the Raspberry Pi Greenhouse
Before installing the electronic components, the cold frame should be built up. You can place 2-3 large flower boxes inside (depending on the size). In these you can either put young plants or seeds. Pay attention to the instructions on the packaging.
In addition, it is necessary to fertilize the soil. If you want, you can also take special tomato or vegetable compost, which contain more minerals.
Adjust the time
If the Pi (e.g. after a blackout) reboots, it doesn’t know the current time and the date, if there is no internet connection. Therefore real-time clock modules, which have a battery are used to store the timestamp permanently. This step is optional and can also be skipped if there is a permanent internet connection.
It is important that the two resistors (R2 and R3) are removed from the Tiny RTC (I2c modules) with a soldering iron. Typically, these modules return 5V signals, which is too much for the Raspberry Pi. Alternatively, you can use a 3.3V-5V TTL.
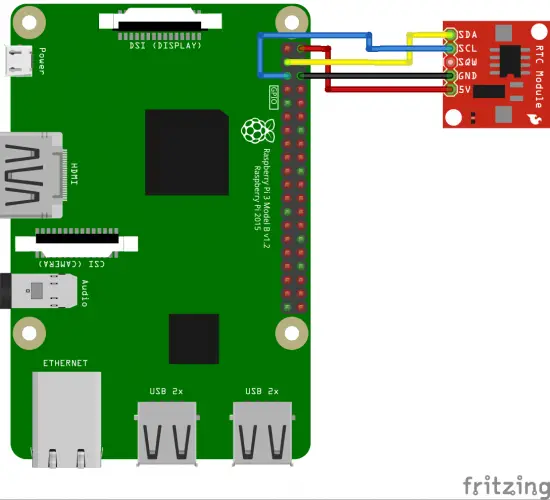
Let’s start with the connection:
| RTC Module | Raspberry Pi |
|---|---|
| SCL | GPIO 3 / SCL (Pin 5) |
| SDA | GPIO 2 / SDA (Pin 3) |
| VCC / 5V | 5V (Pin 2 oder Pin 4) |
| GND | GND (Pin 6) or any other GND Pin |
First we load the required script:
wget https://raw.githubusercontent.com/tutRPi/Raspberry-Pi-Greenhouse/master/SDL_DS1307.py
We then set the correct time and time zone:
sudo raspi-config
Under “Localization Options” you can define your time zone. Then you can use date to check whether the time is correct. Now open the Python console (sudo python) and enter the following to set the RTC time:
import SDL_DS1307
ds1307 = SDL_DS1307.SDL_DS1307(1, 0x68)
ds1307.write_now()
exit()
This saves the current time.
Now we can extend our actual script (sudo nano greenhouse.py):
|
66 67 68 69 70 71 72 |
def readTime(): try: ds1307 = SDL_DS1307.SDL_DS1307(1, 0x68) return ds1307.read_datetime() except: # alternative: return the system-time: return datetime.datetime.utcnow() |
Save with CTRL + O.
Adjust brightness
So that the plants get enough light even on cloudy days, we extend the greenhouse by a bright ~20cm LED. You can also use a (water-resistant) LED strip and use this as additional lighting. However, the artificial lighting is only turned on when it is dark. Therefore we use a light sensor, which outputs an analogue brightness value, which we can read with an MCP3008 ADC.
Alternatively, there are also light sensor modules which already output a digital value, whether the brightness value is above / below a threshold value. If you want to use it, you have to adjust the code slightly.
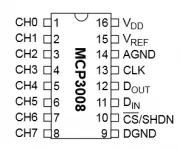
The MCP3008 IC has 8 inputs on which analog signals can be read out. First of all we connect everything:
| Raspberry Pi | MCP3008 |
|---|---|
| Pin 1 (3.3V) | Pin 16 (VDD) |
| Pin 1 (3.3V) | Pin 15 (VREF) |
| Pin 6 (GND) | Pin 14 (AGND) |
| Pin 23 (SCLK) | Pin 13 (CLK) |
| Pin 21 (MISO) | Pin 12 (DOUT) |
| Pin 19 (MOSI) | Pin 11 (DIN) |
| Pin 24 (CE0) | Pin 10 (CS/SHDN) |
| Pin 6 (GND) | Pin 9 (DGND) |
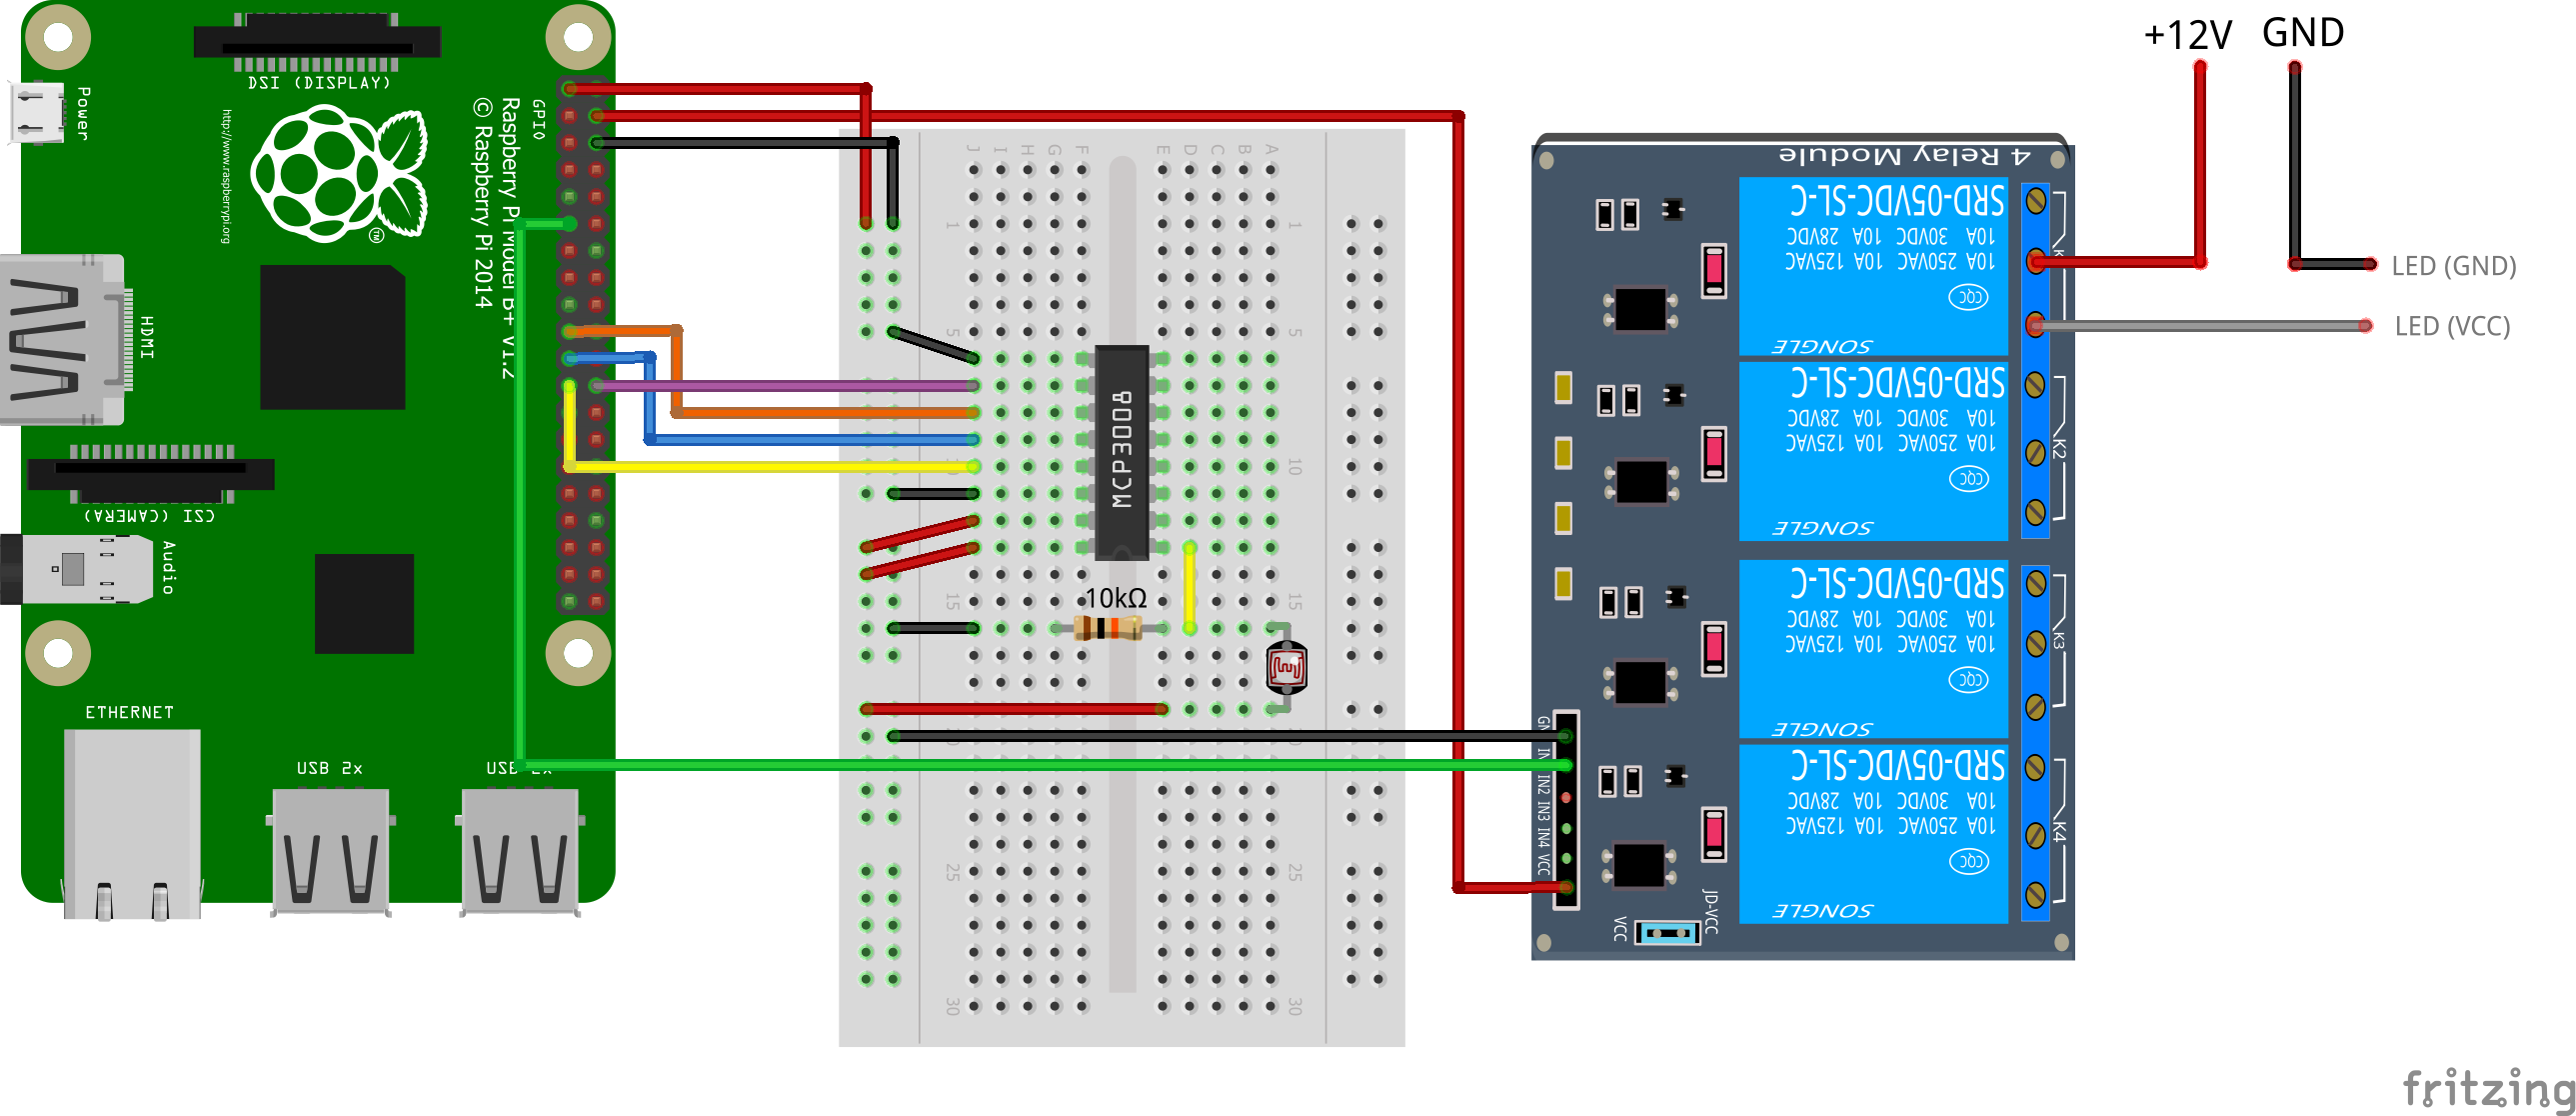
One of the 8 channels is used for the light sensor (channel 0). We connect this via a pull-up resistor as shown in the figure. We also connect the relay (VCC to 5V, GND to GND and, for example, IN1 to GPIO17). If you supply the Raspberrry Pi via the L7805 with power, you can also take the 5V voltage directly from there.
On the other side of the relay, the positive terminal of the 12V connection is connected to the middle terminal and the connection (+) to the LED at the lower end. GND of the LED strip is also connected to the GND of the plug.
First we load a file with a Python class for the MCP3008, which we can integrate:
wget https://raw.githubusercontent.com/tutRPi/Raspberry-Pi-Greenhouse/master/MCP3008.py
Now we are expanding the code again:
|
74 75 76 77 78 79 80 81 82 83 84 85 86 87 88 89 90 91 92 93 94 95 |
def checkLight(): timestamp = readTime() if SETTINGS["LIGHT_FROM"] <= timestamp.hour <= SETTINGS["LIGHT_UNTIL"]: # check light sensors adc = MCP3008() # read 10 times to avoid measuring errors value = 0 for i in range(10): value += adc.read( channel = SETTINGS["LIGHT_CHANNEL"] ) value /= 10.0 if value <= SETTINGS["LIGHT_THRESHOLD"]: # turn light on GPIO.setup(SETTINGS["LIGHT_GPIO"], GPIO.OUT, initial=GPIO.LOW) # Relay LOW = ON else: # turn light off GPIO.setup(SETTINGS["LIGHT_GPIO"], GPIO.OUT, initial=GPIO.HIGH) else: # turn light off GPIO.setup(SETTINGS["LIGHT_GPIO"], GPIO.OUT, initial=GPIO.HIGH) |
Automatic watering
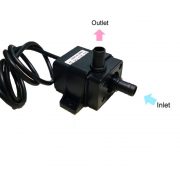
Irrigation by soil moisture is the core element of the greenhouse. For this, we need the submersible pumps, a hose and a relay for each pump. The moisture sensors are read out via the previously connected MCP3008.
Since these minipumps are also operated with 12V, relays are also required. In my case, I have two pumps (one per flowerbox each). If you use more than 3, you should choose a relay board with more channels.
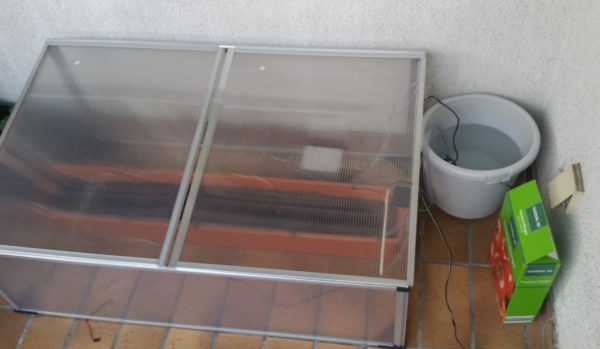
First, we attach the hose to the pump. Next to the hotbed I put a bucket of water (see images at the end). The hose should be long enough to get from this bucket to the end of the flower box. The end of the hose I have sealed with some hot glue and have instead drilled every 10-15cm small holes into the hose. As the pressure increases through the pump, the holes should be very small. I used a drill-thickness of 1-2mm.
Then I attached the hose to the edge of the flower box. On the other side of a hole I set a soil moisture sensor. Subsequently, the average soil moisture is calculated and decided on whether or not to pour. The analog pins of the soil moisture sensors are connected to the MCP3008. A conductor track leads to GND via a 10 k ohm resistor.
If you are using more than 7 sensors, you need another MCP3008 ADC (the first place is reserved for the light sensor). In addition, each sensor is supplied with 3.3V of the Raspberry Pi:

The GPIOs which control the relays can also be set in the settings at the beginning of the file. For my two pumps, these are GPIO 23 and 24.
Here is the corresponding code:
|
98 99 100 101 102 103 104 105 106 107 108 109 110 111 112 113 114 115 116 117 |
def wateringPlants(): # read moisture adc = MCP3008() for plantObject in SETTINGS["PLANTS"]: value = 0 for ch in plantObject["MOISTURE_CHANNELS"]: # read 10 times to avoid measuring errors v = 0 for i in range(10): v += adc.read( channel = ch ) v /= 10.0 value += v value /= float(len(plantObject["MOISTURE_CHANNELS"])) if value > plantObject["MOISTURE_THRESHOLD"]: # turn pump on for some seconds GPIO.setup(plantObject["WATER_PUMP_GPIO"], GPIO.OUT, initial=GPIO.LOW) time.sleep(plantObject["WATERING_TIME"]) GPIO.output(plantObject["WATER_PUMP_GPIO"], GPIO.HIGH) |
Ventilation
Depending on the hotbed or greenhouse, there are several openable windows. For an early bed, there are usually not more than two. To open a window, I use a servo with a longer wooden staff attached to the axis. In the initial state, the angle should be 0°. If you are unsure, you should set the servo once per script to 0° and then attach:
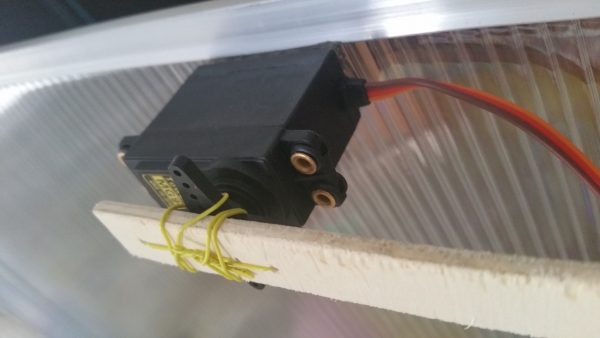
The servo is attached to the inside with strong double-sided tape.
The temperature value is used for control purposes. For this, we still have to connect the DHT11 temperature sensor to GPIO 27, while the servo motor is connected to GPIO 22. Since the engine probably needs more than 3.3V (see the data sheet, if you are unsure), we connect it to the 5V voltage:
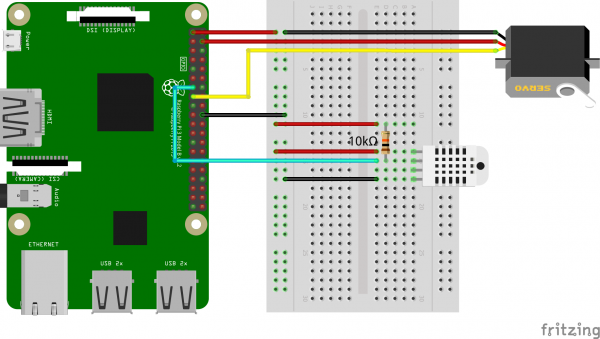
I have the DHT sensor simply attached to the water resistant housing (next point). To change the temperature at which the hatch is to be opened, you can change the initial settings.
In addition, the code needs to be extended:
|
119 120 121 122 123 124 125 126 127 128 129 130 131 132 133 134 135 |
def checkWindow(): # read remperature humidity, temperature = Adafruit_DHT.read_retry(SETTINGS["DHT_SENSOR"], SETTINGS["DHT_GPIO"]) GPIO.setup(SETTINGS["SERVO_GPIO"], GPIO.OUT) pwm = GPIO.PWM(SETTINGS["SERVO_GPIO"], 50) if temperature > SETTINGS["TEMP_THRESHOLD"]: # open window angle = float(SETTINGS["SERVO_OPEN_ANGLE"]) / 20.0 + 2.5 pwm.start(angle) else: # close window pwm.start(2.5) # save current time.sleep(2) pwm.ChangeDutyCycle(0) |
If you have problems reading out (“ImportError: No module named Raspberry_Pi_Driver“), this post may help. Alternatively, you can also use GPIO 4, which is still free in my wiring.
Waterproof housing & mounting
In the last step of the assembly, we pack the important control elements into a water-resistant housing. Here should be the Raspberry Pi as well as the relays and everything else that is water sensitive inside. I have drilled a hole on the lower side and all the cables that have to go in or out of it.
In addition, the components can be soldered to a hole grid once everything has been tested.
At the very least, the electronics and the potentially endangered connections should be kept away from water. It is best to choose a covered area.
Raspberry Pi Greenhouse Activation
Now that we’ve connected and installed all the components, let’s make it work automatically. To do this, we extend the script by calling the created functions in sequence:
|
138 139 140 141 142 143 144 145 146 147 148 149 |
if __name__ == '__main__': try: GPIO.setwarnings(False) GPIO.setmode(GPIO.BCM) # execute functions checkLight() wateringPlants() checkWindow() except: GPIO.cleanup() |
By the way: If you want to download all the files at once, you can do this via my GitHub library:
git clone https://github.com/tutRPi/Raspberry-Pi-Greenhouse
The script should be called automatically every 10 minutes, so we use Cron:
crontab -e
Here, we add a line at the end, which invokes our script every 10 minutes:
*/10 * * * * sudo python /home/pi/Raspberry-Pi-Greenhouse/greenhouse.py > /dev/null 2>&1
With CTRL + O we save and return to the terminal with CTRL + X.
By the way: You can find the absolute path of a directory with cd and then entering pwd.
Now you have nothing to do but wait. To save power, you can disable the wifi and other unneeded services.
Possible extensions of the Raspberry Pi greenhouse
Even if there is already a lot available, you can certainly add more. I have the following points, of which I can also implement one or the other if necessary. If you have any ideas, feel free to leave a comment.
- Water level: Although we irrigate the plants automatically, however, we still have to pour water into the bucket. With a fill level measurement, we could send a message by e.g. the Telegram app as soon as water has to be refilled. Alternatively, a warning light (LED) can be installed.
- Measure the humidity: The DHT11 or DHT22 sensor can measure the humidity as well as the temperature. However, we are not using this at the moment. It would be conceivable to bring the humidity with water sprayers to a certain level. This is, of course, dependent on the plants.
- Heat: Especially in colder spring or autumn, it can sometimes be cooler. In order to create optimum conditions for the plants, one can also heat the air in the greenhouse.
- Cool down actively: So far, we only cool passively (window opens / closes). Through a fan, we could also actively cool at high temperatures.
- LCD Display: In addition, we could also use an LCD display so that we can see the current data on a screen.
PS: You are gladly invited to link pictures of your automatic Raspberry Pi greenhouse or hotbed.
9 Comments
Hi.. I am a student studying in 2nd year and I have took up your project. So can you help me with the code if I don’t want to use GPIO?
I Just found this.
This is the kind of project i was looking.
How is it working?
Hey guys,
when i start greenhouse.py nothing happens…
Anyone got a clue?
Checked Wiring and Installed the whole stuff 4 times now….
anyone can confirm if its working?
Got a setup working here at home. Used arduinos and ESP32s for analog support. Controlled them from the Pi. I ended up making an open source library for my raspberry pi garden to help with building my garden units. Everything loads from a config file so I don’t need to make code alterations every time I want to add or remove a component. Basically the library does all the heavy lifting on the software so I can focus on building my units. You might find this useful to help speed up development or make future revisions. The project was called MudPi. Also I made sure there was a great deal of documentation. Hope this helps and keep sharing your work! https://mudpi.app/docs
I haven’t been able to find moisture sensors that are 30-40cm, did author mean 30-40mm?
I think that it is the distance between installed sensors on the ground.
These sensors (Capacitive Soil Moisture Sensor) are about 98 mm x 23 mm.
Does all of the code have to run on the same schedule? (Every 10 minutes) Or can they run independently? For example, if you wanted the pump to run once an hour and you wanted windows and vents to open/close every 5 minutes depending on the temperature?
Interesting project – tried to look at fritz files but all links are invalid now – can you help