
The Wio Terminal from Seeed Studio is a development device that is standalone or e.g. can be operated with the Raspberry Pi. It is possible to display simple data such as memory information, CPU usage, etc., or even to add a third screen to the Pi.
In addition, the Wio Terminal brings among others also a gyroscope, SD card slot, microphone, buzzer, buttons, and much more. All of these modules can be read out and programmed. In this tutorial, we will focus on how to send various system data from the Raspberry Pi to the Wio Terminal via serial interface and display it.
Required Hardware Parts & Specifications
In this tutorial we will only need the following parts:
- Wio Terminal from Seeed Studio
- Raspberry Pi
- USB Type-C cable
As already mentioned, the Wio Terminal (D51R) has interesting hardware specifications:
|
Main Chip |
Processor |
ARM® Cortex®-M4F |
|
Maximum Speed |
200MHz |
|
|
External Flash Memory |
4 MB |
|
|
LCD |
Resolution |
320 x 240 Pixels |
|
Size |
2.4 Inches |
|
|
Wireless Connections |
WLAN |
802.11 a/b/g/n 1×1, 2.4GHz & 5GHz |
|
Bluetooth |
supports BLE5.0 |
|
|
Module |
Gyroscope |
LIS3DHTR |
|
Microphone |
1.0V-10V -42dB |
|
|
Speaker |
≥78dB @10cm 4000Hz |
|
|
Light Sensor |
400-1050nm |
|
|
Infrared Transmitter |
940nm |
|
|
Interfaces |
MicroSD Card Slot |
max. 16GB |
|
GPIO |
40-PIN (kompatibel mit dem Raspberry Pi) |
|
|
Grove |
2 (multifunctional) |
|
|
FPC |
20 Pins |
|
|
USB Type-C |
Power & USB-OTG |
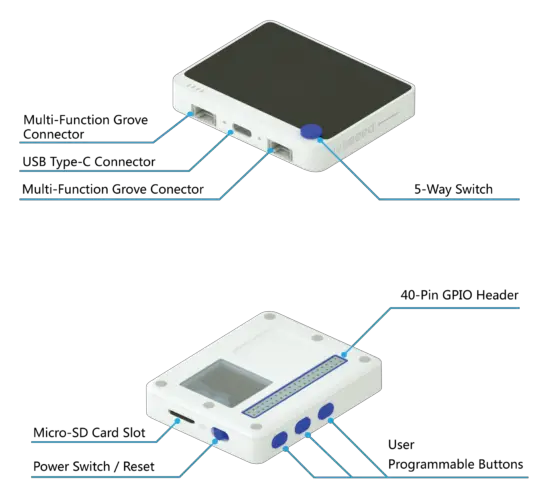 Wio Terminal Inputs (Quelle)
Wio Terminal preparation – Installation of the Arduino IDE
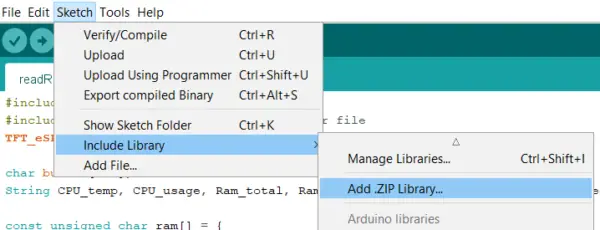
The code for the Wio terminal is transferred via the Arduino IDE. We also use the IDE for the Arduino and ESP8266. If you haven’t already installed it, start with it. Now let’s download the Seeed Studio LCD library from Github (Code> Download ZIP).
https://github.com/Seeed-Studio/Seeed_Arduino_LCD
Then we select the loaded file in the Arduino IDE under “Sketch”> “Include Library”> “Add ZIP Library”.
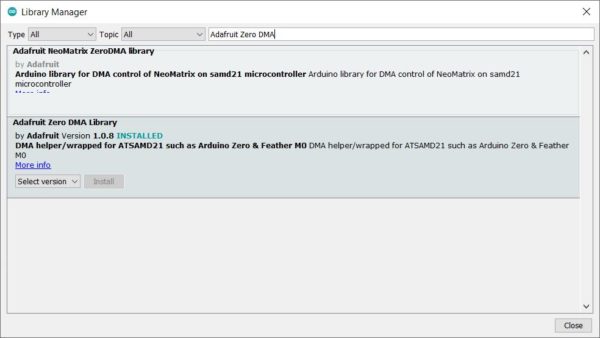
Then we select “Manage Libraries” in the same menu item, search for Adafruit Zero DMA and install it.
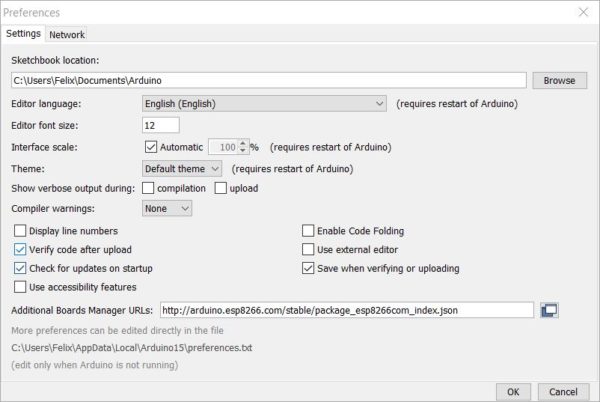
Last but not least, we enter the following URL under “File”> “Preferences”> “Additional Board Manager URLs”:
https://files.seeedstudio.com/arduino/package_seeeduino_boards_index.json
If you have already entered a URL for the ESP8266, that’s no problem. You can save one value per line.
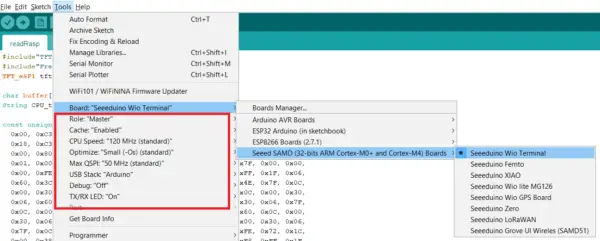
Additional boards are now displayed under “Tools”. As the last point we select “Tools”> “Board”> “Seeed SAMD …”> “Seeduino Wio Terminal”. Also accept the other settings if they are not as shown here:
If you now connect the module via USB, the port should be recognized directly (you have to start it first with the left button).
Coding – Wio Terminal & Raspberry Pi
We’ll start by loading the code onto the Wio Terminal. To do this, create a folder with the name “readRasp” on your PC and create a file there called “readRasp.ino” (alternatively, download and insert from here). The file can be edited with the Arduino IDE and has the following content:
|
1 2 3 4 5 6 7 8 9 10 11 12 13 14 15 16 17 18 19 20 21 22 23 24 25 26 27 28 29 30 31 32 33 34 35 36 37 38 39 40 41 42 43 44 45 46 47 48 49 50 51 52 53 54 55 56 57 58 59 60 61 62 63 64 65 66 67 68 69 70 71 72 73 74 75 76 77 78 79 80 81 82 83 84 85 86 87 88 89 90 91 92 93 94 95 96 97 98 99 100 101 102 103 104 105 106 107 108 109 110 111 112 113 114 115 116 117 118 119 120 121 122 123 124 125 126 127 128 129 130 131 132 133 134 135 136 137 138 139 140 141 142 143 144 145 146 147 148 149 150 151 152 153 154 155 156 157 158 159 160 161 162 163 164 165 166 167 168 169 170 171 172 173 174 175 176 177 178 179 180 181 182 183 184 185 186 187 188 189 190 191 192 193 194 195 196 197 198 199 200 201 202 203 204 205 206 207 208 209 210 211 212 213 214 215 216 217 218 219 220 221 222 223 224 225 226 227 228 229 230 231 232 233 234 235 236 237 238 239 240 241 242 243 244 245 246 247 248 249 250 251 252 253 254 255 256 257 258 259 260 261 262 263 264 265 266 267 268 269 270 271 272 273 274 275 276 277 |
#include"TFT_eSPI.h" #include"Free_Fonts.h" //include the header file TFT_eSPI tft; char buffer[100]; String CPU_temp, CPU_usage, Ram_total, Ram_used, Ram_free, Disk_total, Disk_used, Disk_Per; const unsigned char ram[] = { 0x00, 0xC3, 0x18, 0xC3, 0x00, 0x00, 0xE7, 0x18, 0xE7, 0x00, 0x00, 0xC3, 0x18, 0xC3, 0x00, 0x00, 0xC3, 0x18, 0xC3, 0x00, 0x00, 0xE7, 0x18, 0xE7, 0x00, 0x80, 0xFF, 0xFF, 0xFF, 0x01, 0xC0, 0xFF, 0xFF, 0xFF, 0x03, 0xE0, 0x01, 0x00, 0x80, 0x07, 0xFF, 0x00, 0x00, 0x00, 0xFF, 0x7F, 0x00, 0x00, 0x00, 0xFE, 0x72, 0xF0, 0xFF, 0x0F, 0x4E, 0x60, 0xF8, 0xFF, 0x1F, 0x06, 0x60, 0x3C, 0x00, 0x3C, 0x06, 0x72, 0x1C, 0x00, 0x38, 0x4E, 0x7F, 0x0C, 0x00, 0x30, 0xFE, 0x7F, 0x0C, 0x00, 0x30, 0xFE, 0x60, 0x0C, 0x00, 0x30, 0x06, 0x60, 0x0C, 0x00, 0x30, 0x06, 0x60, 0x0C, 0x00, 0x30, 0x06, 0x7F, 0x0C, 0x00, 0x30, 0xFE, 0x7F, 0x0C, 0x00, 0x30, 0xFE, 0x60, 0x0C, 0x00, 0x30, 0x06, 0x60, 0x0C, 0x00, 0x30, 0x06, 0x60, 0x0C, 0x00, 0x30, 0x06, 0x7F, 0x0C, 0x00, 0x30, 0xFE, 0x7F, 0x0C, 0x00, 0x30, 0xFE, 0x72, 0x1C, 0x00, 0x38, 0x4E, 0x60, 0x3C, 0x00, 0x3C, 0x06, 0x60, 0xF8, 0xFF, 0x1F, 0x06, 0x72, 0xF0, 0xFF, 0x0F, 0x4E, 0x7F, 0x00, 0x00, 0x00, 0xFE, 0xFF, 0x00, 0x00, 0x00, 0xFF, 0xE0, 0x01, 0x00, 0x80, 0x07, 0xC0, 0xFF, 0xFF, 0xFF, 0x03, 0x80, 0xFF, 0xFF, 0xFF, 0x01, 0x00, 0xE7, 0x18, 0xE7, 0x00, 0x00, 0xC3, 0x18, 0xC3, 0x00, 0x00, 0xC3, 0x18, 0xC3, 0x00, 0x00, 0xE7, 0x18, 0xE7, 0x00, 0x00, 0xC3, 0x18, 0xC3, 0x00, }; const unsigned char cpu[] = { 0x00, 0x42, 0x18, 0x42, 0x00, 0x00, 0x42, 0x18, 0x42, 0x00, 0x00, 0x42, 0x18, 0x42, 0x00, 0x00, 0x42, 0x18, 0x42, 0x00, 0x00, 0x00, 0x00, 0x00, 0x00, 0x00, 0x00, 0x00, 0x00, 0x00, 0x80, 0xFF, 0xFF, 0xFF, 0x01, 0xC0, 0x00, 0x00, 0x00, 0x03, 0x40, 0x00, 0x00, 0x00, 0x02, 0x4F, 0x00, 0x00, 0x00, 0xF2, 0x40, 0x00, 0x00, 0x00, 0x02, 0x40, 0x00, 0x00, 0x00, 0x02, 0x40, 0x00, 0x00, 0x00, 0x02, 0x40, 0xF0, 0xFF, 0x0F, 0x02, 0x4F, 0xF8, 0xFF, 0x1F, 0xF2, 0x40, 0x18, 0x00, 0x18, 0x02, 0x40, 0xD8, 0xBD, 0x1E, 0x02, 0x40, 0x78, 0xBC, 0x1E, 0x02, 0x40, 0x78, 0xA4, 0x1E, 0x02, 0x4F, 0x78, 0xBC, 0x1E, 0xF2, 0x4F, 0x78, 0xBC, 0x1E, 0xF2, 0x40, 0x78, 0x84, 0x1E, 0x02, 0x40, 0x78, 0x84, 0x1E, 0x02, 0x40, 0xD8, 0x85, 0x1B, 0x02, 0x40, 0x18, 0x00, 0x18, 0x02, 0x4F, 0xF8, 0xFF, 0x1F, 0xF2, 0x40, 0xF0, 0xFF, 0x0F, 0x02, 0x40, 0x00, 0x00, 0x00, 0x02, 0x40, 0x00, 0x00, 0x00, 0x02, 0x40, 0x00, 0x00, 0x00, 0x02, 0x4F, 0x00, 0x00, 0x00, 0xF2, 0x40, 0x00, 0x00, 0x00, 0x02, 0xC0, 0x00, 0x00, 0x00, 0x03, 0x80, 0xFF, 0xFF, 0xFF, 0x01, 0x00, 0x00, 0x00, 0x00, 0x00, 0x00, 0x00, 0x00, 0x00, 0x00, 0x00, 0x42, 0x18, 0x42, 0x00, 0x00, 0x42, 0x18, 0x42, 0x00, 0x00, 0x42, 0x18, 0x42, 0x00, 0x00, 0x42, 0x18, 0x42, 0x00, }; const unsigned char disk[] = { 0x00, 0x00, 0x00, 0x00, 0x00, 0xF8, 0xFF, 0xFF, 0xFF, 0x03, 0xFC, 0xFB, 0xFF, 0xDF, 0x06, 0x06, 0x02, 0x00, 0x40, 0x0C, 0x06, 0x02, 0x00, 0x5F, 0x18, 0x06, 0x02, 0x00, 0x51, 0x30, 0x06, 0x02, 0x00, 0x59, 0x60, 0x06, 0x02, 0x00, 0x59, 0x40, 0x06, 0x02, 0x00, 0x59, 0x60, 0x06, 0x02, 0x00, 0x59, 0x60, 0x06, 0x02, 0x00, 0x59, 0x60, 0x06, 0x02, 0x00, 0x5F, 0x60, 0x06, 0x02, 0x00, 0x40, 0x60, 0x06, 0xFE, 0xFF, 0x7F, 0x60, 0x06, 0x00, 0x00, 0x00, 0x60, 0x06, 0x00, 0x00, 0x00, 0x60, 0x06, 0x00, 0x00, 0x00, 0x60, 0x06, 0x00, 0x00, 0x00, 0x60, 0x06, 0x00, 0x00, 0x00, 0x60, 0xC6, 0xFF, 0xFF, 0xFF, 0x63, 0x66, 0x00, 0x00, 0x00, 0x66, 0x26, 0x00, 0x00, 0x00, 0x64, 0x26, 0x00, 0x00, 0x00, 0x64, 0x26, 0x00, 0x00, 0x00, 0x64, 0x26, 0xFC, 0xFF, 0x3F, 0x64, 0x26, 0xFC, 0xFF, 0x3F, 0x64, 0x26, 0x00, 0x00, 0x00, 0x64, 0x26, 0x00, 0x00, 0x00, 0x64, 0x26, 0xFC, 0xFF, 0x3F, 0x64, 0x26, 0x00, 0x00, 0x00, 0x64, 0x26, 0x00, 0x00, 0x00, 0x64, 0x26, 0x00, 0x00, 0x00, 0x64, 0x26, 0xFC, 0xFF, 0x3F, 0x64, 0x26, 0x00, 0x00, 0x00, 0x64, 0x26, 0x00, 0x00, 0x00, 0x64, 0x26, 0x00, 0x00, 0x00, 0x64, 0x26, 0x00, 0x00, 0x00, 0x64, 0xEC, 0xFF, 0xFF, 0xFF, 0x37, 0xF8, 0xFF, 0xFF, 0xFF, 0x1F, 0x00, 0x00, 0x00, 0x00, 0x00, }; String getStringPartByNr(String data, char separator, int index) { // spliting a string and return the part nr index // split by separator int stringData = 0; //variable to count data part nr String dataPart = ""; //variable to hole the return text for(int i = 0; i<data.length()-1; i++) { //Walk through the text one letter at a time if(data[i]==separator) { //Count the number of times separator character appears in the text stringData++; }else if(stringData==index) { //get the text when separator is the rignt one dataPart.concat(data[i]); }else if(stringData>index) { //return text and stop if the next separator appears - to save CPU-time return dataPart; break; } } //return text if this is the last part return dataPart; } void setup() { // initialize serial ports: Serial.begin(115200); Serial.flush(); tft.begin(); tft.setRotation(3); //Homescreen when there is no data tft.fillScreen(TFT_WHITE); while(1) { HomeScreen(); if (Serial.available()) break; } } void loop() { // Try to get the data from serial port if (Serial.available() > 0) { int index = 0; int numChar = Serial.available(); if (numChar>50) { numChar=50; } memset(buffer, 0, sizeof(buffer)); while (numChar--) { buffer[index++] = Serial.read(); } CPU_temp = getStringPartByNr(buffer, '.', 0); CPU_usage = getStringPartByNr(buffer, ':', 1); Ram_total = getStringPartByNr(buffer, ':', 2); Ram_used = getStringPartByNr(buffer, ':', 3); Ram_free = getStringPartByNr(buffer, ':', 4); Disk_total = getStringPartByNr(buffer, ':', 5); Disk_used = getStringPartByNr(buffer, ':', 6); Disk_Per = getStringPartByNr(buffer, ':', 7); } //checking the last piece of data is not empty if (Disk_Per != "") { TempScreen(); delay(2000); RamScreen(); delay(2000); DiskScreen(); delay(2000); } } void TempScreen() { tft.fillScreen(TFT_BLACK); tft.setTextColor(TFT_WHITE); tft.setTextSize(1); tft.setFreeFont(FSSB12); //select Free, Sans, Bold, Oblique, 12pt. tft.drawString("Raspberry CPU Data",40,17); tft.drawFastHLine(0,45,320,TFT_RED); tft.drawFastHLine(0,46,320,TFT_RED); tft.drawFastHLine(0,47,320,TFT_RED); tft.drawRoundRect(34,66,82,32,5,TFT_WHITE); tft.fillRoundRect(35,67,80,30,5,TFT_DARKGREY); tft.setFreeFont(FMB12); tft.setTextColor(TFT_WHITE); tft.drawString("TEMP:",40,70); tft.drawRoundRect(34,116,92,32,5,TFT_WHITE); tft.fillRoundRect(35,117,90,30,5,TFT_DARKGREY); tft.drawString("USAGE:",40,120); tft.drawFastHLine(0,220,320,TFT_RED); tft.drawFastHLine(0,221,320,TFT_RED); tft.drawFastHLine(0,222,320,TFT_RED); tft.fillCircle(15,80, 5, TFT_DARKGREY); tft.fillCircle(15,130, 5, TFT_DARKGREY); tft.drawCircle(15,80,6,TFT_WHITE); tft.drawCircle(15,130,6,TFT_WHITE); tft.setTextColor(TFT_WHITE); tft.drawString(CPU_temp+'C',130,70); tft.drawString(CPU_usage+'%',130,120); tft.drawXBitmap(245,110,cpu, 40, 40, TFT_DARKGREY); } void RamScreen() { tft.fillScreen(TFT_BLACK); tft.setTextColor(TFT_WHITE); tft.setTextSize(1); tft.setFreeFont(FSSB12); //select Free, Sans, Bold, Oblique, 12pt. tft.drawString("Raspberry RAM Data",40,17); tft.drawFastHLine(0,45,320,TFT_BLUE); tft.drawFastHLine(0,46,320,TFT_BLUE); tft.drawFastHLine(0,47,320,TFT_BLUE); tft.drawRoundRect(34,66,92,32,5,TFT_WHITE); tft.fillRoundRect(35,67,90,30,5,TFT_PINK); tft.setFreeFont(FMB12); tft.setTextColor(TFT_WHITE); tft.drawString("TOTAL:",40,70); tft.drawRoundRect(34,116,92,32,5,TFT_WHITE); tft.fillRoundRect(35,117,90,30,5,TFT_PINK); tft.drawString("USED:",40,120); tft.drawRoundRect(34,166,92,32,5,TFT_WHITE); tft.fillRoundRect(35,167,90,30,5,TFT_PINK); tft.drawString("FREE:",40,170); tft.drawFastHLine(0,220,320,TFT_BLUE); tft.drawFastHLine(0,221,320,TFT_BLUE); tft.drawFastHLine(0,222,320,TFT_BLUE); tft.fillCircle(15,80, 5, TFT_PINK); tft.fillCircle(15,130, 5, TFT_PINK); tft.fillCircle(15,180, 5, TFT_PINK); tft.drawCircle(15,80,6,TFT_WHITE); tft.drawCircle(15,130,6,TFT_WHITE); tft.drawCircle(15,180,6,TFT_WHITE); tft.setTextColor(TFT_WHITE); tft.drawString(Ram_total+"MB",130,70); tft.drawString(Ram_used+"MB", 130,120); tft.drawString(Ram_free+"MB", 130,170); tft.drawXBitmap(245,110,ram, 40, 40, TFT_PINK); } void DiskScreen() { tft.fillScreen(TFT_BLACK); tft.setTextColor(TFT_WHITE); tft.setTextSize(1); tft.setFreeFont(FSSB12); tft.drawString("Raspberry Disk Data",35,17); tft.drawFastHLine(0,45,320,TFT_ORANGE); tft.drawFastHLine(0,46,320,TFT_ORANGE); tft.drawFastHLine(0,47,320,TFT_ORANGE); tft.drawRoundRect(34,66,92,32,5,TFT_WHITE); tft.fillRoundRect(35,67,90,30,5,TFT_DARKCYAN); tft.setFreeFont(FMB12); tft.drawString("TOTAL:",40,70); tft.drawRoundRect(34,116,92,32,5,TFT_WHITE); tft.fillRoundRect(35,117,90,30,5,TFT_DARKCYAN); tft.drawString("USED:",40,120); tft.drawRoundRect(34,166,92,32,5,TFT_WHITE); tft.fillRoundRect(35,167,90,30,5,TFT_DARKCYAN); tft.drawString("PERC.:",40,170); tft.drawFastHLine(0,220,320,TFT_ORANGE); tft.drawFastHLine(0,221,320,TFT_ORANGE); tft.drawFastHLine(0,222,320,TFT_ORANGE); tft.fillCircle(15,80, 5, TFT_DARKCYAN); tft.fillCircle(15,130, 5, TFT_DARKCYAN); tft.fillCircle(15,180, 5, TFT_DARKCYAN); tft.drawCircle(15,80,6,TFT_WHITE); tft.drawCircle(15,130,6,TFT_WHITE); tft.drawCircle(15,180,6,TFT_WHITE); if (Disk_Per != 0) { int perc = atoi(Disk_Per.c_str()); float ratio = perc*(0.01) * 30; tft.drawRect(180,168,10,30,TFT_WHITE); tft.fillRect(180,(168+(30-(int)ratio)),10,(int)ratio,TFT_WHITE); } tft.drawString(Disk_total+'B',130,70); tft.drawString(Disk_used+'B', 130,120); tft.drawString(Disk_Per+'%', 130,170); tft.drawXBitmap(245,110,disk, 40, 40, TFT_DARKCYAN); } void HomeScreen() { tft.setFreeFont(FSSB9); tft.setTextColor(TFT_BLACK); tft.drawString("Starting...", 120,120); } |
In addition, download the file “Free_Fonts.h” from here and put it in the folder.
Before we go any further, let’s take a quick look at the code:
- Line 5/6: assignments of variables
- Line 8-63: Bitmap arrays
- In lines 66-92 there is the function
getStringPartByNr, which splits a string and returns a certain part (more on this in a moment). - In line 94-109
setupis called once at the start (initialization, opening of the serial interface) - Lines 111-144:
loop– is called via an endless loop – the rendering is called here. We wait for a message over the serial port and extract the data from it. Then 3 screens are shown one after the other, each with a 2-second delay. - From line 146: Render functions of the individual screens. The LCD functions of the Wio Terminal can be called up using
tft(and graphics can be drawn with them).
Now we load the code onto the device. After completing the upload, connect the Wio Terminal to the Raspberry Pi and start both. In the beginning, a white screen with “Starting …” is displayed (as defined in the HomeScreen function).
Raspberry Pi
Now we switch to the Raspberry Pi via SSH. There we first create a new Python file.
sudo nano wio_terminal_example.py
We add the following content:
|
1 2 3 4 5 6 7 8 9 10 11 12 13 14 15 16 17 18 19 20 21 22 23 24 25 26 27 28 29 30 31 32 33 34 35 36 37 38 39 40 41 42 43 44 45 46 47 48 49 50 51 52 53 54 55 56 57 58 59 60 61 62 63 64 65 66 67 68 69 70 71 72 73 74 75 76 77 78 79 80 81 82 83 84 85 86 87 88 89 90 91 |
import os import time import serial # Settings for reading from Arduino Serial serialPort= "/dev/ttyACM0" #Change it to your Serial Port, Check in Arudino IDE baudRate = 115200 ser = serial.Serial(serialPort, baudRate, timeout=0.5) time.sleep(2) # Return CPU temperature as a character string def getCPUtemperature(): res = os.popen('vcgencmd measure_temp').readline() return(res.replace("temp=","").replace("'C\n","")) # Return RAM information (unit=kb) in a list # Index 0: total RAM # Index 1: used RAM # Index 2: free RAM def getRAMinfo(): p = os.popen('free') i = 0 while 1: i = i + 1 line = p.readline() if i==2: return(line.split()[1:4]) # Return % of CPU used by user as a character string def getCPUuse(): return(str(os.popen("top -n1 | awk '/Cpu\(s\):/ {print $2}'").readline().strip())) # Return information about disk space as a list (unit included) # Index 0: total disk space # Index 1: used disk space # Index 2: remaining disk space # Index 3: percentage of disk used def getDiskSpace(): p = os.popen("df -h /") i = 0 while 1: i = i +1 line = p.readline() if i==2: return(line.split()[1:5]) def main(): while True: # CPU informatiom CPU_temp = getCPUtemperature() CPU_usage = getCPUuse() # RAM information # Output is in kb, here I convert it in Mb for readability RAM_stats = getRAMinfo() RAM_total = str(round(int(RAM_stats[0]) / 1000,1)) RAM_used = str(round(int(RAM_stats[1]) / 1000,1)) RAM_free = str(round(int(RAM_stats[2]) / 1000,1)) # Disk information DISK_stats = getDiskSpace() DISK_total = DISK_stats[0] DISK_used = DISK_stats[1] DISK_perc = DISK_stats[3] temp=ser.write(str.encode(CPU_temp+' '+CPU_usage)) data=ser.write(str.encode(CPU_temp+':'+CPU_usage+':'+RAM_total+':'+RAM_used+':'+RAM_free+':'+DISK_total+':'+DISK_used+':'+DISK_perc)) ser.flush() time.sleep(2) print('') print('CPU Temperature = '+CPU_temp) print('CPU Use = '+CPU_usage) print('') print('RAM Total = '+str(RAM_total)+' MB') print('RAM Used = '+str(RAM_used)+' MB') print('RAM Free = '+str(RAM_free)+' MB') print('') print('DISK Total Space = '+str(DISK_total)+'B') print('DISK Used Space = '+str(DISK_used)+'B') print('DISK Used Percentage = '+str(DISK_perc)) if __name__ == '__main__': try: main() except KeyboardInterrupt: if ser != None: ser.close() |
This script reads out the system data, establishes a serial connection to the Wio Terminal and uses it to send the data in the defined order.
Then save (CTRL + O) and quit (CTRL + X) the editor and execute the script:
sudo python wio_terminal_example.py
You will now see the data on the display.
Conclusion & More
The Wio Terminal from Seeed Studio is a very interesting tool in my opinion, which can be used for certain projects just like that (e.g. using MQTT) or a Raspberry Pi to a display, sensors, buttons, and much more. can expand. For all other functions there are also code examples on the wiki page, which can be transferred directly to the Arduino IDE. It is just as possible to operate all those sensors and modules separately, but you don’t have everything in one compact, small housing.
The only drawback that I noticed: You need an additional “stacking header” if you want to plug the terminal onto the GPIOs, otherwise it won’t fit on top of a Raspberry Pi 4.
If you are interested in further tutorials (standalone or in connection with the Raspberry Pi), please write a comment 🙂
Image sources: Seeed Studio
1 Comment
Why did you assign the ser.write returns to the variables temp and data? They’re not used or interrogated.
Btw, fyi…”baudrate” is redundant — baud IS a rate; it directly refers to a rate, i.e., baud is number of bits per second, that is, the rate of bits flowing. So, 115200 baud — not 115200 baudrate.