
Bluetooth is one of the most efficient short ranged wireless connectivity tools for exchanging data using Ultra High-Frequency Radio Waves (typically of 2.4 GHz) and building Personal Area Networks (PAN). Fundamentally, Bluetooth Technology was built as a cable replacement system, so its use in embedded systems is inevitable. Most of the famous microcontrollers such as ESP32, Raspberry Pi, Arduino Mega have built in Bluetooth modules, other microcontrollers can be adapted with modules like HC 05 or JDY-30 to make them Bluetooth compatible. This article will help you grasp the basic know-how about the working of Bluetooth modules between two ESP32s and connectivity between Raspberry Pi and ESP32.
Required Components
You will require the following things:
- Raspberry Pi with PYQT library installed
- Arduino IDE
- Two ESP32 Development Boards
- NRF Application (App Store, Play Store)
- Usb Cable for ESP32
Bluetooth Low Energy (BLE)
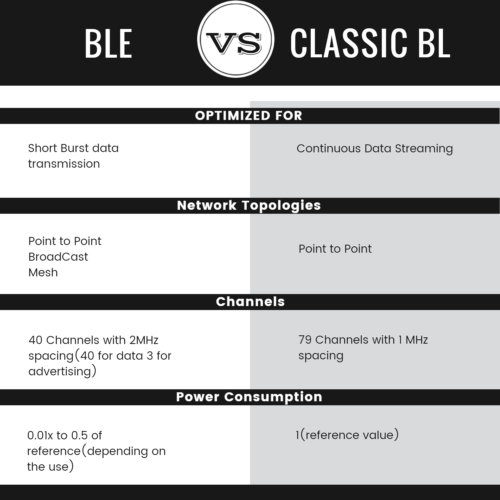
Most of the Microcontrollers including Raspberry Pi and ESP32 have Bluetooth modules based on Bluetooth Low-Energy Technology. BLE is a low-energy consumption variant of Bluetooth, unlike the classic Bluetooth it is designed for a very short range and a small bandwidth of data to be transferred over a small distance. Since it is very good in power conservation, so it uses almost 100 times less energy as compared to classic Bluetooth with a very small compromise of performance. BLE is in a sleep mode unless a connection is made, or it is required in transferring data as compared to classic Bluetooth that is always on.
It operates in four modes:
- Peripheral – It is basically a device that advertise the data, but it can be also used to connect to remote devices
- Broadcaster -It is the device whose sole purpose is to advertise data.
- Observer -Device that only scans for the data.
- Central -This is a device that is dual purpose and can scan for data as well as can connect to them
When BLE was introduced, first two modes were utilized by sensors and other industrial equipment and last two were used by mobile phones computers. However, with the evolution of technology now, most BLE provides all four modes of transfer. ESP32 and Raspberry Pi also provide these four modes of transfer. You can see the significant difference between the classic and BLE in the table below.
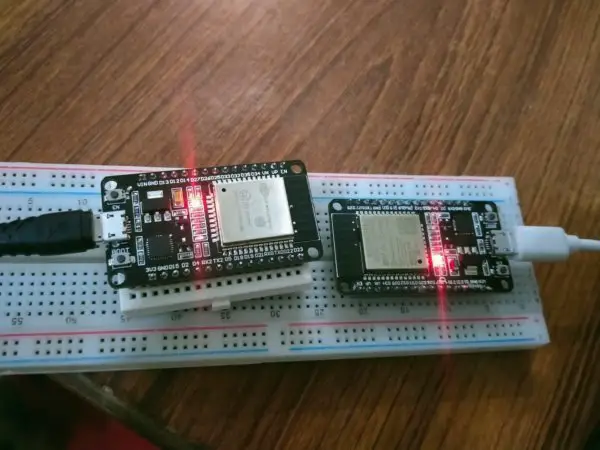
Connection Between Two ESP32’s
Two ESP32s can be connected in a very optimized way using BLE capability. Bluetooth connection between two boards will be established in a way such that one board will act as a server and the other one will act as client. One ESP32 will act as a server and advertise the data and initiate the connection, the second ESP32 will act as a client and will receive the data from the server. We will be sending some strings from one esp32 to the other one using BLE connection.
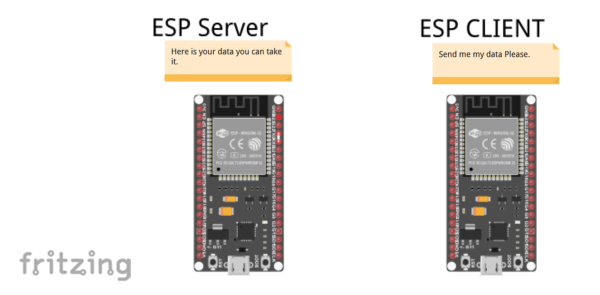
ESP32 as a Server
Our first ESP32 will be acting as a Bluetooth server. It will provide the connection and data to the client. Its code is as following:
|
1 2 3 4 5 6 7 8 9 10 11 12 13 14 15 16 17 18 19 20 21 22 23 24 25 26 27 28 29 30 31 32 33 34 35 36 37 38 39 40 |
#include <BLEDevice.h> #include <BLEUtils.h> #include <BLEServer.h> // See the following for generating UUIDs: // https://www.uuidgenerator.net/ #define SERVICE_UUID "4fafc201-1fb5-459e-8fcc-c5c9c331914b" #define CHARACTERISTIC_UUID "beb5483e-36e1-4688-b7f5-ea07361b26a8" void setup() { Serial.begin(115200); Serial.println("Starting BLE work!"); BLEDevice::init("ESP32 AS A BLE"); BLEServer *pServer = BLEDevice::createServer(); BLEService *pService = pServer->createService(SERVICE_UUID); BLECharacteristic *pCharacteristic = pService->createCharacteristic( CHARACTERISTIC_UUID, BLECharacteristic::PROPERTY_READ | BLECharacteristic::PROPERTY_WRITE ); pCharacteristic->setValue("Hi,other ESP32 here is your data"); pService->start(); // BLEAdvertising *pAdvertising = pServer->getAdvertising(); // this still is working for backward compatibility BLEAdvertising *pAdvertising = BLEDevice::getAdvertising(); pAdvertising->addServiceUUID(SERVICE_UUID); pAdvertising->setScanResponse(true); pAdvertising->setMinPreferred(0x06); pAdvertising->setMinPreferred(0x12); BLEDevice::startAdvertising(); Serial.println("Characteristic defined!"); } void loop() { // put your main code here, to run repeatedly: delay(2000); } |
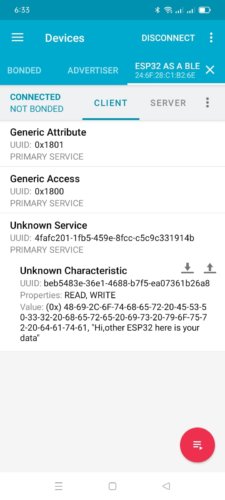
This code is using the BLE class to create its objects like characteristics, BLE, and Advertising objects. It has Characteristic and Service UUID at the start. UUID, an acronym of Universally Unique ID, and it corresponds to a unique number which that is used to identify services and characteristic that a Bluetooth device is supposed to provide. First in this code we created three objects of BLEserver, BLEcharacteristic and BLEService class respectively and initialized them with their required values. Then we simply used the start advertising function from the BLE device class to start our Bluetooth server with the particular UUID, characteristics and Services that we initialized. You can set any data like any sensor data or any other required data and start advertising it. Once this server is started, you can access it even in your mobile phone using nRF Connect in just two steps as below:
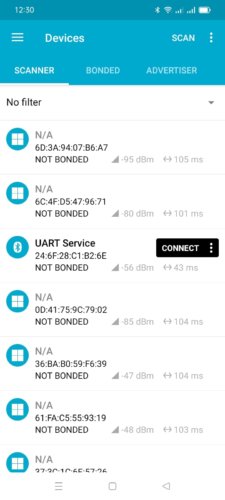
Step 1: Open the scanner and connect to your Bluetooth device
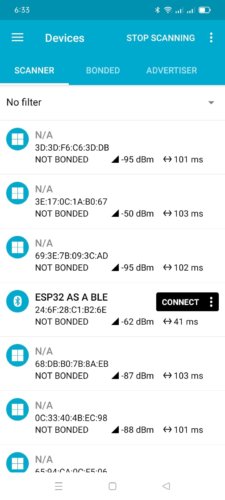
Step 2: After connecting to your ESP32, you can check the characteristic, and it will be displaying your text written.
ESP32 as a Client
As the name implies, second esp32 will be acting as a client and access the data from the server. It should just provide the UUIDs of characteristic and services to connect to the server and access the specified services provided by the server esp32.
Its code is as:
|
1 2 3 4 5 6 7 8 9 10 11 12 13 14 15 16 17 18 19 20 21 22 23 24 25 26 27 28 29 30 31 32 33 34 35 36 37 38 39 40 41 42 43 44 45 46 47 48 49 50 51 52 53 54 55 56 57 58 59 60 61 62 63 64 65 66 67 68 69 70 71 72 73 74 75 76 77 78 79 80 81 82 83 84 85 86 87 88 89 90 91 92 93 94 95 96 97 98 99 100 101 102 103 104 105 106 107 108 109 110 111 112 113 114 115 116 117 118 119 120 121 122 123 124 125 126 127 128 129 130 131 132 133 134 135 136 137 138 139 140 141 142 143 144 145 146 147 148 149 150 151 152 153 154 155 156 |
#include "BLEDevice.h" //#include "BLEScan.h" // The remote service we wish to connect to. static BLEUUID serviceUUID("4fafc201-1fb5-459e-8fcc-c5c9c331914b"); // The characteristic of the remote service we are interested in. static BLEUUID charUUID("beb5483e-36e1-4688-b7f5-ea07361b26a8"); static boolean doConnect = false; static boolean connected = false; static boolean doScan = false; static BLERemoteCharacteristic* pRemoteCharacteristic; static BLEAdvertisedDevice* myDevice; static void notifyCallback( BLERemoteCharacteristic* pBLERemoteCharacteristic, uint8_t* pData, size_t length, bool isNotify) { Serial.print("Notify callback for characteristic "); Serial.print(pBLERemoteCharacteristic->getUUID().toString().c_str()); Serial.print(" of data length "); Serial.println(length); Serial.print("data: "); Serial.println((char*)pData); } class MyClientCallback : public BLEClientCallbacks { void onConnect(BLEClient* pclient) { } void onDisconnect(BLEClient* pclient) { connected = false; Serial.println("onDisconnect"); } }; bool connectToServer() { Serial.print("Forming a connection to "); Serial.println(myDevice->getAddress().toString().c_str()); BLEClient* pClient = BLEDevice::createClient(); Serial.println(" - Created client"); pClient->setClientCallbacks(new MyClientCallback()); // Connect to the remove BLE Server. pClient->connect(myDevice); // if you pass BLEAdvertisedDevice instead of address, it will be recognized type of peer device address (public or private) Serial.println(" - Connected to server"); // Obtain a reference to the service we are after in the remote BLE server. BLERemoteService* pRemoteService = pClient->getService(serviceUUID); if (pRemoteService == nullptr) { Serial.print("Failed to find our service UUID: "); Serial.println(serviceUUID.toString().c_str()); pClient->disconnect(); return false; } Serial.println(" - Found our service"); // Obtain a reference to the characteristic in the service of the remote BLE server. pRemoteCharacteristic = pRemoteService->getCharacteristic(charUUID); if (pRemoteCharacteristic == nullptr) { Serial.print("Failed to find our characteristic UUID: "); Serial.println(charUUID.toString().c_str()); pClient->disconnect(); return false; } Serial.println(" - Found our characteristic"); // Read the value of the characteristic. if(pRemoteCharacteristic->canRead()) { std::string value = pRemoteCharacteristic->readValue(); Serial.print("The characteristic value was: "); Serial.println(value.c_str()); } if(pRemoteCharacteristic->canNotify()) pRemoteCharacteristic->registerForNotify(notifyCallback); connected = true; return true; } /** * Scan for BLE servers and find the first one that advertises the service we are looking for. */ class MyAdvertisedDeviceCallbacks: public BLEAdvertisedDeviceCallbacks { /** * Called for each advertising BLE server. */ void onResult(BLEAdvertisedDevice advertisedDevice) { Serial.print("BLE Advertised Device found: "); Serial.println(advertisedDevice.toString().c_str()); // We have found a device, let us now see if it contains the service we are looking for. if (advertisedDevice.haveServiceUUID() && advertisedDevice.isAdvertisingService(serviceUUID)) { BLEDevice::getScan()->stop(); myDevice = new BLEAdvertisedDevice(advertisedDevice); doConnect = true; doScan = true; } // Found our server } // onResult }; // MyAdvertisedDeviceCallbacks void setup() { Serial.begin(115200); Serial.println("Starting Arduino BLE Client application..."); BLEDevice::init(""); // Retrieve a Scanner and set the callback we want to use to be informed when we // have detected a new device. Specify that we want active scanning and start the // scan to run for 5 seconds. BLEScan* pBLEScan = BLEDevice::getScan(); pBLEScan->setAdvertisedDeviceCallbacks(new MyAdvertisedDeviceCallbacks()); pBLEScan->setInterval(1349); pBLEScan->setWindow(449); pBLEScan->setActiveScan(true); pBLEScan->start(5, false); } // End of setup. // This is the Arduino main loop function. void loop() { // If the flag "doConnect" is true then we have scanned for and found the desired // BLE Server with which we wish to connect. Now we connect to it. Once we are // connected we set the connected flag to be true. if (doConnect == true) { if (connectToServer()) { Serial.println("We are now connected to the BLE Server."); } else { Serial.println("We have failed to connect to the server; there is nothin more we will do."); } doConnect = false; } // If we are connected to a peer BLE Server, update the characteristic each time we are reached // with the current time since boot. if (connected) { String newValue = "Time since boot: " + String(millis()/1000); Serial.println("Setting new characteristic value to \"" + newValue + "\""); // Set the characteristic's value to be the array of bytes that is actually a string. pRemoteCharacteristic->writeValue(newValue.c_str(), newValue.length()); }else if(doScan){ BLEDevice::getScan()->start(0); // this is just example to start scan after disconnect, most likely there is better way to do it in arduino } delay(1000); // Delay a second between loops. } // End of loop |
This code is relying on some user-defined functions. We defined Characteristic and service UUID at the start of the code. Objects of BLERemoteCharacteristic, BLEAdvertisedDevice classes are made at the start and function connectToServer() is used to connect to the server(other esp32). It finally fetches all the data provided by server using variables of characteristic and service . The serial monitor will display the following values as:

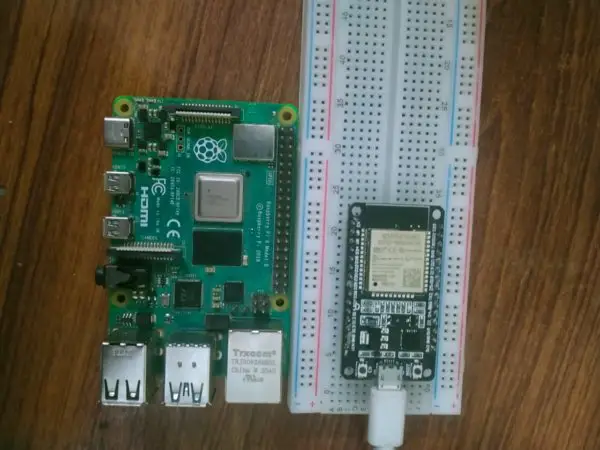
Connection Between ESP32 and Raspberry Pi
ESP32 Connection: Our ESP32 will be running A UART connection on the Bluetooth. So it will be able to communicate two ways with the Raspberry Pi.
Our code is as:
|
1 2 3 4 5 6 7 8 9 10 11 12 13 14 15 16 17 18 19 20 21 22 23 24 25 26 27 28 29 30 31 32 33 34 35 36 37 38 39 40 41 42 43 44 45 46 47 48 49 50 51 52 53 54 55 56 57 58 59 60 61 62 63 64 65 66 67 68 69 70 71 72 73 74 75 76 77 78 79 80 81 82 83 84 85 86 87 88 89 90 91 92 93 94 95 96 97 98 99 100 101 102 103 104 105 106 |
#include <BLEDevice.h> #include <BLEServer.h> #include <BLEUtils.h> #include <BLE2902.h> BLEServer *pServer = NULL; BLECharacteristic * pTxCharacteristic; bool deviceConnected = false; bool oldDeviceConnected = false; uint8_t txValue = 0; // See the following for generating UUIDs: // https://www.uuidgenerator.net/ #define SERVICE_UUID "6E400001-B5A3-F393-E0A9-E50E24DCCA9E" // UART service UUID #define CHARACTERISTIC_UUID_RX "6E400002-B5A3-F393-E0A9-E50E24DCCA9E" #define CHARACTERISTIC_UUID_TX "6E400003-B5A3-F393-E0A9-E50E24DCCA9E" class MyServerCallbacks: public BLEServerCallbacks { void onConnect(BLEServer* pServer) { deviceConnected = true; }; void onDisconnect(BLEServer* pServer) { deviceConnected = false; } }; class MyCallbacks: public BLECharacteristicCallbacks { void onWrite(BLECharacteristic *pCharacteristic) { std::string rxValue = pCharacteristic->getValue(); if (rxValue.length() > 0) { Serial.println("*********"); Serial.print("Received Value: "); for (int i = 0; i < rxValue.length(); i++) Serial.print(rxValue[i]); Serial.println(); Serial.println("*********"); } } }; void setup() { Serial.begin(115200); // Create the BLE Device BLEDevice::init("UART Service For ESP32"); // Create the BLE Server pServer = BLEDevice::createServer(); pServer->setCallbacks(new MyServerCallbacks()); // Create the BLE Service BLEService *pService = pServer->createService(SERVICE_UUID); // Create a BLE Characteristic pTxCharacteristic = pService->createCharacteristic( CHARACTERISTIC_UUID_TX, BLECharacteristic::PROPERTY_NOTIFY ); pTxCharacteristic->addDescriptor(new BLE2902()); BLECharacteristic * pRxCharacteristic = pService->createCharacteristic( CHARACTERISTIC_UUID_RX, BLECharacteristic::PROPERTY_WRITE ); pRxCharacteristic->setCallbacks(new MyCallbacks()); // Start the service pService->start(); // Start advertising pServer->getAdvertising()->start(); Serial.println("Waiting a client connection to notify..."); } void loop() { if (deviceConnected) { pTxCharacteristic->setValue(&txValue, 1); pTxCharacteristic->notify(); txValue++; delay(10); // bluetooth stack will go into congestion, if too many packets are sent } // disconnecting if (!deviceConnected && oldDeviceConnected) { delay(500); // give the bluetooth stack the chance to get things ready pServer->startAdvertising(); // restart advertising Serial.println("start advertising"); oldDeviceConnected = deviceConnected; } // connecting if (deviceConnected && !oldDeviceConnected) { // do stuff here on connecting oldDeviceConnected = deviceConnected; } } |
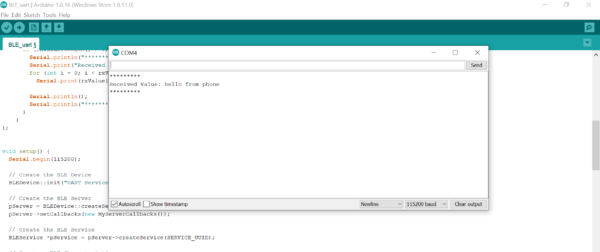
This code is had two portions, one is transmitting any random data in a loop. The other one is receiving data. At the start we have defined two characteristics as RX and TX, then we have defined and assigned them proper values according to our need. As we are using UART, so we can transmit and as well as receive simultaneously without any obstruction . You can test one side of connection by using the NRF Application (App store link: https://apps.apple.com/us/app/nrf-connect-for-mobile/id1054362403 Play store link: https://play.google.com/store/apps/details?id=no.nordicsemi.android.mcp). Upload the above code and open NRF Connector application, connect to the UART-SERVICE as:
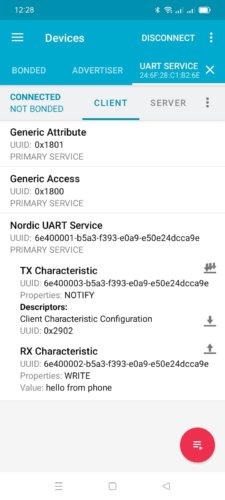
After connecting type, the value, you want to send to serial monitor. Your value will be sent to the serial monitor.
Raspberry Pi Connection:
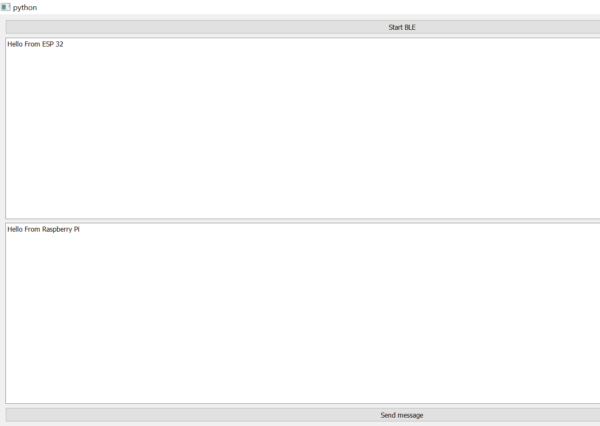
Raspberry Pi is running a script of python using bluepy (a special library of raspberry pi to use BLE mode). Basically, this code develops a basic GUI that helps sends and receive data from the esp. 32. You should install PYQT and bluepy libraries before proceeding. After setting this up just run this code and a graphical user interface will display on the screen. Then you can enter the data to send over the BLE to ESP32, or it will be displaying the data received from the esp32. This connection is a UART (universally asynchronous receiver-transmitter). Which means it has both capabilities to send and receive data at the same time. In the first text box you will receive the data from esp. 32 and in the second textbox you will write the data to be sent from Raspberry Pi.
At the ESP32 serial communication monitor we have:

|
1 2 3 4 5 6 7 8 9 10 11 12 13 14 15 16 17 18 19 20 21 22 23 24 25 26 27 28 29 30 31 32 33 34 35 36 37 38 39 40 41 42 43 44 45 46 47 48 49 50 51 52 53 54 55 56 57 58 59 60 61 62 63 64 65 66 67 68 69 70 71 72 73 74 75 76 77 78 79 80 81 82 83 84 85 86 87 88 89 90 91 92 93 94 95 96 97 98 99 100 101 102 103 104 105 106 107 108 109 110 111 112 113 114 115 116 117 118 119 120 121 122 123 124 125 126 127 128 129 130 131 132 133 134 135 136 137 138 139 |
import sys import time import requests from PyQt5.QtCore import QObject, QRunnable, QThreadPool, QTimer, pyqtSignal, pyqtSlot from PyQt5.QtWidgets import ( QApplication, QLabel, QMainWindow, QPlainTextEdit, QPushButton, QVBoxLayout, QWidget, ) from bluepy import btle class WorkerSignals(QObject): signalMsg = pyqtSignal(str) signalRes = pyqtSignal(str) class MyDelegate(btle.DefaultDelegate): def __init__(self, sgn): btle.DefaultDelegate.__init__(self) self.sgn = sgn def handleNotification(self, cHandle, data): try: dataDecoded = data.decode() self.sgn.signalRes.emit(dataDecoded) except UnicodeError: print("UnicodeError: ", data) class WorkerBLE(QRunnable): def __init__(self): super().__init__() self.signals = WorkerSignals() self.rqsToSend = False @pyqtSlot() def run(self): self.signals.signalMsg.emit("WorkerBLE start") #--------------------------------------------- p = btle.Peripheral("3c:71:bf:0d:dd:6a") p.setDelegate( MyDelegate(self.signals) ) svc = p.getServiceByUUID("6E400001-B5A3-F393-E0A9-E50E24DCCA9E") self.ch_Tx = svc.getCharacteristics("6E400002-B5A3-F393-E0A9-E50E24DCCA9E")[0] ch_Rx = svc.getCharacteristics("6E400003-B5A3-F393-E0A9-E50E24DCCA9E")[0] setup_data = b"\x01\00" p.writeCharacteristic(ch_Rx.valHandle+1, setup_data) # BLE loop -------- while True: """ if p.waitForNotifications(1.0): # handleNotification() was called continue print("Waiting...") """ p.waitForNotifications(1.0) if self.rqsToSend: self.rqsToSend = False try: self.ch_Tx.write(self.bytestosend, True) except btle.BTLEException: print("btle.BTLEException"); #---------------------------------------------hellohello self.signals.signalMsg.emit("WorkerBLE end") def toSendBLE(self, tosend): self.bytestosend = bytes(tosend, 'utf-8') self.rqsToSend = True """ try: self.ch_Tx.write(bytestosend, True) except BTLEException: print("BTLEException"); """ class MainWindow(QMainWindow): def __init__(self): super().__init__() layout = QVBoxLayout() buttonStartBLE = QPushButton("Start BLE") buttonStartBLE.pressed.connect(self.startBLE) self.console = QPlainTextEdit() self.console.setReadOnly(True) self.outconsole = QPlainTextEdit() buttonSendBLE = QPushButton("Send message") buttonSendBLE.pressed.connect(self.sendBLE) layout.addWidget(buttonStartBLE) layout.addWidget(self.console) layout.addWidget(self.outconsole) layout.addWidget(buttonSendBLE) w = QWidget() w.setLayout(layout) self.setCentralWidget(w) self.show() self.threadpool = QThreadPool() print( "Multithreading with Maximum %d threads" % self.threadpool.maxThreadCount()) def startBLE(self): self.workerBLE = WorkerBLE() self.workerBLE.signals.signalMsg.connect(self.slotMsg) self.workerBLE.signals.signalRes.connect(self.slotRes) self.threadpool.start(self.workerBLE) def sendBLE(self): strToSend = self.outconsole.toPlainText() self.workerBLE.toSendBLE(strToSend) def slotMsg(self, msg): print(msg) def slotRes(self, res): self.console.appendPlainText(res) app = QApplication(sys.argv) window = MainWindow() app.exec() |
Practical Uses in Industry
BLE is very beneficial in the places where we don’t have enough power to supply. Let’s discuss some of its practical applications:
Smart Agricultural System: A microcontroller like ESP32 or Raspberry Pi having ble capability can be used on batteries for weeks to transfer all the sensors’ data from one esp32 to other esp32 to take significant actions for proper growth of crops/plants (like turning on the lights or turning on the motor)
Sports Trainers: A microcontroller can be used to send data like heartbeat, running speed or any other data measured through sensors via Bluetooth to mobile phone or simply display on screen like max 7219. They can easily monitor all these values efficiently without any wiring.
Health Monitoring Systems: Wrist bands to measure different data like heartbeat, blood pressure and other things like this can be transferred directly to a computer using BLE capability of a microcontroller.
Home Automation: Home automation is one of the gifts that compact microcontrollers made possible. BLE devices can be used to make very innovative things from controlling lights to making fingerprint lock doors, everything is possible. Some of its interesting applications are:
- Reminders for appliances like stoves, water pumps, heaters, geyser to turn them off at a particular time
- Mobile controlled security cameras
- Mobile controlled automated garage doors (using esp. 32 or Raspberry Pi)
- Different sensor data collection from the house (fire, water, motion, light)
1 Comment
The example didn’t work in my device. It returned the error on “class MyDelegate()”, where it returns UnicodeError in terminal.