")
Today we will be making a DIY Weight measuring scale using ESP8266. Development in the field of embedded systems have made it a piece of cake to make a precise and accurate weight measuring scale with spending minimum time and budget. Even if you have a very little or no understanding of microcontrollers like esp8266 development board or NodeMCU you will make it without facing any difficulty. We will be making a Weight Measuring scale using a load cell, HX711, and ESP8266 development board.
Components Required
You will require the following things:
- ESP8266
- Arduino IDE
- USB Cable ESP8266
- Load Cell (10 kg or according to your desire)
- HX711 ADC for load Cell
- Breadboard
- Jumper Wires
- I2C Liquid Crystal Display
Circuit Setup
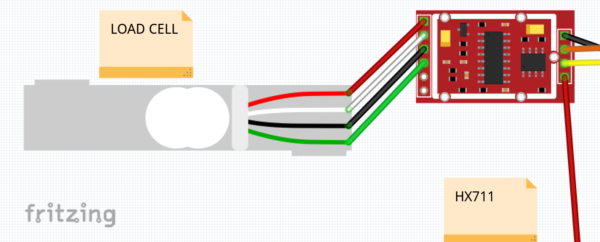
Step 1: Connect the HX711 with the load cell. The load cell will have four wires with colors red, black, green, and white. Connect them according to the following table:
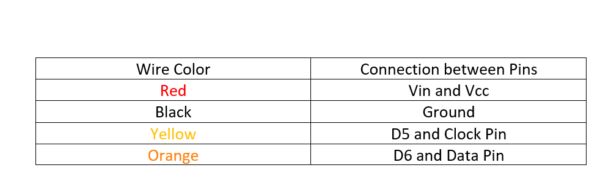
Step 2: Now connect HX711 with ESP8266.HX711 have four pins that include Vcc, Ground, Data and Clock pins. Connect Data and Clock pins to D5 and D6 of ESP8266. Ground and Vcc are simply connected to the Vin and Ground pins.
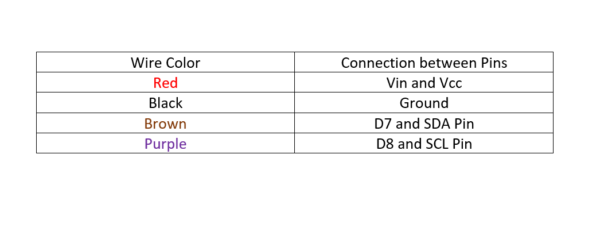
Step 3: Connect the ESP8266 and I2C LED to display the weight values. I2C LED have four pins that include ground, Vcc, SDA and SCL pins. Connect them according to the following table:
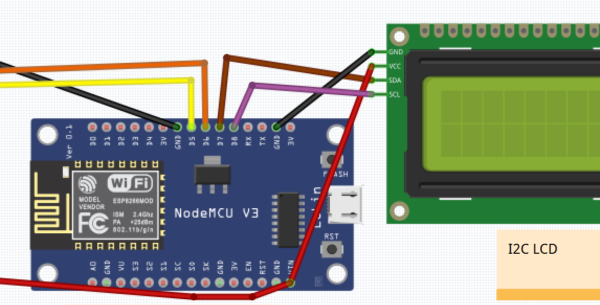
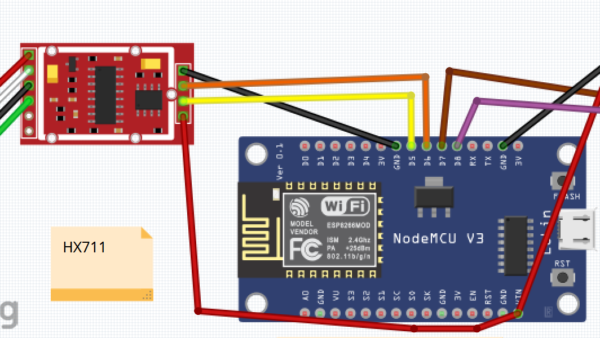
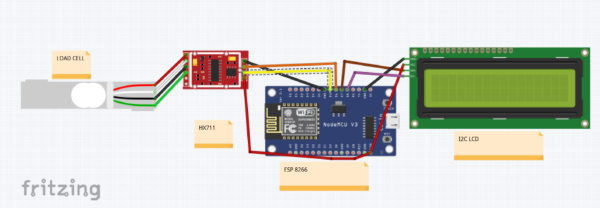
Final Circuit: While connecting the circuit, be careful about the loose connections and proper connections according to the table and connections shown above. After connecting all the wires, the final circuit will be as:
Coding Part of The Circuit
First, we need to calibrate our HX711 sensor and load cell. Calibrating it once will give us accurate and precise values, otherwise we will be getting wrong values for the things we are placing on the load cell. You need two libraries in the coding part, which include:
Calibration
The calibration of HX711 is done by hit and trial method that means we measure the value of a weight on a load cell many times to adjust the value of calibration factor once our reading becomes equal to the known value of our weight then we can easily utilize our weighing scale to measure any other weight.
In the first part of calibration code, we have made an object of HX711 class and used a function scale.begin() to allocate the data and clock pins. After that, we just reset the initial value of our HX711
In the second part of the calibration, we just repeated a loop to get the exact value of the calibration factor. We calibrate our HX711 by increasing or decreasing the factor according to our need by entering the proper value in the serial monitor.
|
1 2 3 4 5 6 7 8 9 10 11 12 13 14 15 16 17 18 19 20 21 22 23 24 25 26 27 28 29 30 31 32 33 34 |
#include "HX711.h" //Install this library from library manager #include <Wire.h> #include <LiquidCrystal_I2C.h> //Including I2C LCD library LiquidCrystal_I2C lcd(0x27, 16, 2); //Creating an object of LCD_I2C #define Clock D5 #define Data D6 //Defining Clock and Data Pins HX711 scale; //Making an object of HX711 class //Assume a random conversion factor and then this is changed according to the calibration float calibration_factor = -109000; //Assuming a calibration_factor float weight; void setup() { //Setup Function scale.begin(Data, Clock); //Using Hx711 function scale to begin the connection Serial.begin(9600); Serial.println("HX711 Calibration"); Serial.println("First Remove all the weight"); Serial.println("PLace your weight after the readings start"); Serial.println("Calibration is increased when you press a,b,c,d by the factor of 10,100,1000,10000"); Serial.println("Calibration is increased when you press e,f,g,h by the factor of 10,100,1000,10000"); Serial.println("Press t for reset"); //Printing necessary instructions scale.set_scale(); scale.tare(); //Reset the scale to 0 long zero_factor = scale.read_average(); //Get a baseline reading Serial.print("Zero factor: "); //This can be used to remove the need to tare the scale. Useful in permanent scale projects. Serial.println(zero_factor); Wire.begin(D7,D8); //Starting Connection of LCD lcd.begin(); lcd.setCursor(1,1); //Setting the LCD cursor to display value at a particular spot lcd.print("Weighing Scale"); delay(3000); lcd.clear(); //Clearing the LCD after the delaying } |
We keep on reading the values and find the calibration factor until our load cells reads the exact value of the weight, we are using to calibrate it.
|
1 2 3 4 5 6 7 8 9 10 11 12 13 14 15 16 17 18 19 20 21 22 23 24 25 26 27 28 29 30 31 32 |
void loop() { scale.set_scale(calibration_factor); //We are adjusting the calibration factor Serial.print("Reading Values "); Serial.print(scale.get_units(), 3); Serial.print(" kg"); //Changing this unit to KG to follow SI units Serial.print(" calibration_factor: "); Serial.print(calibration_factor); Serial.println(); if(Serial.available()) //Applying the condition to check if something is entered on the serial or not { char temp = Serial.read(); //Reading the value entered on the serial monitor if(temp == '+' || temp == 'a') calibration_factor += 10; //Applying if statements to increase or decrease the calibration factor according to requirement else if(temp =='-' || temp == 'e') calibration_factor -= 10; else if(temp == 'b') calibration_factor += 100; else if(temp == 'f') calibration_factor -= 100; else if(temp == 'c') calibration_factor += 1000; else if(temp == 'g') calibration_factor -= 1000; else if(temp == 'd') calibration_factor += 10000; //Calibration factor will increase or decrease according to the key pressed else if(temp == 'h') calibration_factor -= 10000; //Once we get right value of the weight placed we simplyset that thing as calibration factor else if(temp == 't') scale.tare(); } } |
Final Code
In the final code, we first set up our LCD and HX711 and reset them to zero. In the setup, we begin the connection with I2C LCD and set the cursor position to display a line with a delay of 3 seconds.
|
1 2 3 4 5 6 7 8 9 10 11 12 13 14 15 16 17 18 19 20 21 22 23 24 25 26 27 |
#include "HX711.h" //Install this library from library manager #include <Wire.h> #include <LiquidCrystal_I2C.h> //Inluding I2C LCD library LiquidCrystal_I2C lcd(0x27, 16, 2); //Creating object of LCD #define Clock D5 #define Data D6 HX711 scale; //Assume a random conversion factor and then this is changed according to the calibration float calibration_factor = -109000; //Assuming a calibration factor float weight; void setup() { Serial.begin(115200); //Starting serial connection scale.begin(Data, Clock); //Starting Connection of Hx711 scale.set_scale(); scale.tare(); //Reset the scale to 0 long zero_factor = scale.read_average(); //Get a baseline reading Serial.print("Zero factor: "); //This can be used to remove the need to tare the scale. Useful in permanent scale projects. Serial.println(zero_factor); Wire.begin(D7,D8); //Starting LCD connection lcd.begin(); lcd.setCursor(1,1); //Displaying a value at a particular spot on LCD lcd.print("Weighing Scale"); delay(3000); lcd.clear(); //Clearing LCD } |
Now, in the second part, we used our calibration factor that we obtained and used it to set the scale of our HX711. We get the weight values using the get_units () function. Then simply this value of weight is displayed on the LCD by setting the cursor and displayed on the serial monitor also.
|
1 2 3 4 5 6 7 8 9 10 11 12 13 14 15 |
void loop() { scale.set_scale(calibration_factor); //Adjust to this calibration factor weight = scale.get_units(5); //Getting the weight using HX711 lcd.setCursor(0, 0); lcd.print("Measured Weight"); lcd.setCursor(0, 1); lcd.print(weight); //Displaying different values on LCD lcd.print(" KG "); delay(3000); lcd.clear(); Serial.print("Weight: "); Serial.print(weight); Serial.println(" KG"); //Also printing the weights on the serial monitor } |
Working of Different Components
HX711
HX711 includes a HX711 chip with the capability of analog to digital conversion with up to 24 bits accuracy. It amplifies the millivolts applied by the load cells and makes it usable by the ESP8266, and eventually it will calculate the weight from the data fetched.
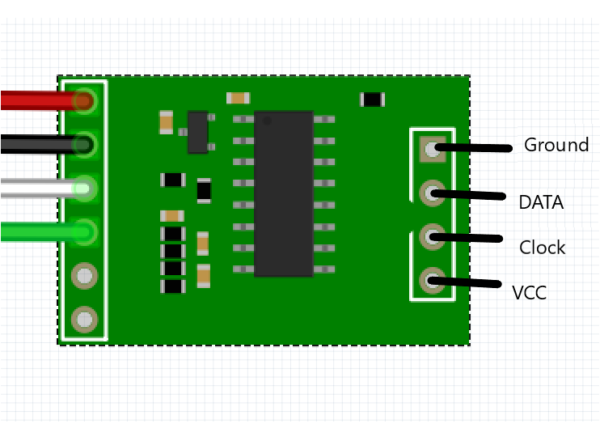
It has four pins. VCC and Ground pins are for powering the HX711. Data pin is supposed to fetch the data from the load cell. Clock signal is also connected to the pin to take the signal from one of the pins of the ESP8266.
Load Cell
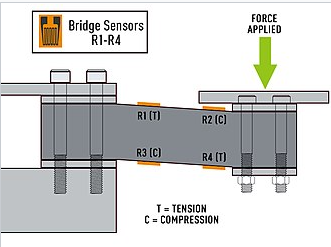
A load cell is a force transducer. It will convert the force such as tension, pressure or compression into an electrical signal that can be measured or standardized. As the force applied to the load increases, the electrical signal changes proportionally. Basically, a load cell is operated on the principle of a Wheatstone Bridge
Excitation Voltage VEX is constant, and voltage Vo is the variable voltage depending on the shape of the strain gauges. If resistors are balanced, then the Vo is zero. If any resistance is changed the Vo will be changed relatively and this change will be detected.
In the load cell, the resistors are changed with the strain gauges and arranged in an alternating manner with tension and compression formation. When force is applied on the load cell, the structure and resistance of the strain gauges changes, which changes Vo. This change can be measured.
ESP8266 / NodeMCU
The ESP8266 is the main central part of our circuit and is responsible to fetch the data from the load cell and display. ESP8266 is a low-cost Wi-Fi microchip with the capability of built-in TCP/Networking software and microcontroller capability. Its low cost and high functionality make it a very ideal chip to be used in weight measuring scale.
I2C Liquid Crystal Display
I2C is a short for inter IC. It is a multi-master packet switched, multi slave and single ended serial bus that means multiple chips can be connected to the same. I2C uses two bidirectional communications. I2C adapter is used to connect to the LCD directly and this adapter is connected to the ESP8266. We will be using the I2C Liquid Crystal library to display and integrate our LCD to our microcontroller. I2C is a very powerful communication protocol to exchange data in between closely placed microcontroller or sensors.
Advantages of Weight Measuring Scale
Weight Measuring Scale made using ESP8266 is very useful and beneficial as it is having an accuracy of about +/-0.03. Moreover, it can be modified by using a greater number of load cells to measure weight up to hundreds of Kgs. Furthermore, we can develop a proper PCB of this circuit and get a plastic body using a 3d printer to make a more accurate and intuitive Measuring Scale. We can also use the internet of things and ESP8266 to send values of a weight measured remotely to any place. We can also calibrate this Measuring Scale to any other units like Pound or any other local unit.
1 Comment
Can we use this with Blynk or RemoteXY?