
Frequently, a lot of data is generated in projects that run around the clock. One way to store them permanently is to store the data in a local database. However, there are also some reasons that speak against it. In order to keep the measured data (for example, from a weather station) available in the future, it is also possible to avoid various online services.
One of these providers is ThingSpeak. Here you can create a free account for smaller applications and transfer its data very easily. And that’s exactly what this tutorial is about: How to transfer sensor data to ThingSpeak and evaluate it later.
Required Hardware Parts
All you need is a Raspberry Pi with an internet connection and a sensor whose data you measure. Even the CPU activity can be logged. In this tutorial, I used a DHT22, with help of which I measure and log the temperature and humidity.
The following sensors and modules would be useful for a weather station:
- DHT22 (Tutorial)
- BMP180 (Tutorial)
- Photoresistors
- Normal Resistors
- Female – Female Jumper Cable
- If necessary, a waterproof Plastic Box
A list of other components can be found in this article: 50 of the most important Raspberry Pi sensors and modules
Setting up a ThingSpeak account
Before we start, you need an account at ThingSpeak. Create an account here if you do not have one yet. Then, create a new channel at https://thingspeak.com/channels .
Here you give a name to the channel as well as which fields you want to use. In total, up to 8 fields can be used. The names given have no influence on the transmission of the data, as we only specify “field1”, “field2”, etc. All these assigned names are still changeable later.
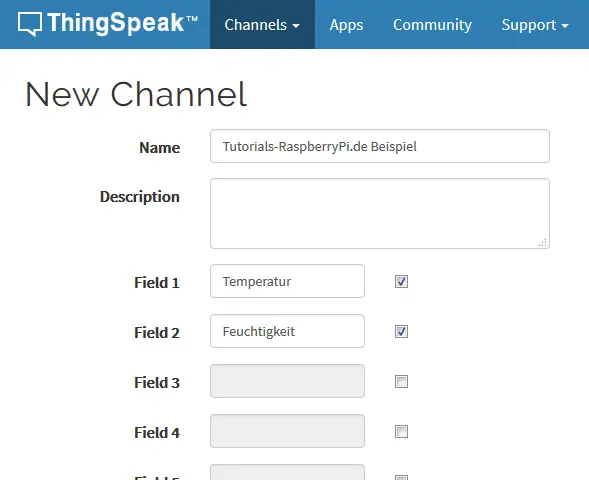
After you have saved the channel below, you will automatically be redirected to the tab “Private View”. Here the assigned fields are displayed as a diagram. Further up you will find the “Channel ID“. We will need them soon.
Afterwards, we switch to the tab “API Keys”. The two values of “Write API Key” as well as “Read API Key” are equally needed so that we can write or retrieve data.
Connecting and setting up the Temperature Sensor
If you do not want to use the DHT11 or DHT22, you can skip this chapter.
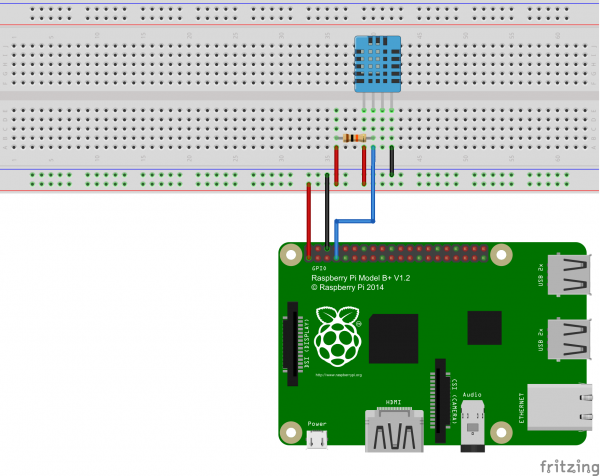
I have already discussed the two sensors in detail here, so this is only the connection as a reminder (10kΩ resistance):
If you have never used the sensor before and the library is not yet installed, we need to install it first. Some packages are needed for that:
sudo apt-get update
sudo apt-get install build-essential python-dev python-openssl git
Now we install the library to read the DHT11/22 sensors:
git clone https://github.com/adafruit/Adafruit_Python_DHT.git && cd Adafruit_Python_DHT
sudo python setup.py install
If everything went through without errors, we can already proceed.
Using Raspberry Pi ThingSpreak Library
In order to be able to use the service, it is possible to simply send the data via “POST” or retrieve via “GET”. Functions are available in just about any programming language and with a little bit of knowledge, data transfer should be fast. The answers are in principle in JSON.
If you do not have enough experience or just do not feel like writing it yourself, you can also use the ThingSpeak library. For this we install it simply by pip:
sudo pip install thingspeak
On the one hand, a Python library is created and, in addition, a terminal-application. You can also call thingspeak via the console (or from another C ++ / Java program).
So let’s start. Our little Python script should read the temperature and humidity of the DHT22 every 15 seconds and send it to our channel. In addition, the data should then be retrieved again (this is not necessary in applications that only send data, so it is just a demonstration example).
We will create a new file,
sudo nano thingspeak_example.py
which gets the following content (save and exit with CTRL + O, CTRL + X):
|
1 2 3 4 5 6 7 8 9 10 11 12 13 14 15 16 17 18 19 20 21 22 23 24 25 26 27 28 29 30 |
import thingspeak import time import Adafruit_DHT channel_id = 206897 # PUT CHANNEL ID HERE write_key = '24GJQV17H7H4XGJ5' # PUT YOUR WRITE KEY HERE read_key = '9EZ7E0918UVVAGAY' # PUT YOUR READ KEY HERE pin = 4 sensor = Adafruit_DHT.DHT22 def measure(channel): try: humidity, temperature = Adafruit_DHT.read_retry(sensor, pin) # write response = channel.update({'field1': temperature, 'field2': humidity}) # read read = channel.get({}) print("Read:", read) except: print("connection failed") if __name__ == "__main__": channel = thingspeak.Channel(id=channel_id, write_key=write_key, api_key=read_key) while True: measure(channel) # free account has an api limit of 15sec time.sleep(15) |
You need to adjust lines 5 to 7 accordingly. Line 8 only needs to be changed if you are using a different GPIO for the sensor.
Of course, if you do not use the DHT22 sensor, the code needs to be adjusted a bit.
Get data in the Web Panel and via API
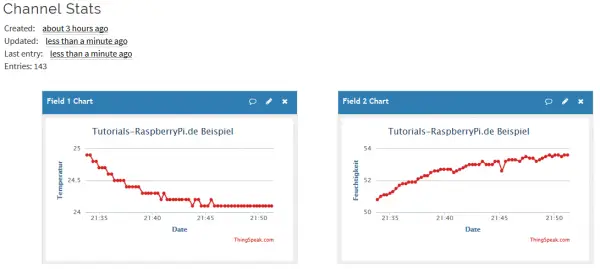
The data of the panel is displayed with a few seconds delay “quasi live”. You can customize the panels (appearance and data display) and even write your own ideas for the data. For these so-called apps, you just have to master a bit of HTML, CSS and Javascript. Alternatively, you can also download plugins from the Forum.
If you want to retrieve the data via API, you can do so easily via JSON. You have to replace your Channel ID (with me: 206897) as well as your “Read API Key” (with me: 9EZ7E0918UVVAGAY) in the following link:
https://api.thingspeak.com/channels/206897/feeds.json?api_key=9EZ7E0918UVVAGAY
In addition, there are a lot of other parameters that you can specify to limit, sum or filter the data. You can find them in the MathWorks Wiki.
In conclusion, I would like to point out that you should always be aware of what exactly you are transferring. Even though ThingSpeak is a reputable provider, you should be saving the particularly sensitive data yourself, even if this is a little more complicated and less fail-safe. For uncritical projects such as weather stations or, for example, the monitoring of an aquarium I see no danger.
9 Comments
Hi,
I’ve just tried to get data online via ThingSpeak. However, when I do sudo nano thingspeak_example.py, copy the code and run the program (sudo python thingspeak_example.py), I just get this information: TypeError: __init__() got an unexpected keyword argument ‘write_key’.
What is supposed to do?
The demo code is using an older version of the library.
Try this:
channel = thingspeak.Channel(id=channel_id, api_key=write_key)
response = channel.update({1:temperature, 2:humidity})
Good luck
I already tried this one, but no data popup in my chart on thingspeak
Hi I get this error:
Traceback (most recent call last):
File “thingspeak_example.py”, line 1, in
import thingspeak
ImportError: No module named thingspeak
sudo pip install thingspeak
this should solve your problem
import thingspeak
import time
import Adafruit_DHT
channel_id = 206897 # PUT CHANNEL ID HERE
write_key = ’24GJQV17H7H4XGJ5′ # PUT YOUR WRITE KEY HERE
read_key = ‘9EZ7E0918UVVAGAY’ # PUT YOUR READ KEY HERE
pin = 4
sensor = Adafruit_DHT.DHT11
def measure(channel):
try:
humidity, temperature = Adafruit_DHT.read_retry(sensor, pin)
# write
response = channel.update({‘field1’: temperature, ‘field2’: humidity})
# read
read = channel.get({})
print(“Read:”, read)
except:
print(“connection failed”)
if __name__ == “__main__”:
channel = thingspeak.Channel(id=channel_id, api_key=write_key)
while True:
measure(channel)
# free account has an api limit of 15sec
time.sleep(15).
Here I am using the DHT11 sensor so i made some changes in line no 9. I have edited line 5 to 7 according to my channel. I am getting the output in my terminal as “connection failed”. That means it is not able to perform channel.get({}) properly. Can anybody help me with this issue? Thank you
I have the same situation as you. Can you finally solve the problem?
While my configuration is different than that in the article, when my Raspberry Pi writes the sensor data to Thingspeak, sometimes it just pauses and there’s gaps in the data. That is until I call up a trend on Thingspeak, and the data starts populating again. Any ideas how to track down the cause?
Discovered that this anomaly is caused by the browser not updating the trend properly. A refresh of the webpage refreshes the trend with all available data and clears the problem. Sorry for the bother.