
For weather stations and similar projects, it is often important to determine the air pressure. How to determine the temperature and humidity with sensors has already been shown in previous tutorials. With the help of the barometer BMP180 the air pressure (in hPa / bar) can be determined via the I²C bus of the Raspberry Pi.
In contrast to the DHT11 / DHT22, the BMP180 can not measure humidity, but the air pressure, which in turn cannot be measured by the other two sensors. But both can also measure the temperature.
Accessories
The earlier model BMP085 was manufactured by Bosch. In this tutorial, I use a successor model BMP180, although the previous version is also compatible
- BMP180 Air pressure sensor
- Female-Female Jumper Kabel
- Breadboard
Construction
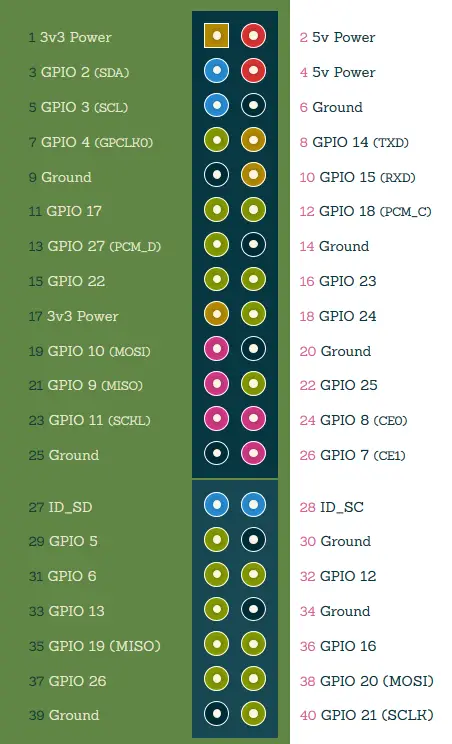
Depending on which model (and from which manufacturer) you are using the label may be different. I, therefore, try to give a general description. All in all, only four pins of the Raspberry Pi are needed (3V3, GND, data line SDA, clock SCL).
| Sensor | Raspberry Pi |
|---|---|
| VCC | 3V3 (Pin 1) |
| GND | GND (Pin 6) |
| SCL | SCL (pin 5) |
| SDA | SDA (Pin 3) |
All other pins of the sensor (such as 3.3 or XCLR) do not need to be connected.
Here is the pin assignment of the Raspberry Pi’s:
I²C Activation
Since the BMP180 sensor works via the I²C bus, it must be enabled first, because it is deactivated by default (if you have already done so, you can jump to the next chapter).
We first process the following file:
sudo nano /etc/modules
At the end of the file these two lines are added:
i2c-bcm2708
i2c-dev
With CTRL + O and CTRL + X we save and exit.
Now we can comment out the blacklist entries (in some versions the file does not exist, then just go to the next command):
sudo nano /etc/modprobe.d/raspi-blacklist.conf
Here we can use a hash # to comment out the corresponding entries.
#blacklist spi-bcm2708
#blacklist i2c-bcm2708
In addition, Raspbian versions from 2015 onwards require activation of the Devietree. This can be done in the configuration:
sudo raspi-config
Under “Advanced Options” you activate the automatic loading of the I2C bus. Restart your Raspberry.
Now we install three more needed tools:
sudo apt-get install python-smbus i2c-tools git
Then you can by means of
i2cdetect -y 1
test if everything worked. A device should be displayed. For me it looks like this:
pi@raspberrypi ~ $ i2cdetect -y 1
     0  1  2  3  4  5  6  7  8  9  a  b  c  d  e  f
00:          -- -- -- -- -- -- -- -- -- -- -- -- --
10: -- -- -- -- -- -- -- -- -- -- -- -- -- -- -- --
20: -- -- -- -- -- -- -- -- -- -- -- -- -- -- -- --
30: -- -- -- -- -- -- -- -- -- -- -- -- -- -- -- --
40: -- -- -- -- -- -- -- -- -- -- -- -- -- -- -- --
50: -- -- -- -- -- -- -- -- -- -- -- -- -- -- -- --
60: -- -- -- -- -- -- -- -- -- -- -- -- -- -- -- --
70: -- -- -- -- -- -- -- 77
BMP180 Software
The easiest way to address the sensor is to take an existing library that already has all the functions. Adafruit offers such a library, with examples also to other sensors.
We clone the repository of Adafruit (git must be installed).
git clone https://github.com/adafruit/Adafruit-Raspberry-Pi-Python-Code.git
cd Adafruit-Raspberry-Pi-Python-Code/
git checkout 9ff733d59242a02f7ccd0222001ce80f6090a978
cd Adafruit_BMP085
Then we can already do the first test:
sudo python Adafruit_BMP085_example.py
The script will provide an output similar to this one:
Temperature: 25.70 C
Pressure:    1007.08 hPa
Altitude:    50.83
In my test, it was 1007 hPa (which corresponds to 100700 Pascal or 1.007 bar).
Of course, we can now integrate the file into another project. For this we only copy the file to be included and edit the just called Adafruit_BMP085_example.py, which looks like this:
|
1 2 3 4 5 6 7 8 9 10 11 12 13 14 15 16 17 18 19 20 21 22 23 24 25 26 27 28 29 30 31 32 33 34 35 36 |
#!/usr/bin/python from Adafruit_BMP085 import BMP085 # =========================================================================== # Example Code # =========================================================================== # Initialise the BMP085 and use STANDARD mode (default value) # bmp = BMP085(0x77, debug=True) bmp = BMP085(0x77) # To specify a different operating mode, uncomment one of the following: # bmp = BMP085(0x77, 0) # ULTRALOWPOWER Mode # bmp = BMP085(0x77, 1) # STANDARD Mode # bmp = BMP085(0x77, 2) # HIRES Mode # bmp = BMP085(0x77, 3) # ULTRAHIRES Mode temp = bmp.readTemperature() # Read the current barometric pressure level pressure = bmp.readPressure() # To calculate altitude based on an estimated mean sea level pressure # (1013.25 hPa) call the function as follows, but this won't be very accurate altitude = bmp.readAltitude() # To specify a more accurate altitude, enter the correct mean sea level # pressure level. For example, if the current pressure level is 1023.50 hPa # enter 102350 since we include two decimal places in the integer value # altitude = bmp.readAltitude(102350) print "Temperature: %.2f C" % temp print "Pressure: %.2f hPa" % (pressure / 100.0) print "Altitude: %.2f" % altitude |
As you can see, there are several modes (Ultralowpower, etc) that you can specify. You are now free to customize the file to your liking and/or change.
6 Comments
hi man, I am having problem when I run the code it says “No module named ‘Adafruit_BMP085”. I have run it on the terminal window, it works there. But when I try to run it on python idle it through the above error
@Huzaifa Rahman You have to install the library after cloning
cd ~/Adafruit_Python_BMP
python2 : sudo python setup.py install
python3: sudo python3 setup.py install
Hey there, quick question, do you know if it can run offline? And can you have it save to a document where you can open it an see all of the data?
Sure, but to install and update packages, you’ll need an internet connection.
hi im using a rpi4b but this code is not really comptable whith thonny pythn if i run it im getting strange errors i have tried to debug it but it failed no more error messages but is is 0.1c in my bedroom and we are living 4000 meters underneath the sea level
do you know how to get this working
https://www.banggood.com/Digital-Barometric-40KPa-Pressure-Sensor-Module-Liquid-Water-Level-Controller-Board-p-1532086.html
I think its HX710