
After we are able to record individual images with (USB) cameras / webcams, we also want to view live pictures. This can either take place on the smartphone or on a PC fom outside of the home network. For this purpose, we configure the Livestream of the Raspberry Pi security camera. The great thing is that almost every USB camera (also webcams) can be used. Depending on placement, e.g. a camera without an infrared filter can be useful to enable better night shots.
Equipment

If we want to connect a USB camera, our Raspberry Pi must obviously have a free USB port. However, we can also use the official camera, which is available in two versions:
- Standardversion in green (US / UK), which has 8MP, and the like. Videos in 1080p can record. Since an infrared filter is installed, it is particularly suitable for daylight recording or for places with sufficient light irradiation.
- NoIR Version in black (US / UK): The specifications (resolution, etc.) are the same, but no IR filter is installed, which makes records with bad light conditions better. This is especially recommended for dark scenes.
Both cameras can be directly connected via the CSI connector on board, which means that no USB port is used. The newer Zero models (from generation 2) now also have CSI ports.
Alternatively, any USB Webcam (US / UK) can be used as long as the corresponding drivers for Linux are available. However, this is the case with almost all newer cameras. If our Raspberry Pi does not have an integrated wifi adapter, we may need one more because a network or Internet connection is unavoidable.
Preparations for the Livestream
Before we enable the stream of our Raspberry Pi camera or USB Webcam, we need to update the packages:
sudo apt-get update
sudo apt-get upgrade
Then you can install the Motion tool, which makes our Livestream possible.
sudo apt-get install motion -yThe installation will take some time.
If everything has worked so far, the camera can be connected (if not already done). If you are using a USB webcam, you can check if it has been detected:
lsusb
If no special drivers are required, all connected video devices / cameras should be displayed with the following command:
ls /dev/video*
If you are using one of the official camera modules, it is important to do the following so that the camera is displayed immediately (preferably by autostart):
sudo modprobe bcm2835-v4l2
If only a single webcam / Raspberry Pi camera is connected, by using /dev/video0 the device should be specified. If you have several devices connected, you have to select the device to transfer the stream.
Configure the Raspberry Pi Livestream
For the next steps, in which we set some settings, wee need to look at the camera details:
v4l2-ctl -V
For my USB Webcam I got the following output. We will immediately specify the information for the resolution, etc. in the configuration file.
pi@raspberrypi:~ $ v4l2-ctl -V
Format Video Capture:
        Width/Height  : 640/480
        Pixel Format  : 'YUYV'
        Field         : None
        Bytes per Line: 1280
        Size Image    : 614400
        Colorspace    : SRGB
        Flags         :
So let’s edit Motion’s configuration file:
sudo nano /etc/motion/motion.conf
The following lines have to be adjusted (the variable can be searched with CTRL + W, the bold values have been changed):
# Start in daemon (background) mode and release terminal (default: off)
daemon on
...
# Restrict stream connections to localhost only (default: on)
stream_localhost off
...
# Target base directory for pictures and films
# Recommended to use absolute path. (Default: current working directory)
target_dir /home/pi/Monitor
The following lines are optimal and should also be changed (we have read them out previously):
v4l2_palette 15     # Nummer aus der Tabelle davor entnehmen, 15 enstpricht YUYV
...
# Image width (pixels). Valid range: Camera dependent, default: 352
width 640

# Image height (pixels). Valid range: Camera dependent, default: 288
height 480 # Maximum number of frames to be captured per second.

# Valid range: 2-100. Default: 100 (almost no limit).
framerate 10
Save with CTRL + O and close with CTRL + X. Further options (port, etc.) can also be adjusted afterwards (requires a reboot). The brief description of the settings is however very revealing.
Now we only have to activate the daemon so that we can run the service afterwards:
sudo nano /etc/default/motion
Here we replace “no” with “yes”, after which it should look like the following text:
start_motion_daemon=yes
Now we have to create the folder, which we have previously specified as the storage location for the captured frames, and give it the necessary writing rights:
mkdir /home/pi/Monitor
sudo chgrp motion /home/pi/Monitor
chmod g+rwx /home/pi/Monitor
Then we can start the service:
sudo service motion start
Raspberry Pi Surveillance Camera Livestream Test
In order to test whether our camera is really sending live images, we basically have two options: One way is simply to use the browser (Mozilla Firefox, Chrome, etc.) and the name of the Raspberry Pi followed by the port (default: 8081). If you have not changed the hostname and port, you should be able to see the stream: http://raspberrypi:8081/ (Alternatively, the local IP address can be used, such as 192.168.1.51:8081).
Some older browsers do not support this stream (Internet Explorer :-D). Those users may choose the Livestream e.g. on the VLC Player. To do this, simply open the VLC Player and specify in the menu under “Media” -> “Open Network Stream” (CTRL + N) the above address. This is also possible in the VLC Player for smartphones and tablets (Android, Apple): Select “Open Media Address” in the menu and the IP address including port.
Depending on the specified Framerate (specified in the configuration file) the image is better or not. Of course, your camera must also support the framerate. If, for example, the camera can send a maximum of 10 frames per second, it does not matter if more are set in the configuration.
Make it available outside the home network
Since it makes little sense to watch the camera in its own network, we also want to access it from outside. For this we need a fixed IP or a dDNS service. Most telecommunication providers provide fixed IP addresses (if at all) only for payment, which is why we want to use a free DNS provider. Of course you can also take another vendor of your choice. If you already have a fixed IP address at home, you can skip this step.
Note: Theoretically, you can also use a non-static IP address, but this has the disadvantage that after each reconnect you’ll get a new IP address. Since Provider approximately once a day (usually at night) force a reconnect of your router, a DNS service is highly recommended, since the DNS address does not change.
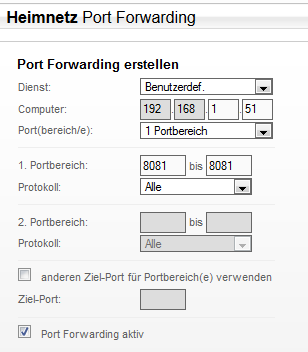
In addition, we have to open the selected port (for example 8081) in our router for port forwarding. This means that we can address this port from outside the network and connect it to it. Since this is something different for each router, refer to the corresponding manual. Under the heading “Port forwarding” or similar, you can specify the port which is opened for a specific local IP address. In my router looks like this for example:
The menu of most routers is accessible via 192.168.1.1 or 192.168.0.1 via the browser. If this is not the case, however, the manual will also tell you how to find the menu.
If you use the VLC Player, you must now of course replace the local IP address, which you have previously specified, with your DNS or static IP address (port is still the same). Some routers may fail to do this within the home network. To test it nevertheless at home, you can use mobile data on your phone for example. Turn wifi off and check if you can see the Livestream of the Raspberry Pi surveillance camera. Depending on the Internet connection (upload speed), the picture may be somewhat delayed.
68 Comments
Hello.
Great article thank you.
How is it possible to stream video from more than one camera?
Similar to “Solo”- one Pi, 2 camera solution, my solution is for 2 Pi’s with a camera each:
If you only wish to view multiple cameras inside your home network just use the ip address of the
Pi’s followed by the same port number 8081 in a browser.
eg 192.168.1.2:8081 and 192.168.1.3:8081
If you wish to view the cameras from outside your network, eg at work,
you will need to specify a different port for the 2nd camera on both the Pi and your Router. eg, 192.168.1.2:8081, and 192.168.1.3:8082.
Then use the IP address of your home and just add the port for which ever camera you wish to view.
eg http://45.167.251.78:8081 and 45.167.251.78:8082
NOTE: This requires you to know the current IP address of home. If it is not static, you will need to use a third party site to assist – as mentioned above.
Then you are done!
Very helpful article. Had a couple of stumbles, but was able to get a camera running. I am using Raspian Stretch. Cam FPS is 30. So set motion.conf to same. However, camera response is slow. Could this be due to Raspian?
In /etc/motion/motion.conf
I changed:
stream_maxrate 1 (one fps!?)
To:
stream_maxrate 30
Thanks Art. It really helped.
I tried with both Raspbian Stretch and Raspbian Stretch Lite , following the instructions, it seems to fail installing Motion – says it is already installed and “sudo modprobe bcm2835-v4l2” fails as well as “v4l2-ctl -V” fails. I am about to give up. Seems new versions break old instructables consistently.
Did you activate camera and I2C in your raspi-config?
You are using 1 instead of L, maybe?
What`s your problem, you can always delete your motion version and install another one…
Connect two cameras to the Pi, one USB camera and another Raspberry Pi camera. Set USB camera to port :8080 and Pi camera to :8081 ports. What it does it sets two cameras on two ports from one device.
Once that is set, go to web browser and enter IP address or Hostname of the Pi followed by port numbers.
That should show up in the web browser
How did you do to assign different ports to the cameras?
Audio options? I had a lot of trouble getting it up and running (I’m an RPi noob), but after a quick sudo apt-get upgrade it was solved and I was streaming. How do I incorporate live audio into the stream?
I glanced through the /etc/motion/motion.conf and noticed tons of things to tinker with, most notably, the motor controls for servos, which I’ll be playing with more down the road. I have a plan to build a home security camera system utilizing an Octapi server as the base, with 8 dual servo controlled wifi cameras based off of pi zeros. Video is great, but for my purposes, video with audio would be ideal.
But how? lol. Even if you had a link about how to set up motion for live audio along with video it would be great
Thank for steam but i always full my disk space. How to fix it!!!.
That’s because it saves surveilance pics and video to your disk. If you don’t want that:
output_pictures off
ffmpeg_output_movies off
use_extpipe off
timelapse_interval 0
Additionally, start motion with -m switch to dosable motion detetction
I just sent the pics and videos to save in /dev/null
output_pictures off
ffmpeg_output_movies off
use_extpipe off
timelapse_interval 0
(if you only need live cam: additionally, start motion with -m switch to dosable motion detetction
>> (if you only need live cam: additionally, start motion with -m switch to dosable motion detetction)
How do I change the way motion is invoked?
Hello and thank you for the nice post.
I have attached the official camera module and followed the steps gingerly.
When I test in any browser I get :
“This site can’t be reached
raspberrypi refused to connect.”
In VLC I get:
“Your input can’t be opened:
VLC is unable to open the MRL ‘http://192.168.1.30:8081’. ”
Any idea?
I have rebooted pi and motion service several times.
Best Regards,
Apostolos
OK solved it myself.
I forgot to stream_localhost off
and also added at the end of the file:
sudo nano /etc/modules
this line :
bcm2835-v4l2
Hey Apostolos,
When I open up the “sudo nano /etc/modules” and then I input the line “bcm2835-v4l2” below the “i2c-dev” line, it still doesn’t change anything and I still get the same “can’t reach this page when I try to check the livestream. Any thoughts? Thanks!
Me 2..
E-sync security is the Chennai based company which deals with all type of electronic security systems Chennai and outer with excellent customer support. We provide high resolution surveillance security systems for both domestic and commercial applications. From single camera to multi-site camera configuration, we will design a security systems that meets your surveillance security requirements. It is one of the few company which believes “SERVICE FIRST”
I am using a Raspberry Pi camera. I can grab a picture off of it. I am using bcm2835-v4l2 in etc/modules. I have a /dev/video0, but when I go http://x.x.x.x:8081 I get a grey screen saying “unable to open video device”. Any suggestions?
Me too… Trying to solve…
The Raspberry Pi camera is not support by default motion package, go to “https://motion-project.github.io/” and download the correct Motion package according your SO. I’m using Raspbian stretch and used “pi_stretch_motion_4.1.1-1_armhf.deb” Worked OK. See at ” https://www.bouvet.no/bouvet-deler/utbrudd/building-a-motion-activated-security-camera-with-the-raspberry-pi-zero” if you want more details.
I had the same problem and was not resolved with anything I had tried. I finally tried the following commands and the problem was resolved once I restarted the raspberry pi:
sudo nano /etc/modules
enter bcm2835-v4l2
exist and save the fle
sudo reboot
Additionally, when copying and pasting the commands we must make sure that the letter l is not printed us a number 1 . For example the command v4l2-ctl -V and the command v412-ct1 -V, are different. This bug can happen, when use copy paste for commands.
Any reason the stream is sooooo slow and laggy. It’s like it’s running at 5FPS. If this is the best it can go it’s pretty much pointless 🙁
I changed:
stream_maxrate 1
To:
stream_maxrate 30
This made the live part go way faster.
This part:
v4l2_palette 15 # Nummer aus der Tabelle davor entnehmen, 15 enstpricht YUYV
I can’t find it. I found all the rest, but that one looks like German and mine is in English.
(First of all, I’m a raspberry pi noob. Second, I tried the translator.)
Any suggestions?
Thanks in advance.
Plus, I tried finding Nummer by ctrl+W, but it says “Nummer” not found.
I did try finding v4l2 and it was followed by:
#Tuner device to be used for capturing using tuner as source (default /dev/tuner0)
Also: in sudo modprobe bcm2835-v4l2, I’ve got nothing and when I input /dev/video0, it says access denied…. I know there is a lot of questions, but please help..
[0:motion] [NTC] [ALL] conf_load: Processing thread 0 – config file /home/pi/.mo tion/motion.conf
[0:motion] [ALR] [ALL] conf_cmdparse: Unknown config option “mmalcam_name”
[0:motion] [NTC] [ALL] motion_startup: Motion 4.0 Started
[0:motion] [ERR] [ALL] create_path: Problem creating directory /var/log/motion: Permission denied
[0:motion] [EMG] [ALL] motion_startup: Exit motion, cannot create log file /var/ log/motion/motion.log: Permission denied
Message from syslogd@raspberrypi at Sep 22 13:31:06 …
motion: [0:motion] [EMG] [ALL] motion_startup: Exit motion, cannot create log f ile /var/log/motion/motion.log: Permission denied
Broadcast message from systemd-journald@raspberrypi (Sat 2018-09-22 13:31:06 CES T):
motion[1775]: [0:motion] [EMG] [ALL] motion_startup: Exit motion, cannot create log file /var/log/motion/motion.log: Permission denied
i got this after i wanted to start motion
Try enterning it again with ¨sudo¨. :))
How to use the -m switch to disable the motion activated. is it when we start the service?
Great post, followed instructions and got it working! One suggestion (helpful for beginners like me):
Explain where and how you would add a command so it runs during the boot (sudo modprobe bcm2835-v4l2), that would make the article complete.
I have one issue (i have the system one day running, so not sure whether this is a persisent issue): It seemed the camera wasn’t correcting its brightness/exposure this morning. So the stream and images were overexposed (80% white). After a reboot it was fine.
Great job. However, I tried all the steps but I cannot reach http://raspberrypi:8081/
Any Suggestions, please.
Leave off the last /
It worked for me.
Thank you for creating this guide. I’ve successfully created it and streaming in my LAN as a baby monitor. But for some reason I occasionally can’t access and the error states that the connection is refused even it was working a few minutes ago, is there a fix on it?
Also I found a real easy way to start bcm2835 on boot. Open etc/modules with:
sudo nano /etc/modules
then add
bcm2835-v4l2
it automatically boots up every time.
Broken tutorial
Will this program start on boot? I don’t want it start automatically, use motion sensing, or save to the disk. I just want a stupid simple live stream that I can start when and if I want it too. Thanks.
Thank you, great job! I have completed the project!
Hi,
I have tried using this tutorial and it does’t seem to want to work for me.
I have gone over it multiple times and i still can’t get it to work.
The IP address for my pi is correct but when i try to connect it says this site cant be reached and refused to connect.
If anyone can help i would be grateful.
Thanks
Perfect video tutorial, easy to follow. I had the same problem with my old asus and couldn’t fix it on my own. I followed your tutorial and it was fixed in a breeze.
How do you set it up for multiple cameras? Like for example if I had a picamera and a webcam?
Great tutorial – was up and running in 10 minutes!
Is there any way to disable the LED on the Arducam Pi specific camera? It’s really bright.
Thanks. I know next to nothing about the Linux thingy but I got it working with your help. I disagree with your statement “Since it makes little sense to watch the camera in its own network” Makes perfect sense to me.
my mobile phone browser (not connected to wifi) wont connect to my ddns.net address
The Blog Was Great.
Hello, I am trying to save details in the database and while it seems to save a line in the database every time a create a new file, t also generates an error.
[1:ml1] [ERR] [DBL] [Oct 07 20:43:43] do_sql_query: Mysql query failed You have an error in your SQL syntax; check the manual that corresponds to your MariaDB server version for the right syntax to use near ‘sql_query_start insert into security_events(camera, event_time_stamp) values(‘0” at line 1 error code 1064: Resource temporarily unavailable
Any idea?
Is there any way to get a colored stream instead of greyscale?
How do I add a user and password login for the stream that actually works?
it should automatically be in color. Try deleting motion and reinstalling it, or rebooting your pi
I did all this, and it works great, but now I want to uninstall or stop so my camera can be used by Zoom. Is that possible, or should I make a new SD card?
I am dealing with a 4 second latency and slow frame rate.
# Maximum number of frames to be captured per second.
# Valid range: 2-100. Default: 100 (almost no limit).
framerate 100
# Live
Stream Server
############################################################
# The mini-http server listens to this port for requests (default: 0 = disabled)
stream_port 8081
# 50% scaled down substream (default: 0 = disabled)
# substream_port 8082
# Quality of the jpeg (in percent) images produced (default: 50)
stream_quality 50
# Output frames at 1 fps when no motion is detected and increase to the
# rate given by stream_maxrate when motion is detected (default: off)
stream_motion off
# Maximum framerate for stream streams (default: 1)
stream_maxrate 80 ### It doesn’t matter what I put in here.####
# Restrict stream connections to localhost only (default: on)
stream_localhost off
# Limits the number of images per connection (default: 0 = unlimited)
# Number can be defined by multiplying actual stream rate by desired number of seconds
# Actual stream rate is the smallest of the numbers framerate and stream_maxrate
stream_limit 0
# Set the authentication method (default: 0)
# 0 = disabled
# 1 = Basic authentication
# 2 = MD5 digest (the safer authentication)
stream_auth_method 0
# Authentication for the stream. Syntax username:password
# Default: not defined (Disabled)
; stream_authentication username:password
# Percentage to scale the stream image for preview
# This is scaled on the browser side, motion will keep sending full frames
# Default: 25
; stream_preview_scale 25
# Have stream preview image start on a new line
# Default: no
; stream_preview_newline no
camera is upside down and I cannot change orientaion….
As well can’t change camera name
If I log into the pi using :8765 I can change settings but nothing happens
I’m looking into this as a possible idea for a remote monitoring site over a 4G wifi connection. Anyone know if its possible to open up ports on a 4G router and are there any recommended carriers/routers that do support this?
Hey, I got this working perfectly, thanks.
Wondering if there is a way to setup login criteria for the feed its self.
Just abandon all the stuff above and install MotionEye or MotionEyeOS. It will give streaming, camera control web interface and login control. (Or try RPi_Cam_Web_Interface)
Hi. I have a gsm modem and would like to capture an image and have it sent to me via SMS. How can I do this??
Id like to know how can I make this setup as a motion sensor camera?
Just abandon all the stuff above and install MotionEye or MotionEyeOS. It will give streaming, camera control web interface and login control. (Or try RPi_Cam_Web_Interface)
how do i tell it to not record, just want to keep it streaming
OMG!!! THANK YOU!!!! I LOOKED ALL OVER TO SOLVE THIS ISSUE!!! I have used skype and it worked fine… Then of course I have a presentation I need to record tomorrow and couldn’t get it to open!! I was like what the hell is going on!!?? I almost left to go buy a camera to hook up!!! YOU ARE THE BEST!!! THANK YOU!!!!
Harold Burton
What happens when the sd card is full? Does it delete the oldest files ?
Great guide. Up and running in 10 min. needed to reboot and then all worked!
please let me know the changes needed to be done to see the live stream only without saving any pictures or videos to the storage(in ‘~/Monitor’). I do not need to store any video or image, I only need to check the current position to make sure it is getting the correct frame.
Also I need this live stream to be temporary, so is there a way of running the motion command so that the stream is active only while it is active on the terminal and will stop once the motion command is exited with a ^C (ctrl+c) or something.
Thanks
my Dell Inspiron 15 7569 laptop has an integrated camera, it records and takes video flipping the image, any solution on how I can fix that and how I can record as how the image is previewed, it uses the windows 10 camera app.
CrazyAsk
sudo nano /etc/default/motion
Doesn’t exist on my Pi4.
Game over.