In many projects, the Raspberry Pi is used as a surveillance camera or for machine learning tasks. Here you can often see text in images that is of interest to the application. We want to extract this and convert it so that we can analyze the text with a program. This type of text recognition is also possible with the Raspberry Pi, and it’s not even difficult. We either read text from static images or a camera live stream.
In this tutorial, we will look at how we can implement text recognition with the Raspberry Pi and what we need for it.
Required Components Before You Start
The main part of the application is purely software-based. Therefore, we only require a small amount of hardware to set up the text recognition. We will need and use the following components.
- Powerful Raspberry Pi (e.g. Model 4)
- Official Raspberry Pi camera
- alternatively: USB webcam
- Power connection: micro USB cable and USB adapter
Screen, keyboard and mouse can be used, but since we work remotely on the Raspberry Pi, we don’t necessarily need them.
Therefore, you should have set up your Raspberry Pi accordingly, as well as enabled SSH and also established a remote desktop connection. After that, we can start directly.
What is Text Recognition (OCR) and How Does it Work on the Raspberry Pi?
In short, text recognition (optical character recognition or OCR for short) on images is rather a recognition of individual letters. If these are close enough together, they form a word.
We have seen in previous tutorials that we can train a model that recognizes objects on images. If we now train all (Latin) letters – instead of objects – we could also recognize them again by means of our model.
In theory, this works, but it is associated with a lot of effort. Different fonts, colors, formatting, etc. would have to be trained first. However, we want to save the time needed for this.
Therefore, we use the Tesseract library from Google. This already includes such models and has been optimized by many developers.
Installing the Tesseract OCR Library
We can either compile Tesseract ourselves or simply install it via the package manager. The latter is easily done via the following command:
sudo apt install tesseract-ocr
We can easily check if the installation worked with tesseract -v.
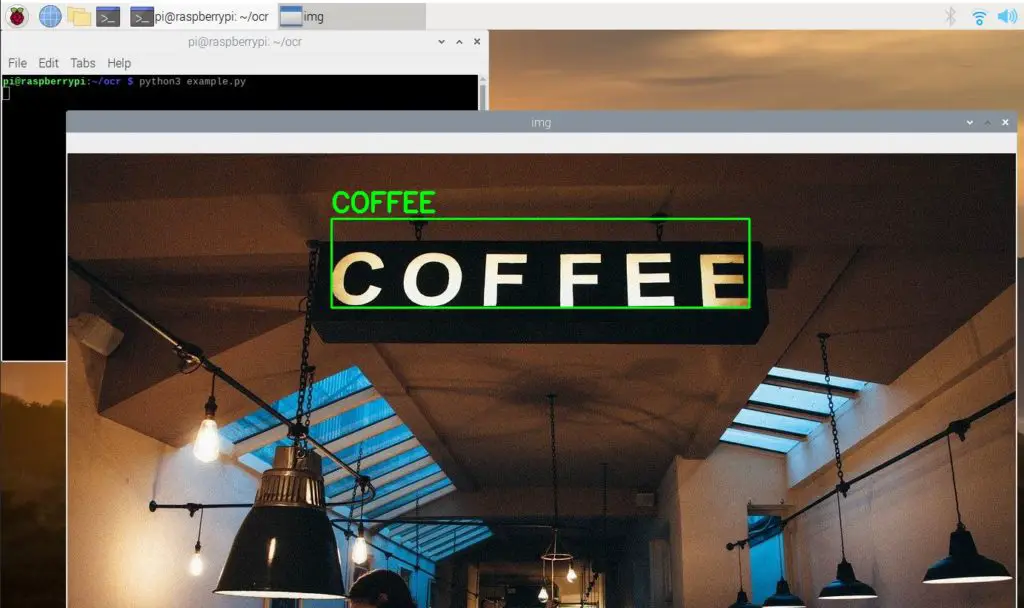
Now we can already do the first small test. For that we will use this image:

You can download it herewith:
wget https://tutorials-raspberrypi.de/wp-content/uploads/coffee-ocr.jpg
Then we execute the following command:
tesseract coffee-ocr.jpg stdout
The output looks like this:
Warning: Invalid resolution 0 dpi. Using 70 instead.
Estimating resolution as 554
COFFEE
So in our input image, the text “COFFEE” was recognized.
Since we want to use the whole thing in a Python script, we require some libraries like OpenCV and a Python wrapper for Tesseract. We install this via the Python package manager:
pip3 install opencv-python pillow pytesseract imutils numpy
Testing Text Recognition on the Raspberry Pi – via Python Script
So far we have tried to recognize words only on the unprocessed, colored image. Preprocessing steps can often improve the result. For example, by converting the color image into a grayscale image. On the other hand, we can also try to detect edges within an image to better highlight letters/words.
So let’s start by enabling text recognition on the Raspberry Pi using a Python script. For this, we create a folder and a file.
mkdir ocr
cd ocr
sudo nano example.py
We insert the following content:
|
1 2 3 4 5 6 7 8 9 10 11 12 13 14 15 16 17 18 19 20 21 22 23 24 25 26 27 28 29 30 31 32 33 34 35 36 37 38 39 40 41 42 43 44 45 46 47 48 |
import cv2 import pytesseract import numpy as np from pytesseract import Output img_source = cv2.imread('images/coffee.jpg') def get_grayscale(image): return cv2.cvtColor(image, cv2.COLOR_BGR2GRAY) def thresholding(image): return cv2.threshold(image, 0, 255, cv2.THRESH_BINARY + cv2.THRESH_OTSU)[1] def opening(image): kernel = np.ones((5, 5), np.uint8) return cv2.morphologyEx(image, cv2.MORPH_OPEN, kernel) def canny(image): return cv2.Canny(image, 100, 200) gray = get_grayscale(img_source) thresh = thresholding(gray) opening = opening(gray) canny = canny(gray) for img in [img_source, gray, thresh, opening, canny]: d = pytesseract.image_to_data(img, output_type=Output.DICT) n_boxes = len(d['text']) # back to RGB if len(img.shape) == 2: img = cv2.cvtColor(img, cv2.COLOR_GRAY2RGB) for i in range(n_boxes): if int(d['conf'][i]) > 60: (text, x, y, w, h) = (d['text'][i], d['left'][i], d['top'][i], d['width'][i], d['height'][i]) # don't show empty text if text and text.strip() != "": img = cv2.rectangle(img, (x, y), (x + w, y + h), (0, 255, 0), 2) img = cv2.putText(img, text, (x, y - 10), cv2.FONT_HERSHEY_SIMPLEX, 1.2, (0, 255, 0), 3) cv2.imshow('img', img) cv2.waitKey(0) |
Let’s look at the individual, interesting lines:
- Importing the libraries (line 1-4)
- Load the image (line 5), adjust the path if necessary!
- Preprocessing functions, for converting to gray values (lines 9-23)
- Line 32: Here we extract any data (text, coordinates, score, etc.)
- In order to be able to colorize the boxes afterwards, we convert the grayscale image back into an image with color channels if necessary (lines 36-37)
- Starting from line 39, the boxes that have a score above 60 will be colored.
- For this we extract text, start coordinates and dimensions of the box in line 41.
- Only if a (non-empty) text was detected, we draw the box (43-45).
- Then we run the script and wait for the escape key to be pressed (lines 47/48).
We now run the script:
python3 example.py
Then the 5 different images appear one after the other (press ESC to make the next image appear). The recognized text is marked on it. This way, you can determine which preprocessing step is best for you.
Recognize Text in Live Images via Raspberry Pi Camera
So far, we have only used static images as input for our text recognition. Now, we would also like to recognize texts in the live stream of the connected camera. This requires only a few small changes to our previous script. We create a new file:
sudo nano ocr_camera.py
The file gets the following content:
|
1 2 3 4 5 6 7 8 9 10 11 12 13 14 15 16 17 18 19 20 21 22 23 24 25 26 27 28 29 30 |
import cv2 import pytesseract from pytesseract import Output cap = cv2.VideoCapture(0) cap.set(cv2.CAP_PROP_BUFFERSIZE, 1) while True: # Capture frame-by-frame ret, frame = cap.read() d = pytesseract.image_to_data(frame, output_type=Output.DICT) n_boxes = len(d['text']) for i in range(n_boxes): if int(d['conf'][i]) > 60: (text, x, y, w, h) = (d['text'][i], d['left'][i], d['top'][i], d['width'][i], d['height'][i]) # don't show empty text if text and text.strip() != "": frame = cv2.rectangle(frame, (x, y), (x + w, y + h), (0, 255, 0), 2) frame = cv2.putText(frame, text, (x, y - 10), cv2.FONT_HERSHEY_SIMPLEX, 1.0, (0, 0, 255), 3) # Display the resulting frame cv2.imshow('frame', frame) if cv2.waitKey(1) & 0xFF == ord('q'): break # When everything done, release the capture cap.release() cv2.destroyAllWindows() |
What we have changed now:
- In lines 5-6, we define the camera, instead of a fixed image. The camera must be connected and recognized.
- In line 10 we then read out the current frame.
- We have omitted preprocessing steps here, but these can be inserted quite easily as well (in line 11).
Last but not least, we run the script as well:
python3 ocr_camera.py
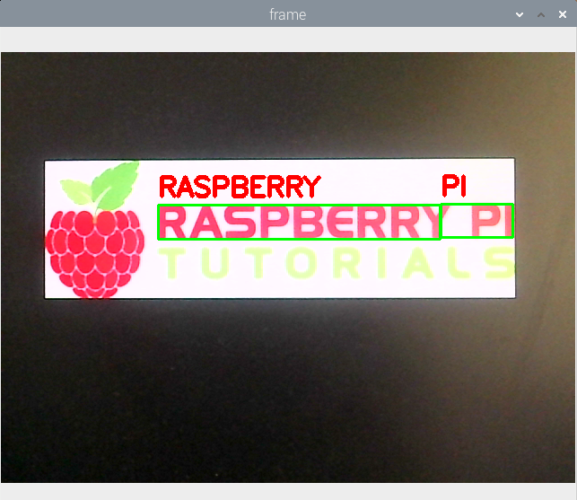
Now hold the camera over a text and watch how the words on it are recognized:

In my example, you can see well that a conversion to a gray value image would have made sense because the word “Tutorials” is too bright.
Text Recognition in Additional Languages
Tesseract has only English installed as language by default. We can check this with this:
tesseract --list-langs
If you want to add more languages in which texts should be recognized, this is done as follows:
sudo apt-get install tesseract-ocr-[lang]
Replace [lang] with the abbreviation of the language (all installs all existing ones).
Then you can select the language in the Python script. Add the parameter:
|
1 |
d = pytesseract.image_to_data(img, lang='eng') |
Conclusion
With Tesseract we have a powerful tool that provides out-of-the-box text recognition for images or frames. This means that we do not have to train and create our own machine learning model. Despite the relatively high computational effort, the Raspberry Pi text recognition works very well. The result can be improved with various processing steps.
By the way, you can also find both scripts in the Github-Repository.


8 Comments
How fast is it reading and recognizing the text? Can all be done in less than 250 milliseconds?
I get blank output with the suggested “tesseract coffee-ocr.jpg stdout” command.
I found by specifying a page segmentation model parameter I could get some output. “tesseract coffee-ocr.jpg stdout –psm 6” gives me
ee COFFEE
aoe
en) o- . Lt . Pd we =.
omy AE Vay
Pa, ee pon , ”
Same issue here.
Raspberry PI4
Could you please help us?
I had the same but I solved it by adding dash between image and –psm. Correct command:
“tesseract coffee-ocr.jpg stdout – –psm 6”
I am having trouble to install opencv-python 🙁 Does someone has an idea why? And, maybe, a solution 😉
***
Failed to build opencv-python
ERROR: Could not build wheels for opencv-python which use PEP 517 and cannot be installed directly
am using raspberry pi 2 but i have failed to install open cv yet i have updated and upgraded it to the latest version could the problem be the RAM
Is this project still alive? What raspberry OS is used?
Code adaptation for those who want to use ArduCam with the python library (picamera2):
import cv2
import pytesseract
from pytesseract import Output
from picamera2 import MappedArray, Picamera2, Preview
QT_DEBUG_PLUGINS = 1
picam2 = Picamera2()
picam2.configure(picam2.create_preview_configuration({“size”: (1024, 768)}))
picam2.start_preview(Preview.QTGL)
picam2.start()
while True:
# Capture frame-by-frame
frame = picam2.capture_array()
d = pytesseract.image_to_data(frame, output_type=Output.DICT)
n_boxes = len(d[‘text’])
for i in range(n_boxes):
if int(d[‘conf’][i]) > 60:
(text, x, y, w, h) = (d[‘text’][i], d[‘left’][i], d[‘top’][i], d[‘width’][i], d[‘height’][i])
# don’t show empty text
if text and text.strip() != “”:
frame = cv2.rectangle(frame, (x, y), (x + w, y + h), (0, 255, 0), 2)
frame = cv2.putText(frame, text, (x, y – 10), cv2.FONT_HERSHEY_SIMPLEX, 1.0, (0, 0, 255), 3)
# Display the resulting frame
cv2.imshow(‘frame’, frame)
if cv2.waitKey(1) & 0xFF == ord(‘q’):
break
# When everything done, release the capture
cap.release()
cv2.destroyAllWindows()