Node.JS is a server platform that uses JavaScript. Originally developed for the Google Chrome browser, it is very resource-efficient, which makes the use of a Raspberry Pi Node.JS web server interesting. In addition to the advantages of asynchronous applications, Node.JS offers a very simple but powerful method to install and use different plugins or libraries, using the internal package manager “npm”.
This tutorial shows you how to set up and configure a Raspberry Pi NodeJS server. In addition, I have written a small program for Node, which can control the GPIOs of the Raspberry Pi.
A NodeJS server is a prerequisite for many different applications, such as HomeBridge. Many other projects, for which a server is needed, can also be realized with a Raspberry Pi and NodeJS.
Used Hardware
Because of the better performance compared to the previous versions and especially because of the ARMv8 architecture, I recommend a Raspberry Pi 3. In addition, your router must support portforwarding, if you want to call the applications outside of your home network. I recommend for this a FRITZ!Box or similar.
In order to be able to reproduce the small example at the end, the following hardware is also required:
- Some LEDs
- 330Ω resistors
- Breadboard
- Female-Female Jumper Kabel
In addition, I recommend using the SSH access, as well as optimally from an FTP service, to simply transfer files to the Raspberry Pi.
Installation of Node.JS on the Raspberry Pi
Before we install Node, we update the packages and package sources to have everything you need:
sudo apt-get update
sudo apt-get full-upgrade
The process may take some time. Since Node.JS is not in the predefined package sources, we must add it first. The latest LTS version can be viewed on the Node.JS website and adapted accordingly.
curl -sL https://deb.nodesource.com/setup_6.x | sudo -E bash -
Now we can easily install Node via the internal package manager, which may take a little time:
sudo apt-get install -y nodejs
First Test
If the installation went through without any problems, we can simply write the following in the console to see if everything has worked:
node --version
The latest version should now be displayed.
Now let’s begin with a little Hello-World! program. We are creating a new file.
sudo nano hello-world.js
Here we add the following content:
|
1 2 3 4 5 6 7 8 9 10 11 12 13 14 |
// Load the http module to create an http server. var http = require('http'); // Configure our HTTP server to respond with Hello World to all requests. var server = http.createServer(function (request, response) { response.writeHead(200, {"Content-Type": "text/plain"}); response.end("Hello World\n"); }); // Listen on port 8000, IP defaults to 127.0.0.1 server.listen(8000); // Put a friendly message on the terminal console.log("Server running at http://127.0.0.1:8000/"); |
We then save and close the editor (CTRL + O, CTRL + X). You can now start the server simply by entering the following in the terminal:
node hello-world.js
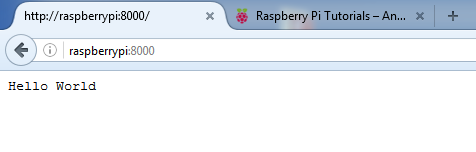
You can now view the page in the browser. Enter either the IP of your Pi in the network including the port (e.g., 192.168.1.68:8000) or (if your router supports it) simply the name of the host including port. For me, this is http://raspberrypi:8000/
PS: We use port 8000 in this example. The default port for web servers is 80. However, Node.js requires root privileges for ports that are less than 1000.
If you want to permanently access the server from outside your home network, it makes sense to install a DNS server. Of course, the selected ports must also be selected and enabled in your router via port forwarding for the internal IP address of your Raspberry Pi.
NPM – NodeJS Package Manager
With the help of the NPM (Node.js Package Manager), additional libraries can be easily installed and used in a node project. Typically, a created project has a file named “package.json” in the root directory. In this file “dependencies” are used to specify the packages used (minimum required). If you use / download another project, the required packages must first be installed. To do this, change to the directory where the package.json is located and enter:
npm install
All necessary packages are installed. However, it is not absolutely necessary that you enter your used packages by hand. If you want to use a new package (in our case it is rpio) you can specify the parameter --save and the package will be automatically added to the package.json file:
npm install rpio --save
For further instructions and explanations, you can take a look at the NPM documentation.
Control Raspberry Pi GPIOs via web interface
If your sample file is still running, you can terminate it by pressing CTRL + C.
I have written a small application that allows you to control your GPIOs via the web interface (desktop PC browser, smart phone, tablet). Since this is only a small example, the output can only be controlled. However, it is also easy to define GPIOs as inputs and to read them out. As a basis I took the NPM package rpio.
For a simple test, you can clone the GitHub package:
git clone https://github.com/tutRPi/Raspberry-Pi-Simple-Web-GPIO-GUI
cd Raspberry-Pi-Simple-Web-GPIO-GUI
Before we start the server, the other packages have to be installed:
npm install
The Raspberry Pi Node.JS server can then be started. Since we use the GPIOs we have to start it with sudo. So I decided to run the server on port 80, because we can easily access it via the hostname or internal IP of the Pi without specifying the port. The prerequisite is that nothing else is running on this port (such as Apache2). So we start now:
sudo npm start
Back in the web browser, you can see the user interface for controlling the GPIOs (no port required). For this, it must be said that the GPIOs are initially displayed as “OFF”, even if another application has previously connected one of the pins. This is because the library unfortunately can not read the output state of the GPIOs. Although you could start the web app all GPIOs to the low level, but I have decided to not do that. If this bothers you, you are free to adjust it.
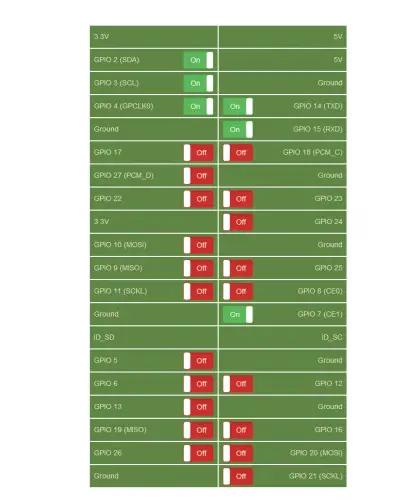
Furthermore, I’ve recorded it to show how the control would look through the web interface. If you want to see the structure of the sample circuit, you can do this here. Basically, however, it is quite simple, since an LED with a series resistor was simply attached to the individual (controllable) GPIOs.
Auto boot of the Raspberry Pi Node.js Server
Finally, we want to start the server automatically after rebooting of the Raspberry Pi. Otherwise, the server would end at shutdown and you would have to be activated again by hand.
Before we can create the entry for automatic starting from our server application, we have to find the path where Node is located (by default, this is /usr/bin/node).
pi@raspberrypi:~ $ which node
/usr/bin/node
Now we need the complete the path where our javascript file (app.js) is located. By using ls, we can display the files that are present in the folder and with pwd the path.
These two values are copied to create now a new entry:
sudo crontab -e
At the end of this file, entries can be added, which are run e.g. after a reboot or at a certain point in time. To start our application automatically after rebooting, we add the following line to the end of the file (if necessary, adjust the paths):
@reboot sudo /usr/bin/node /home/pi/Raspberry-Pi-Simple-Web-GPIO-GUI/app.js &
Save it with CTRL + O and exit with CTRL + X (Nano Editor). To check if everything has worked, you can restart the Raspberry Pi (sudo reboot) and then call the URL in your browser again. If the page is displayed, everything has worked.
The applications that you can run on your Raspberry Pi Node.JS server are almost unlimited. From the pure GPIO control, via a surface for home automation to the monitoring server for individual services or sensors. Due to the low power consumption of the Raspberry Pi and still comparatively high performance, the Raspberry Pi is an ideal server for small (hobby) projects.
23 Comments
Greetings,
Help! Followed your tutorial and this is what I got.
pi@raspberrypi:~ $ node hello-world.js
/home/pi/hello-world.js:2
2 var http = require(‘http’);
^^^
SyntaxError: Unexpected token var
at createScript (vm.js:56:10)
at Object.runInThisContext (vm.js:97:10)
at Module._compile (module.js:542:28)
at Object.Module._extensions..js (module.js:579:10)
at Module.load (module.js:487:32)
at tryModuleLoad (module.js:446:12)
at Function.Module._load (module.js:438:3)
at Module.runMain (module.js:604:10)
at run (bootstrap_node.js:383:7)
at startup (bootstrap_node.js:149:9)
pi@raspberrypi:~ $
Try to insert
'use strict';in the first line and removevar.Hi,
This server is going to be my long term solution (I hope). I continued with the instructions you provided for your web interface and it works GREAT! The only wish I have now is that I can use a port other than 80. I looked around in the program files for .config type file but so far have found nothing. MY SITE {http://dominotopple.mywire.org:61/index.htm}
Thanks so much for your time in making this available!!!
Doesn’t work.
For whatever reason, I can use Arduino / ATMega things just fine. The Raspberry Pi, which should be great for GPIO, SUCKS. It’s great for emulating retro games, but for anything hardware related, it’s literally the biggest waste of time I’ve encountered in the maker space. You can spend hours downloading, and setting things up, with no idea if any of it will work. Load the example code…. and nothing. Some random error message. Absolute garbage.
Web applications are not easy because you need to link many files together.
Try to follow this tutorial to start: https://www.w3schools.com/nodejs/nodejs_raspberrypi_webserver_websocket.asp
Or try Node-Red : https://nodered.org/, https://youtu.be/RXvpYHK2Q-I which I did after giving up 😉
Seems to work fine, which was not the case with other tutorials, but after a while of turning an LED off and on I get this: POST /ajax 500 76.029 ms – 1782
bcm2835_init: gpio mmap failed: Cannot allocate memory JS on GPIO has great promise, but not a lot of stability was my thought until trying your tutorial. If the error mentioned can be solved, I will be happy to put far more effort into JS on GPIO. For what it is, your tutorial is a tremendous help.
It does not seem to work for more than a few minutes without incurring a chronic error for which the application needs to be restarted. Too bad, it was a great tutorial in getting started. If I am overlooking something, or there is a fix, please let me know. JS is more responsive than Python, but Python is stable. RPi and JS are the way forward for future IoT development.
Hi,
Perhaps I am missing something big but I am successful up until the step where I type npm install into the raspberry pi terminal. The terminal replies ‘command not found’. Any idea what I’m doing wrong? Thanks.
In ccase others fall into this. Probably you didn’t install node js properly or it’s not in your path. Type ‘which node’ in terminal to double check.
Greg, try just sudo apt-get install npm first, it worked for me.
This is there a nifty little project , and I am enjoying it. I was able to get it running first try and it seems to be quite stable . The only problem I have is when I go to look at the Python and javascript code it is WAY more complicated than I would have expected. This is certainly not a beginners project!
How long did you run it for? Some say it becomes unstable after a while
You can try running it as a service instead, so any crash it will be automatically restarted. Instead of adding a cron job just create a unit service (enable and start it).
Hi, followed this exactly ( I know nothing about Linux). All works bar for the starting on reboot. paths are identical to this so I literally copied and pasted the line in crontab , checked the entry is definitely there but it will not start. To start I change directory to the app and then run sudo npm start and that fires it up. If i close the terminal the app stops working. I just want it to start automatically and run continously – could anyone help me?
You should better run it as a service. Otherwise, make sure cron is actually running, that is a service too.
Absolutely crap tutorial. So many errors it is impossible to debug. That’s the problem of modern technologies, they look nice, but are very faulty.
Plain C rules.
That’s not true, it cant be perfect. You need to have some knowledge of node js, npm and linux (not more than a week of reading) and get this going. If there is a particular error you get just ask here or stack exchange sites.
Very good, is it possible to switch via http://post?
Works great for me (mostly). I can get to it from the browser on my phone, and I see feedback on the terminal when I hit the buttons. However, I can’t get the GPIO working. I’ve tried installing RPIO with “sudo pip install RPIO” but that didn’t fix it. When I start the server, I see a line that says “WARNING: Hardware auto-detect failed, running in raspi-3 mock mode”. Any thoughts on how I can get the GPIO working?
me tooo
pi@raspberrypi:~/Raspberry-Pi-Simple-Web-GPIO-GUI $ sudo npm start
> Raspberry-Pi-Simple-Web-GPIO-GUI@1.0.0 start
> node ./bin/www
/home/pi/Raspberry-Pi-Simple-Web-GPIO-GUI/node_modules/bindings/bindings.js:96
throw err
^
Error: Could not locate the bindings file. Tried:
→ /home/pi/Raspberry-Pi-Simple-Web-GPIO-GUI/node_modules/rpio/build/rpio.node
→ /home/pi/Raspberry-Pi-Simple-Web-GPIO-GUI/node_modules/rpio/build/Debug/rpio.node
→ /home/pi/Raspberry-Pi-Simple-Web-GPIO-GUI/node_modules/rpio/build/Release/rpio.node
→ /home/pi/Raspberry-Pi-Simple-Web-GPIO-GUI/node_modules/rpio/out/Debug/rpio.node
→ /home/pi/Raspberry-Pi-Simple-Web-GPIO-GUI/node_modules/rpio/Debug/rpio.node
→ /home/pi/Raspberry-Pi-Simple-Web-GPIO-GUI/node_modules/rpio/out/Release/rpio.node
→ /home/pi/Raspberry-Pi-Simple-Web-GPIO-GUI/node_modules/rpio/Release/rpio.node
→ /home/pi/Raspberry-Pi-Simple-Web-GPIO-GUI/node_modules/rpio/build/default/rpio.node
→ /home/pi/Raspberry-Pi-Simple-Web-GPIO-GUI/node_modules/rpio/compiled/15.5.0/linux/arm/rpio.node
at bindings (/home/pi/Raspberry-Pi-Simple-Web-GPIO-GUI/node_modules/bindings/bindings.js:93:9)
at Object. (/home/pi/Raspberry-Pi-Simple-Web-GPIO-GUI/node_modules/rpio/lib/rpio.js:17:34)
at Module._compile (node:internal/modules/cjs/loader:1108:14)
at Object.Module._extensions..js (node:internal/modules/cjs/loader:1137:10)
at Module.load (node:internal/modules/cjs/loader:973:32)
at Function.Module._load (node:internal/modules/cjs/loader:813:14)
at Module.require (node:internal/modules/cjs/loader:997:19)
at require (node:internal/modules/cjs/helpers:92:18)
at Object. (/home/pi/Raspberry-Pi-Simple-Web-GPIO-GUI/routes/ajax.js:1:12)
at Module._compile (node:internal/modules/cjs/loader:1108:14) {
tries: [
‘/home/pi/Raspberry-Pi-Simple-Web-GPIO-GUI/node_modules/rpio/build/rpio.node’,
‘/home/pi/Raspberry-Pi-Simple-Web-GPIO-GUI/node_modules/rpio/build/Debug/rpio.node’,
‘/home/pi/Raspberry-Pi-Simple-Web-GPIO-GUI/node_modules/rpio/build/Release/rpio.node’,
‘/home/pi/Raspberry-Pi-Simple-Web-GPIO-GUI/node_modules/rpio/out/Debug/rpio.node’,
‘/home/pi/Raspberry-Pi-Simple-Web-GPIO-GUI/node_modules/rpio/Debug/rpio.node’,
‘/home/pi/Raspberry-Pi-Simple-Web-GPIO-GUI/node_modules/rpio/out/Release/rpio.node’,
‘/home/pi/Raspberry-Pi-Simple-Web-GPIO-GUI/node_modules/rpio/Release/rpio.node’,
‘/home/pi/Raspberry-Pi-Simple-Web-GPIO-GUI/node_modules/rpio/build/default/rpio.node’,
‘/home/pi/Raspberry-Pi-Simple-Web-GPIO-GUI/node_modules/rpio/compiled/15.5.0/linux/arm/rpio.node’
]
}
npm ERR! code 1
npm ERR! path /home/pi/Raspberry-Pi-Simple-Web-GPIO-GUI
npm ERR! command failed
npm ERR! command sh -c node ./bin/www
npm ERR! A complete log of this run can be found in:
npm ERR! /root/.npm/_logs/2021-01-03T00_01_25_781Z-debug.log
i have problem with “sudo nano start”
pi@raspberrypi:~/Raspberry-Pi-Simple-Web-GPIO-GUI $ sudo npm start
> Raspberry-Pi-Simple-Web-GPIO-GUI@1.0.0 start
> node ./bin/www
/home/pi/Raspberry-Pi-Simple-Web-GPIO-GUI/node_modules/bindings/bindings.js:96
throw err
^
Error: Could not locate the bindings file. Tried:
→ /home/pi/Raspberry-Pi-Simple-Web-GPIO-GUI/node_modules/rpio/build/rpio.node
→ /home/pi/Raspberry-Pi-Simple-Web-GPIO-GUI/node_modules/rpio/build/Debug/rpio.node
→ /home/pi/Raspberry-Pi-Simple-Web-GPIO-GUI/node_modules/rpio/build/Release/rpio.node
→ /home/pi/Raspberry-Pi-Simple-Web-GPIO-GUI/node_modules/rpio/out/Debug/rpio.node
→ /home/pi/Raspberry-Pi-Simple-Web-GPIO-GUI/node_modules/rpio/Debug/rpio.node
→ /home/pi/Raspberry-Pi-Simple-Web-GPIO-GUI/node_modules/rpio/out/Release/rpio.node
→ /home/pi/Raspberry-Pi-Simple-Web-GPIO-GUI/node_modules/rpio/Release/rpio.node
→ /home/pi/Raspberry-Pi-Simple-Web-GPIO-GUI/node_modules/rpio/build/default/rpio.node
→ /home/pi/Raspberry-Pi-Simple-Web-GPIO-GUI/node_modules/rpio/compiled/15.5.0/linux/arm/rpio.node
at bindings (/home/pi/Raspberry-Pi-Simple-Web-GPIO-GUI/node_modules/bindings/bindings.js:93:9)
at Object. (/home/pi/Raspberry-Pi-Simple-Web-GPIO-GUI/node_modules/rpio/lib/rpio.js:17:34)
at Module._compile (node:internal/modules/cjs/loader:1108:14)
at Object.Module._extensions..js (node:internal/modules/cjs/loader:1137:10)
at Module.load (node:internal/modules/cjs/loader:973:32)
at Function.Module._load (node:internal/modules/cjs/loader:813:14)
at Module.require (node:internal/modules/cjs/loader:997:19)
at require (node:internal/modules/cjs/helpers:92:18)
at Object. (/home/pi/Raspberry-Pi-Simple-Web-GPIO-GUI/routes/ajax.js:1:12)
at Module._compile (node:internal/modules/cjs/loader:1108:14) {
tries: [
‘/home/pi/Raspberry-Pi-Simple-Web-GPIO-GUI/node_modules/rpio/build/rpio.node’,
‘/home/pi/Raspberry-Pi-Simple-Web-GPIO-GUI/node_modules/rpio/build/Debug/rpio.node’,
‘/home/pi/Raspberry-Pi-Simple-Web-GPIO-GUI/node_modules/rpio/build/Release/rpio.node’,
‘/home/pi/Raspberry-Pi-Simple-Web-GPIO-GUI/node_modules/rpio/out/Debug/rpio.node’,
‘/home/pi/Raspberry-Pi-Simple-Web-GPIO-GUI/node_modules/rpio/Debug/rpio.node’,
‘/home/pi/Raspberry-Pi-Simple-Web-GPIO-GUI/node_modules/rpio/out/Release/rpio.node’,
‘/home/pi/Raspberry-Pi-Simple-Web-GPIO-GUI/node_modules/rpio/Release/rpio.node’,
‘/home/pi/Raspberry-Pi-Simple-Web-GPIO-GUI/node_modules/rpio/build/default/rpio.node’,
‘/home/pi/Raspberry-Pi-Simple-Web-GPIO-GUI/node_modules/rpio/compiled/15.5.0/linux/arm/rpio.node’
]
}
npm ERR! code 1
npm ERR! path /home/pi/Raspberry-Pi-Simple-Web-GPIO-GUI
npm ERR! command failed
npm ERR! command sh -c node ./bin/www
npm ERR! A complete log of this run can be found in:
npm ERR! /root/.npm/_logs/2021-01-03T00_01_25_781Z-debug.log
Great explanation! Bash variables are super useful for scripting and automation. They make your scripts flexible and easy to manage. Just remember to avoid spaces around the = sign when assigning values — that trips up a lot of beginners. 👍