
OpenHAB is an interface for many home automation devices. In addition, it is also possible to use it to control the music played. In this case: Spotify. As you already probably know, Spotify can be controlled remotely (e.g. from the app). We will take advantage of this and create our own Remote Raspberry Pi Spotify Player in OpenHAB.
The necessary scripts can then be integrated into the graphical user interfaces and sitemaps of OpenHAB 2, which means that control of all important devices has been collected in one place.
Required Hardware Parts
This project is mostly software-based, so we don’t need anything more than a Raspberry Pi and an internet connection.
An official Spotify client must also be running. This can either be on the PC, smartphone or, for example, the voice assistant Amazon Alexa on the Echo Platform. A small Echo Dot is sufficient for this (ideally with a loudspeaker).
You also need a (Free or Premium) Spotify account, as well as a developer account (we’ll go through the setup step by step).
Preparation for the Raspberry Pi Spotify Player
First, a simple Spotify account is required (Free or Premium, it is irrelevant). If you don’t have one, you have to create it first. Then we activate the developer account on the following page: https://developer.spotify.com/my-applications/#!/applications
After you have logged in and created the developer account, we have to create a new project. Indicate that the app is not commercial and name the project.
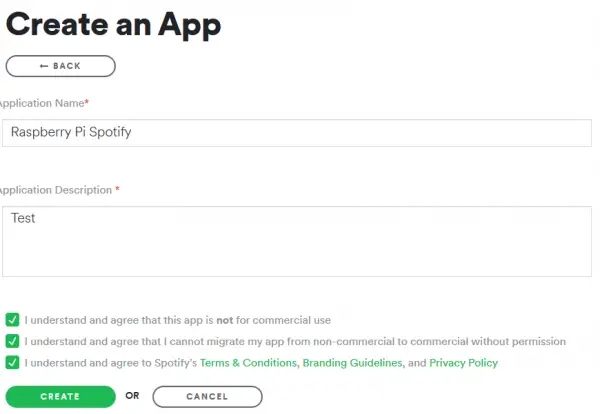
A client ID and client secret are assigned. We will need those in the next step.
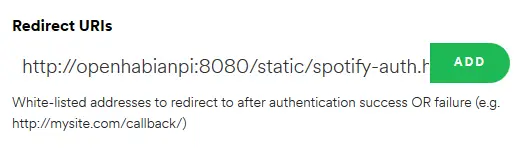
Now click on “Edit Settings” and enter this under “Redirect URIs”, click on ADD and save:
http://openhabianpi:8080/static/spotify-auth.html
Next, we have to install OpenHAB. Once that is done, we can proceed to the next step.
Installing the Raspberry Pi Spotify Player
The script used is based on this GitHub project. It contains some files that we have to download first. Therefore, connect via SSH and then do the following:
wget https://raw.githubusercontent.com/pmpkk/openhab_spotify-webconnect-api/master/matrix-theme.css -P /etc/openhab2/html/matrix-theme/
wget https://raw.githubusercontent.com/pmpkk/openhab_spotify-webconnect-api/master/AppIcons.svg -P /etc/openhab2/html/matrix-theme/
wget https://raw.githubusercontent.com/pmpkk/openhab_spotify-webconnect-api/master/spotify-auth.html -P /etc/openhab2/html/
wget https://raw.githubusercontent.com/pmpkk/openhab_spotify-webconnect-api/master/myopenhab.py -P /etc/openhab2/scripts/
wget https://raw.githubusercontent.com/pmpkk/openhab_spotify-webconnect-api/master/spotify.py -P /etc/openhab2/scripts/
wget https://raw.githubusercontent.com/pmpkk/openhab_spotify-webconnect-api/master/spotify.rules -P /etc/openhab2/rules/
wget https://raw.githubusercontent.com/pmpkk/openhab_spotify-webconnect-api/master/spotify.items -P /etc/openhab2/items/
We check whether all files are available by calling: http://openhabianpi:8080/static/spotify-auth.html on the PC. An image like this should appear (“Spotify Integration”):
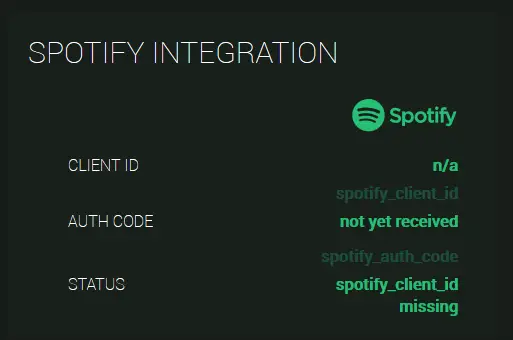
Since we have not yet set up anything, these messages will appear. To do this, we open the OpenHAB CLI:
ssh -p 8101 openhab@localhost
The password is habopen. Here we update the values using:
smarthome:update spotify_client_id bd7d01b72d...0a260a9
smarthome:update spotify_client_secret 0c8f6ddb1...6216b6e13c737
Instead of my values, you have to enter your ID and secret from before. To return to the normal console, just enter logout.
Now open http://openhabianpi:8080/static/spotify-auth.html once again and click on “Click to Authenticate” below. After successful authentication, this text should be there: “New Auth Code successfully saved to OpenHAB!”.
Note: If you can only access the panel via http://openhabianpi:8080 and not via http://openhabianpi.local:8080 you have to adjust the following:
sudo nano /etc/openhab2/scripts/spotify.py
There the REDIRECT_URI must be changed accordingly:
REDIRECT_URI = 'http://openhabianpi:8080/static/spotify-auth.html'
Testing the Spotify Player
To test the Remote Raspberry Pi Spotify Player, we have to have Spotify open on a device (PC, Amazon Alexa, etc.) or have music ready. For me, this is the case on my computer.
We then call the script:
/usr/bin/python /etc/openhab2/scripts/spotify.py
Information about the device, the song being played, etc. should be displayed.
If no device is connected to your account, the remote control will fail. You can use this to check which devices are connected:
/usr/bin/python /etc/openhab2/scripts/spotify.py get_devices
To play, stop, skip, change the volume, etc., we simply give the script the parameters (play, pause, next, previous, etc.). You can find all commands here.
/usr/bin/python /etc/openhab2/scripts/spotify.py play
This script can now be integrated by other Things, e.g. via a surface and a touchscreen.