")
After our robot has already learned to drive and to follow a line, we now want to let it be controlled remotely. For this, we will first use an infrared remote control and later possibly an Xbox 360 controller. In addition to controlling the driving ability, the modes (follow line, autopilot, etc.) should also be set.
In this part of the Raspberry Pi robot tutorials, we program the IR receiver and create the commands for remote control. The remote control is also shown in the video.
Required Hardware Parts
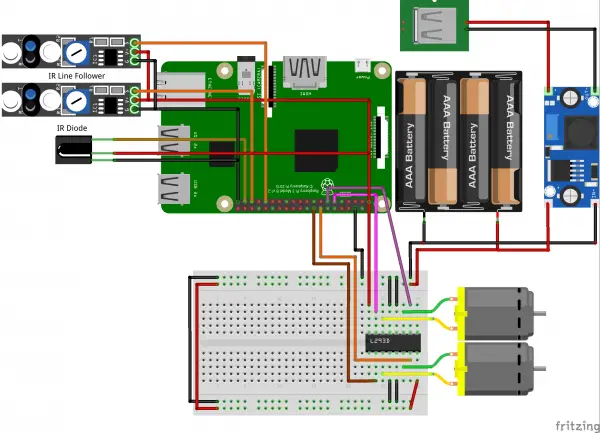
In addition to the previous components, we also need an IR remote control and infrared diode for this tutorial (available here as a kit). Usually, the jumper cables are already included and the diode can be connected directly. If you buy the diodes individually (or still have them available), please have a look at the datasheet to be on the safe side with the following wiring.
You can also use the IR diode with remote control for general remote control of your Raspberry Pi, be it in a multimedia system such as KODI or just to start scripts.
Connection of the IR receiver
The connection of the infrared receiver to the Raspberry Pi is very easy, as the module only has three pins. If you are using a receiver including a PCB (see above), the connections will be named. Otherwise, you would have to look in the datasheet for the correct assignment, as this may differ.
In principle, the VCC pin is connected to a free 5V pin of the Raspberry Pi, the GND pin to ground/GND of the Pi and the pin labelled IN/DATA goes to GPIO 26.
Preparation
To use the infrared receiver, we need the Lirc program. I have already shown the installation and setting of Lirc in a previous tutorial. I assume that this has been implemented because we need a Lirc in the following. The lower section (infrared Raspberry Pi universal remote control – start programs) is about creating the lircrc file. In order to control the robot and recognize the commands later in our script, we need to create such a file.
As soon as you have installed and tested Lirc, we create this file in the folder in which the rest of the robot scripts are located:
cd robot/
sudo nano lircrc
The following content is written to the file. You can of course also choose a different assignment, I have chosen this one:
|
1 2 3 4 5 6 7 8 9 10 11 12 13 14 15 16 17 18 19 20 21 22 23 24 25 26 27 28 29 30 31 32 33 34 35 36 37 38 39 40 41 42 43 44 45 46 47 48 49 50 51 52 53 54 55 56 57 58 59 |
begin button = KEY_1 prog = robot_ir config = LEFT_FORWARD end begin button = KEY_2 prog = robot_ir config = FORWARD end begin button = KEY_3 prog = robot_ir config = RIGHT_FORWARD end begin button = KEY_4 prog = robot_ir config = LEFT end begin button = KEY_5 prog = robot_ir config = STOP end begin button = KEY_6 prog = robot_ir config = RIGHT end begin button = KEY_7 prog = robot_ir config = LEFT_BACKWARD end begin button = KEY_8 prog = robot_ir config = BACKWARD end begin button = KEY_9 prog = robot_ir config = RIGHT_BACKWARD end begin button = KEY_PAUSE prog = robot_ir config = LINE_FOLLOW_ON end |
In a moment we will wait for the remote control codes. To do this, the character string is transferred to the program under “config”. You can also assign other keys here later, e.g. to make other actions available later. In my case, the mode for following a line is started with the Play/Pause button.
In order to be able to use Lirc via Python, we then install a corresponding library:
sudo apt-get install python-lircIf you are using Python 3, the package is python3-lirc.
Code to Receive Infrared Signals
We are expanding our previously created robot class. To do this, we create the IRControl() function after the end of the lineFollowModeOn(self)function.
|
1 2 3 4 5 6 7 8 9 10 11 12 13 14 15 16 17 18 19 20 21 22 23 24 25 26 27 28 29 30 31 32 33 34 35 36 37 38 39 40 41 42 43 44 45 46 47 |
def IRControl(self): sockid = lirc.init("robot_ir", "lircrc") dist_per_leypress = 30.0 #cm while True: #self.motor.stop() code = lirc.nextcode()[0] print(code) if code == "FORWARD": self.motor.forward() time.sleep(dist_per_leypress / self.motor.DIST_PER_SEC) self.motor.stop() elif code == "LEFT_FORWARD": # 30 degree turn left, then stop self.motor.forwardRight() time.sleep(self.motor.SEC_PER_TURN / 360.0 * 30.0) self.motor.stop() elif code == "RIGHT_FORWARD": # 30 degree turn right, then stop self.motor.forwardLeft() time.sleep(self.motor.SEC_PER_TURN / 360.0 * 30.0) self.motor.stop() elif code == "LEFT": self.motor.forwardRight() time.sleep(self.motor.SEC_PER_TURN / 360.0 * 90.0) self.motor.stop() elif code == "RIGHT": self.motor.forwardLeft() time.sleep(self.motor.SEC_PER_TURN / 360.0 * 90.0) self.motor.stop() elif code == "BACKWARD": self.motor.backward() time.sleep(dist_per_leypress / self.motor.DIST_PER_SEC) self.motor.stop() elif code == "LEFT_BACKWARD": # 30 degree turn left back, then stop self.motor.backwardRight() time.sleep(self.motor.SEC_PER_TURN / 360.0 * 30.0) self.motor.stop() elif code == "RIGHT_BACKWARD": # 30 degree turn right back, then stop self.motor.backwardLeft() time.sleep(self.motor.SEC_PER_TURN / 360.0 * 30.0) self.motor.stop() elif code == "STOP": self.motor.stop() elif code == "LINE_FOLLOW_ON": self.lineFollowModeOn() |
You can also see the complete (previous) code here. In the Nano Editor, you save with CTRL + O and close with CTRL + X.
Background Process for Controlling the Robot
Now we want to test the functionality. We have two options for this. The simpler one is that we just enter the following Python code in the console (after sudo python). The other variant is to create a script with the appropriate code and start it in the background after booting. This is e.g. especially important on Raspberry Pi Zero if you don’t have a WLAN adapter connected. Tip: If you also have a “big” Raspberry Pi 3/2B, you can first play the code on the Pi via SSH or FTP and then just insert the Micro SD card into the Zero.
The code for the test file is quite simple (sudo nano test.py):
|
1 2 3 4 5 6 7 8 9 10 11 12 |
from robot import Robot import time try: r=Robot() r.IRControl() #r.lineFollowModeOn() #while True: # time.sleep(0.1) except: r.motor.stop() |
Either we just start the file (sudo nano test.py) or we let it open automatically when you restart.
The easiest way to do this is to use crontab:
crontab -e
At the end we write the following line:
@reboot ~/robot/test.py
From now on, the file will be called upon restart and you can control the Raspberry Pi robot remotely via infrared remote control.
In the next tutorial, we will give the robot an “autopilot” so that it automatically moves to where there is no object in the way. Part 6 of the series also shows controlling it via the Xbox 360 controller.