 to the official 7″ Raspberry Pi Touchscreen")
The official Raspberry Pi touchscreen module offers many options and makes many other touch displays look old for a similar price. Not only is the very accurate 10-finger capacitive touch a positive, but also no GPIOs or HDMI ports are occupied.
In order to cover many topics, I have created this article, where some frequently asked questions (FAQ) are summarized.
The official 7″ Raspberry Pi touchscreen was developed by the Raspberry Pi Foundation and has a large number of options. If you have bought the display recently or are thinking about it, you can read some important points here. For this, I have made an overview. If you have more points, write a short comment and it will be added 😉
Overview 7″ Raspberry Pi Touchscreen FAQ
- Rotating the display
- Activating right click
- Switching backlight on/off
- Turning off screensaver
- Installing touch keyboard
- Creating screenshots
- Making the mouse pointer disappear
- Optimal programs and tools for the touchscreen
- What is the coloured dot in the top right corner?
All of these tips have been tested on Raspbian, but should also run on Jessie or Kodi. In addition, a Raspberry Pi Model 2B or Raspberry Pi 3 should be used, if the display is not powered externally (so only via the GPIOs).
Rotating the display
One point that initially bothered me a bit is that the micro USB entrance for the power supply is on the bottom of the display. So if you do not have a 90 degree USB cable, it will be difficult to set up the display vertically.
Luckily, there is the possibility to rotate the picture automatically. It only needs to be specified for one file
sudo nano /boot/config.txt
The following is written at the end of the file:
lcd_rotate=2
After the restart, the image should now be rotated by 180 ° and you can turn the display over, which puts the micro USB connector on top.
Alternatively, there are the following options:
display_rotate=0 # Normal
display_rotate=1 # 90 degrees
display_rotate=2 # 180 degrees
display_rotate=3 # 270 degrees
display_rotate=0x10000 # horizontal flip
display_rotate=0x20000 # vertical flip
Activating right click
If you use the touchscreen without a mouse and keyboard, you will definitely miss the right-click function. But this is easily adjustable. In this case, pressing the touchscreen for a longer time in one place triggers the same effect as right-clicking on that location.
For this, we have to edit a file
sudo nano /etc/X11/xorg.conf
and insert the following content:
Section "InputClass"
   Identifier "calibration"
   Driver "evdev"
   MatchProduct "FT5406 memory based driver"

   Option "EmulateThirdButton" "1"
   Option "EmulateThirdButtonTimeout" "750"
   Option "EmulateThirdButtonMoveThreshold" "30"
EndSection
Now just reboot quickly.
sudo reboot
After the restart, a long click should look like this:
Switching backlight on/off
Unfortunately, it is not possible to connect the display after starting the Pi, as it must already be connected and powered up at startup. However, there is the possibility of switching the backlight on and off via command line, should the display currently not be needed.
First of all, the firmware must be brought up to date, as the drivers were initially not there. Then you have to restart.
sudo rpi-update
sudo reboot
Now we give the file, which is responsible for the backlight, the necessary rights:
sudo chmod 777 /sys/class/backlight/rpi_backlight/bl_power
Then the lighting can be switched off (1) or back on (0) by means of the following commands:
echo 1 > /sys/class/backlight/rpi_backlight/bl_power
echo 0 > /sys/class/backlight/rpi_backlight/bl_power
If the display is used as an input, e.g. for home automation, you could possibly set a motion detector in front/above it, where the display is turned on only when needed: Operate a motion sensor PIR on the Raspberry Pi
Turning off screensaver
– Note: Below is a simpler method for current Raspbian versions –
Another point that bothers some applications is that after a few minutes of inactivity, the screen saver starts and the touchscreen turns completely black. To prevent this, we proceed as follows: First, we install a required package:
sudo apt-get install x11-xserver-utilsThen we edit the following file,
sudo nano /etc/X11/xinit/xinitrc
the additional content gets attached:
@xset s off
@xset -dpms
@xset s noblank
In addition, the line @xscreensaver -no-splash must be commented out with a #.
Finally, we edit the config file
sudo nano /etc/kbd/config
and add the following parameters at the end:
BLANK_TIME=0
BLANK_DPMS=off
POWERDOWN_TIME=0
This should stop the touchscreen from automatically turning off. Here there is an alternative solution, but this works (for me) only when started via startx and not when the Pi starts in the desktop mode.
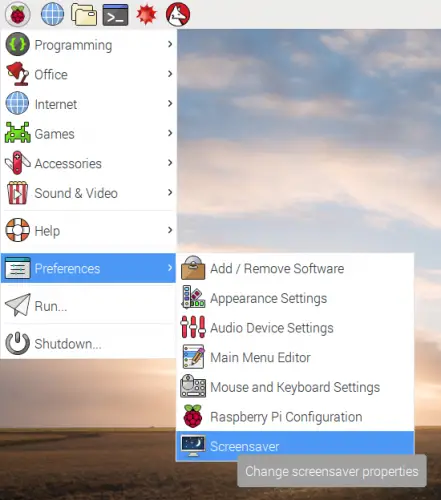
If this does not bring the desired effect (some Raspbian distributions), there is another possibility. For this we need to install xscreensaver:
sudo apt-get install xscreensaver
After that we go under Preferences -> Screensaver.
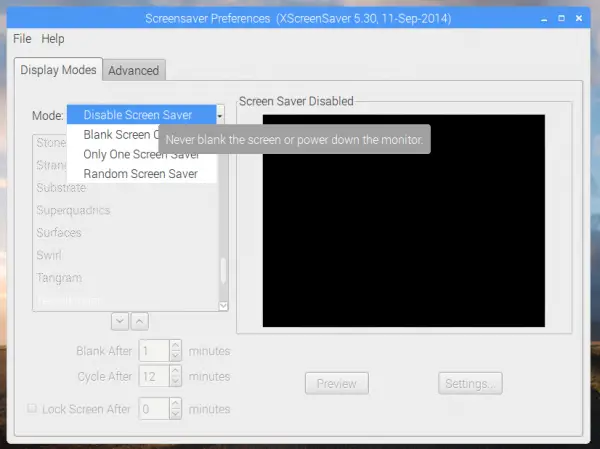
Here the screen saver can be deactivated (Disable Screen Saver):
Installing touch keyboard
Even a virtual keyboard can be very useful if you do not want to connect an additional keyboard. For this you should first boot directly into the desktop:
sudo raspi-config
Under “3 Enable Boot to Desktop/Skratch” you select the second entry: “Desktop Log in as user ‘pi’ at the graphical desktop“. Then we can
sudo apt-get install at-spi2-core florence
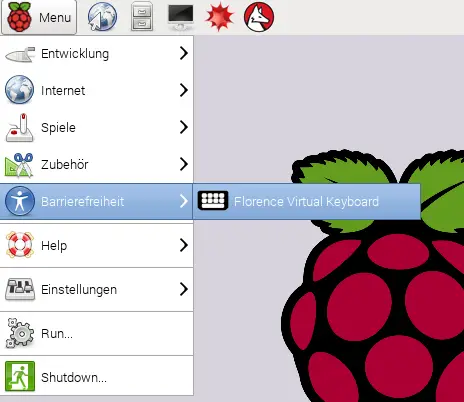
You can find the keyboard under the Start Menu -> Accessibility. If you minimize it, there will be an icon in the top right corner of the taskbar, so you can bring it out as needed.
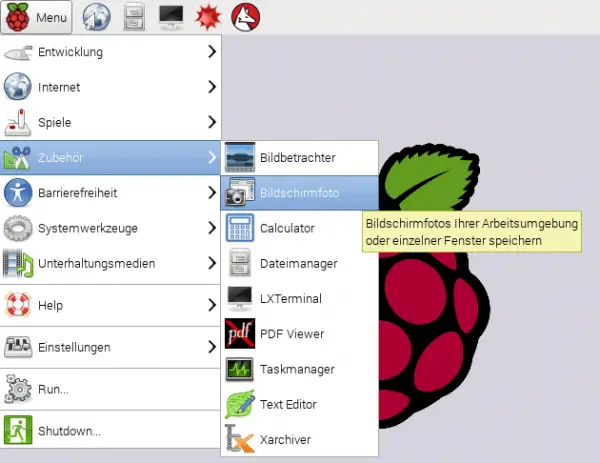
Creating screenshots
Every now and then one would like to take screenshots, but did not connect a keyboard with which one could press the appropriate button. Even with the virtual keyboard, this is not easily possible. But is with GNOME-screenshot, which simply creates screenshots via a GUI:
sudo apt-get install gnome-screenshot
After the quick installation you will find it under the Start menu -> Accessories -> Screenshot:
Once clicked, such a window appears:
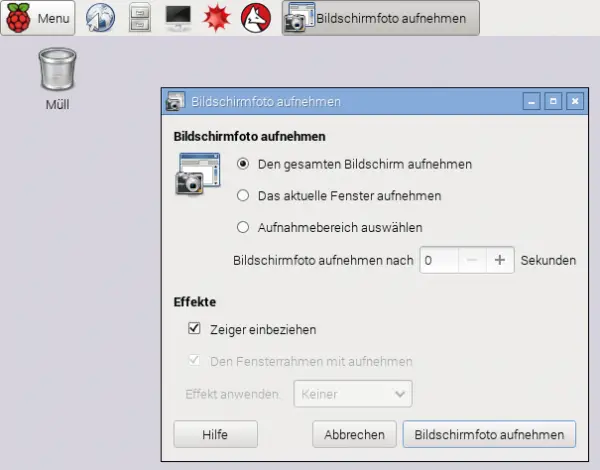
Here are some options which can be set and then the screenshot is created. This window, which can be seen in the picture above, is not on it. After the image has been taken, you will be asked for the location, which by default will become the home directory.
Although there are KSnapshot orscrot for the console-lovers, I think GNOME-screenshot is most suitable for the majority of users.
Making the mouse pointer disappear
In some applications (car PC, Skin Automation Panel) where a GUI is present, the mouse pointer is often annoying. To easily remove the cursor, we can install a package that will hide it:
sudo apt-get install unclutterAfter a restart, the cursor is no longer visible.
Optimal programs and tools for the touchscreen
There are some programs that are more suitable on the display (if you know other optimal apps for the touchscreen, I would be happy to see a comment 🙂 )
- Iceweasel – The browser is very similar to Firefox and also has many of its strengths integrated. In my tests, the default browser of Raspbian (Epiphany) often had problems playing Youtube videos in HTML5 Player. Several hotfixes did not work, so I decided to use another browser – which I think is a lot better. You can easily install it from the console:
sudo apt-get install iceweasel
- To be continued …
What is the coloured dot in the top right corner?

Maybe he has already noticed you: The blinking coloured dot in the upper right corner. This is an indication that the display is not getting enough power, e.g. if you supply it with power via the GPIOs. The problem with this is that only a certain number of milliamperes flow through it, which is just enough for the display, but it is not optimal.
You can remedy this by connecting the display directly to a power source via a micro USB cable. You will see that the picture will lighten up.
Do you have any more tips & tricks, which should not be missing? If so, feel free to leave a comment 🙂
5 Comments
Hello
I have Pi4 with Raspbian downloaded and installed and updated as of today 18 July 2020.
I have a Official 7″ TouchScreen. Trying to get Activating Right Click to work. I have tried the method described above and similar variations found on the web saving to different directories and different .conf files. But none of them work. How do I know if evdev is correct for Driver and if FT5406 memory based driver is correct for MatchProduct ? Could that be why this fix isnt working for me ?
Excellent article, thank you.
Mine seems to work perfectly but the resolution shown in the Preferences > Raspberry Pi Configuration > Display > Set Resolution shows 720×480. The correct native resolution for this screen of 800×480 isn’t available.
Display looks ok though. Is that correct?
Thank you!
I have several Raspberry Pi boards (B+, 3, Zero, ZeroW)
The B+ has a 3.5″ display and the Zero has a 7″ display.
They work fine with USB keyboard and mouse, but the touch function doesn’t work for them both.
Some help would be welcome.
🙂
I have tried several of your activities up above, and the only one to work properly for me afterwards was the right-click, the keyboard and iceweasel both ended with this…
E: Package ‘iceweasel’ has no installation candidate
E: Unable to locate package florence
Should the backlight turn off with the Screensaver? I would have sworn that it was when I first assembled everything but definitely not now.
The screen goes black but the backlight continues to glow. It’s possible the behavior changed with an update.
This is a 4b with the official 7″ touchscreen running the latest Raspberry Pi OS.