
Voice control is an increasingly important component in smart homes. For this purpose, Amazon provides skills that run on Amazon Echo Dot, Fire TV sticks, smartphones and other devices. In this way, Raspberry Pi Alexa skills can also be created in a simple manner.
The skills can be published optionally and even money can be made with them. In this tutorial, we will create an Alexa skill which will execute commands on our local Raspberry Pi. We will go through all the points of that process step by step.
Various other providers such as Google (“OK Google”), Apple (Siri) and Microsoft (Cortana) also have language assistants and offer opportunities to write your own skills. If you are interested, we can show those in future tutorials.
This tutorial includes building simple LED controls, but many other scenarios can be built through small adjustments.
Required Hardware Parts
The software runs completely on the Pi. We also need the hardware which will be operated by voice control. For this we will use the following:
- Raspberry Pi
- LEDs
- Optimal: Resistors
- a Power Supply (USB Type C)
An Amazon device with Alexa is also required. These are:
Preparation and Raspberry Pi Programming
Before we create the actual Alexa skill, we have to set up and configure a few things. First of all, we need an Amazon developer account. We first create an account on developer.amazon.com or log in with the existing Amazon account.
Then we take care of the setup on the Raspberry Pi.
Connecting the Raspberry Pi Hardware and Installing the Software
Before you start the Pi, connect a simple LED with the long end to GPIO 17 and the short end to Ground. Here you can see the pin assignment:

Ideally, you can also connect a small resistor (220Ω) between Ground and the LED.
Since this example is very simple, I would like to give you some better project ideas:
- change (and dim) LED strip effects via voice control
- control a thermostat
- water the garden on command
- query the temperature of other rooms
- start video recording from surveillance cameras
- and much more
Installation
Now connect e.g. via SSH with the Raspberry Pi. First of all we install the required software. We use the Python packages Flask or Flask-Ask, which make it very easy to write Amazon Alexa skills:
python3 -m pip install Flask-Ask
pip3 install --upgrade setuptools
pip3 install 'cryptography<2.2'
As you can see, we used a version less than 2.2 of the package cryptography. With newer versions. there are often errors in connection with Flask.
Now let’s create the python file that contains our code:
sudo python3 alexaskill.py
This file has the following content:
|
1 2 3 4 5 6 7 8 9 10 11 12 13 14 15 16 17 18 19 20 21 22 23 24 25 26 27 28 29 30 31 32 33 34 35 36 37 38 39 40 41 42 43 44 45 46 47 48 49 50 51 |
import logging import os from flask import Flask from flask_ask import Ask, request, session, question, statement import RPi.GPIO as GPIO app = Flask(__name__) ask = Ask(app, "/") logging.getLogger('flask_ask').setLevel(logging.DEBUG) STATUSON = ["on", "switch on", "enable", "power on", "activate", "turn on"] # all values that are defined as synonyms in type STATUSOFF = ["off", "switch off", "disactivate", "turn off", "disable", "turn off"] @ask.launch def launch(): speech_text = 'Welcome to the Raspberry Pi alexa automation.' return question(speech_text).reprompt(speech_text).simple_card(speech_text) @ask.intent('LightIntent', mapping = {'status':'status'}) def Gpio_Intent(status,room): GPIO.setwarnings(False) GPIO.setmode(GPIO.BCM) GPIO.setup(17,GPIO.OUT) if status in STATUSON: GPIO.output(17,GPIO.HIGH) return statement('Light was turned on') elif status in STATUSOFF: GPIO.output(17,GPIO.LOW) return statement('Light was turned off') else: return statement('Sorry, this command is not possible.') @ask.intent('AMAZON.HelpIntent') def help(): speech_text = 'You can say hello to me!' return question(speech_text).reprompt(speech_text).simple_card('HelloWorld', speech_text) @ask.session_ended def session_ended(): return "{}", 200 if __name__ == '__main__': if 'ASK_VERIFY_REQUESTS' in os.environ: verify = str(os.environ.get('ASK_VERIFY_REQUESTS', '')).lower() if verify == 'false': app.config['ASK_VERIFY_REQUESTS'] = False app.run(debug=True) |
Save the file with Ctrl + O and close the editor with Ctrl + X. Then we run the file:
python3 alexaskill.py
Accessibility Outside of the Local Network
We now have a Raspberry Pi server running, but this can only be accessed via the local network. It must be publicly accessible so that Amazon can call up our Raspberry Pi later.
We could either use a dDNS service and enable the ports in the router, or we could use ngrok. This has the advantage that we can save the configuration.
Open a new terminal (do not close the old one) and enter the following:
wget https://bin.equinox.io/c/4VmDzA7iaHb/ngrok-stable-linux-arm.zip
unzip ngrok-stable-linux-arm.zip
Afterwards we can start:
./ngrok http 5000
 We then need the second URL (https) for Amazon.
Attention: As a non-registered user, the connection will be reset after 8 hours and you will get a new URL. You can change this by registering and providing your token:
./ngrok authtoken <TOKEN>
It is also possible to choose the subdomain yourself. You can find more information about ngrok in the documentation.
./ngrok http -subdomain=myveryownamazonalexaskill 5000
By the way: We can also start both commands (Python script and ngrok) via autostart.
Setting up the Raspberry Pi Alexa Skill in the Amazon Developer Account
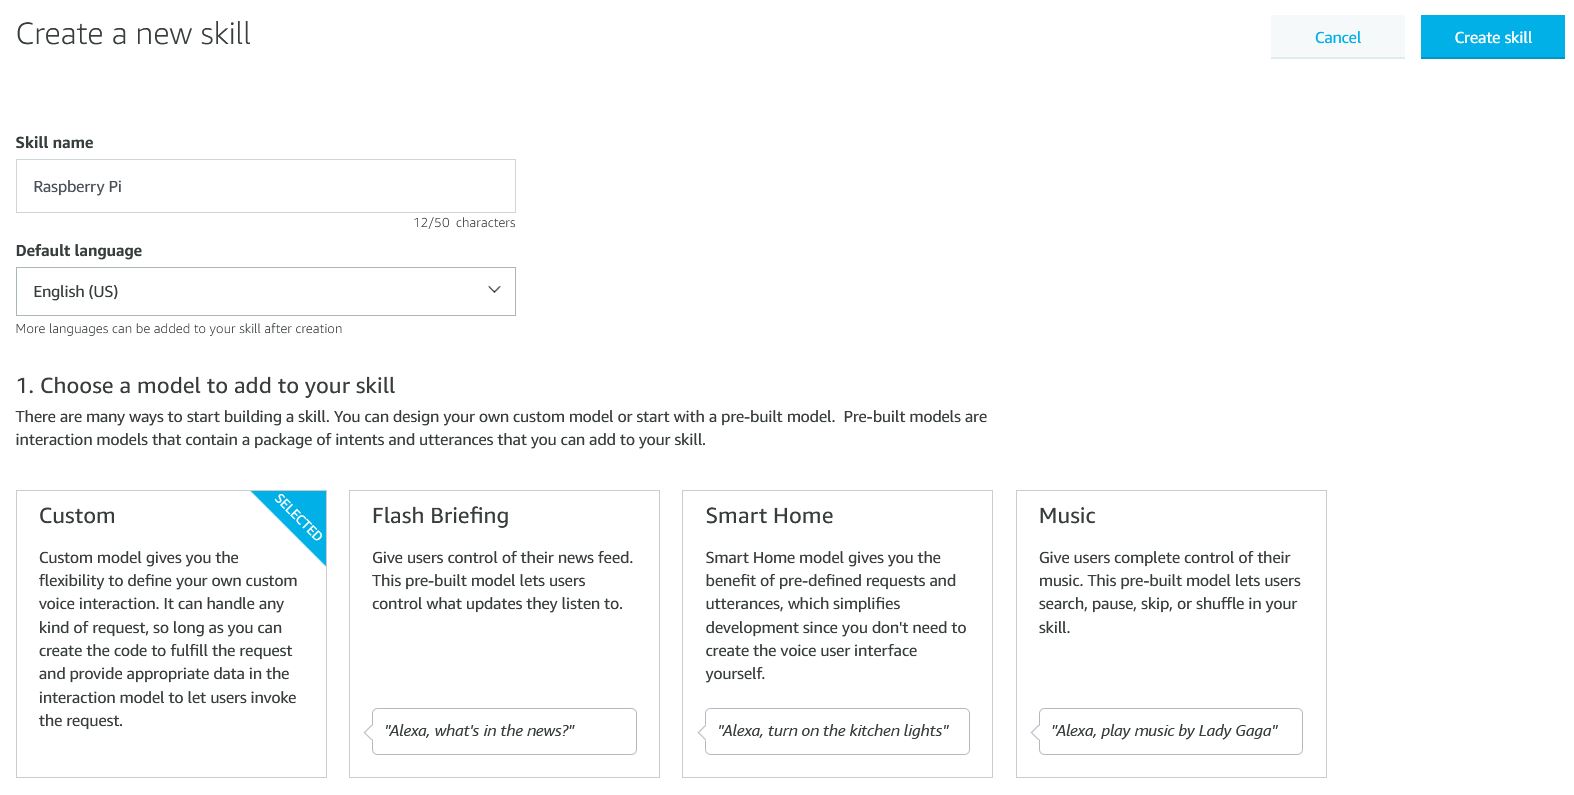
We press the “Create Skill” button in the Amazon Developer Console. Here we assign a name (e.g. “Raspberry Pi”), choose the language and the “Custom” model. The hosting method is “Provision your own”. Then we click on “Create Skill” in the top right corner.
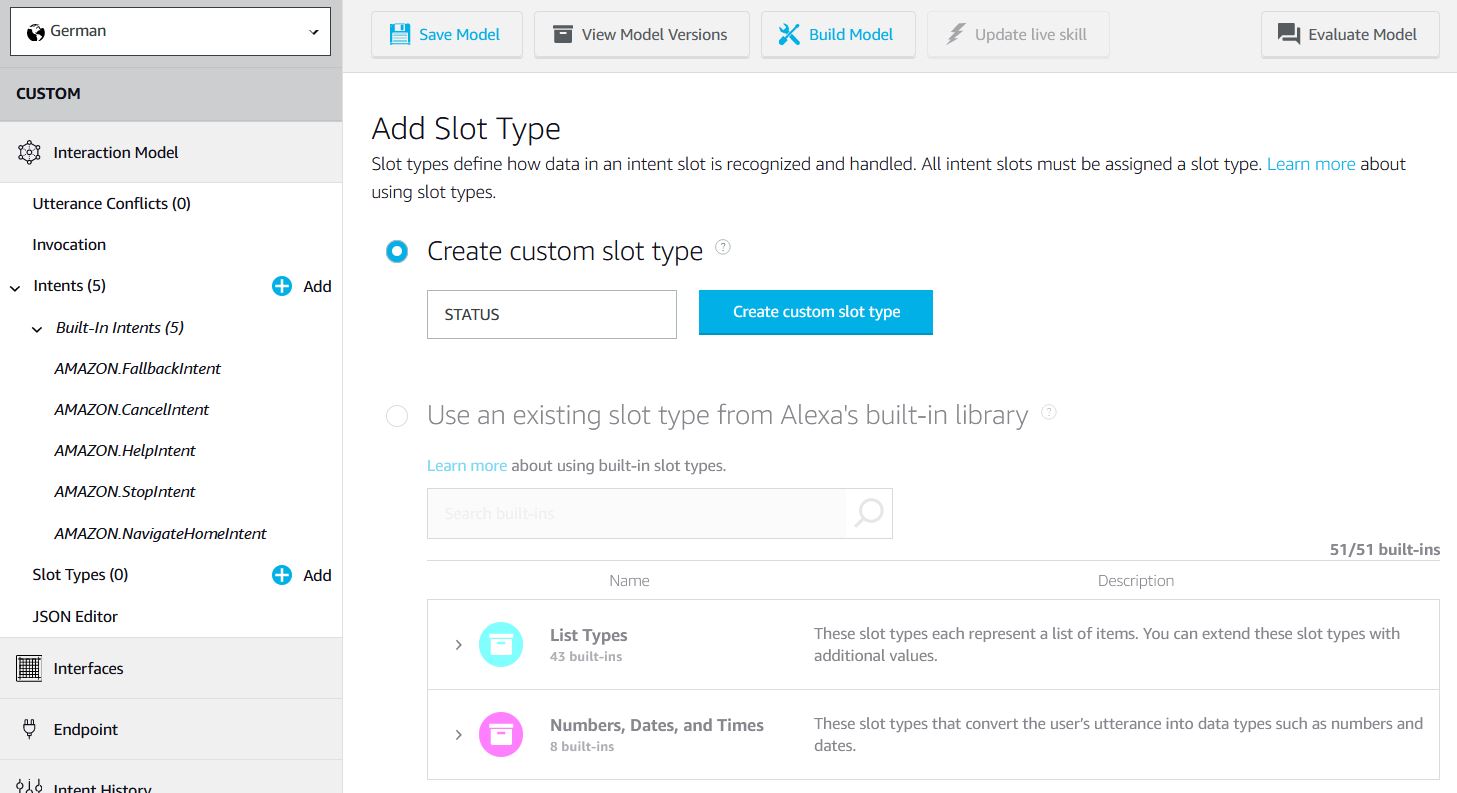
Then we press the plus sign next to “Slot Types” (Interaction Models) and create a new type called “STATUS”:
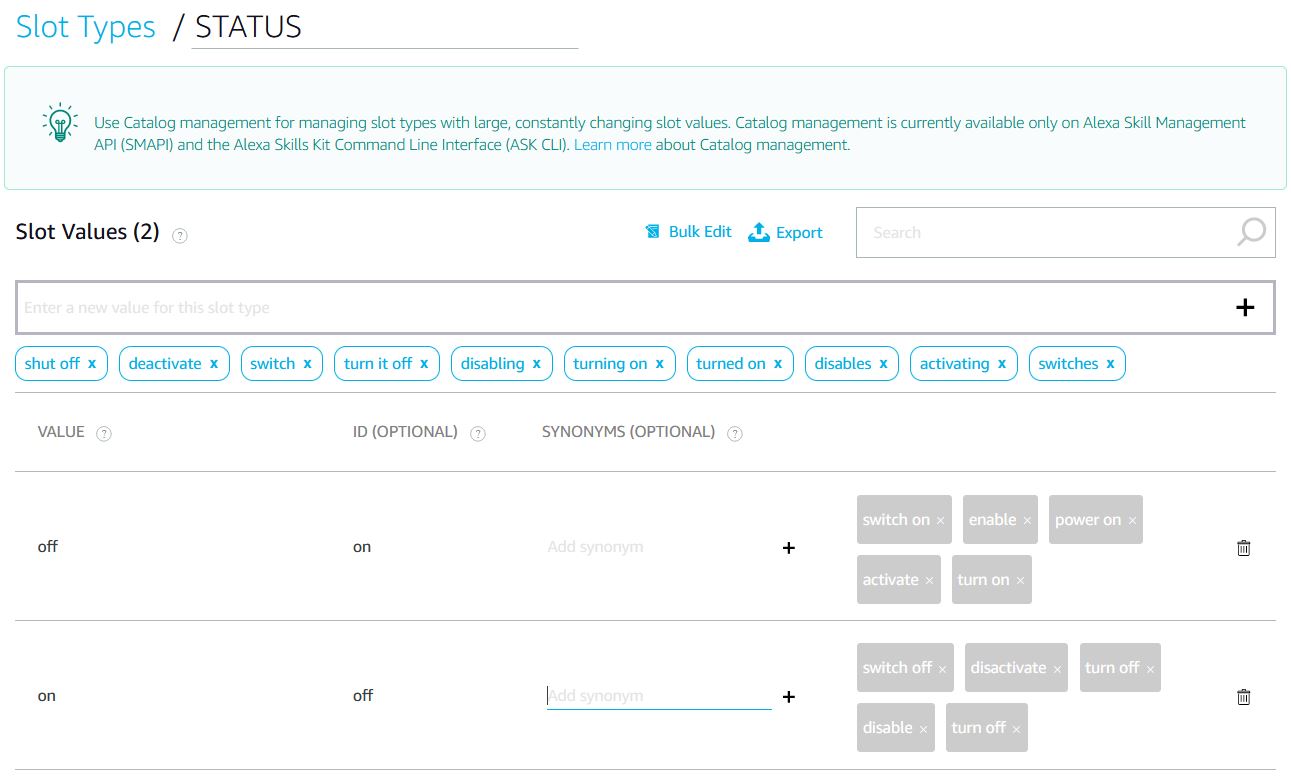
For this we create two “values”. These are given the names “on” and “off” and we also define all possible synonyms (these are the same synonyms that are also specified in the Python script):
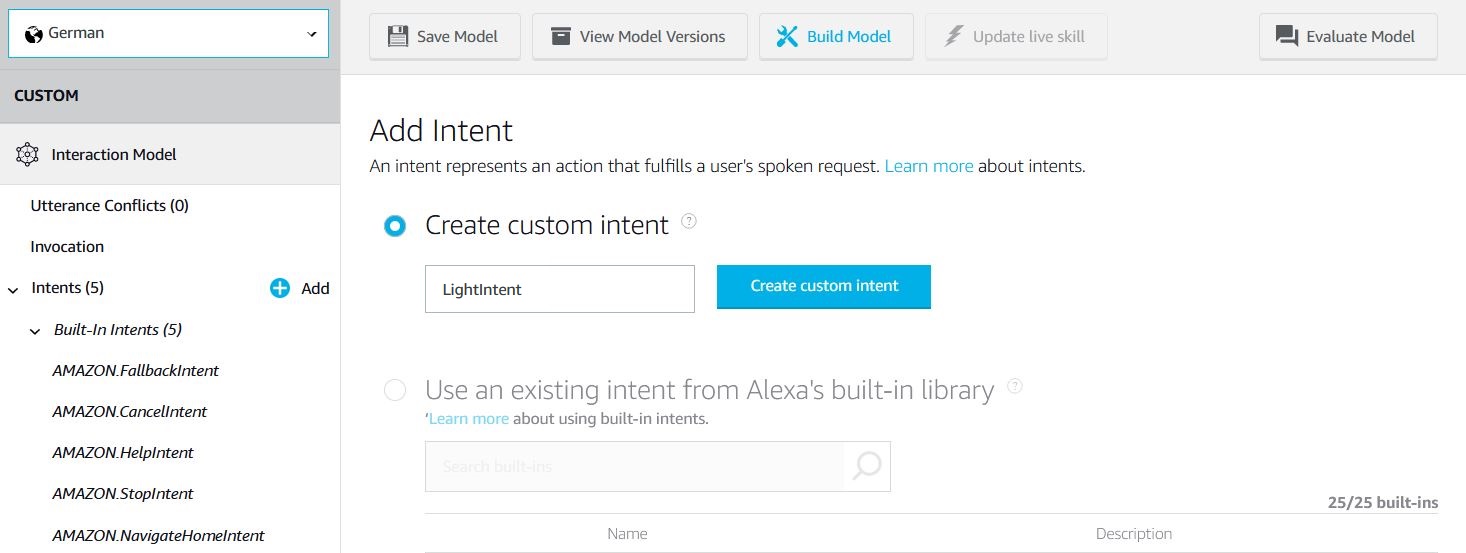
As the last configuration step, we create an “intent” (click on the plus sign) with the name “LightIntent” (the same name which was also specified in the script):
In the lower part, we first add the “intent slot”. Here we choose the type “STATUS” and also call it “status” (lower case):

In the upper part, you can now enter all possible voice commands, such as “turn off the light”. By double-clicking on a word, you can replace it with the slot:
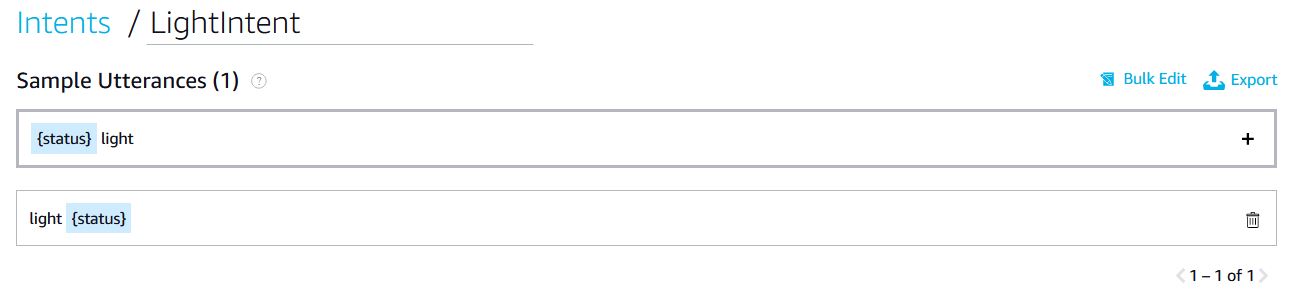
Think about different combinations that you want to use later. Usually, the call is e.g. as following:
Alexa, tell Raspberry Pi, [turn on light / turn off light / …]
The second part is therefore important and should be defined in this part. Save the model and press “Build Model”.
Here again the generated JSON file. You can also just paste them in
|
1 2 3 4 5 6 7 8 9 10 11 12 13 14 15 16 17 18 19 20 21 22 23 24 25 26 27 28 29 30 31 32 33 34 35 36 37 38 39 40 41 42 43 44 45 46 47 48 49 50 51 52 53 54 55 56 57 58 59 60 61 62 63 64 65 66 67 68 69 70 71 72 73 74 75 76 77 78 79 |
{ "interactionModel": { "languageModel": { "invocationName": "raspberry pi", "modelConfiguration": { "fallbackIntentSensitivity": { "level": "LOW" } }, "intents": [ { "name": "AMAZON.FallbackIntent", "samples": [] }, { "name": "AMAZON.CancelIntent", "samples": [] }, { "name": "AMAZON.HelpIntent", "samples": [] }, { "name": "AMAZON.StopIntent", "samples": [] }, { "name": "AMAZON.NavigateHomeIntent", "samples": [] }, { "name": "LightIntent", "slots": [ { "name": "status", "type": "STATUS" } ], "samples": [ "light {status}" ] } ], "types": [ { "name": "STATUS", "values": [ { "id": "on", "name": { "value": "off", "synonyms": [ "switch on", "enable", "power on", "activate", "turn on" ] } }, { "id": "off", "name": { "value": "on", "synonyms": [ "switch off", "disactivate", "turn off", "disable", "turn off" ] } } ] } ] } } } |
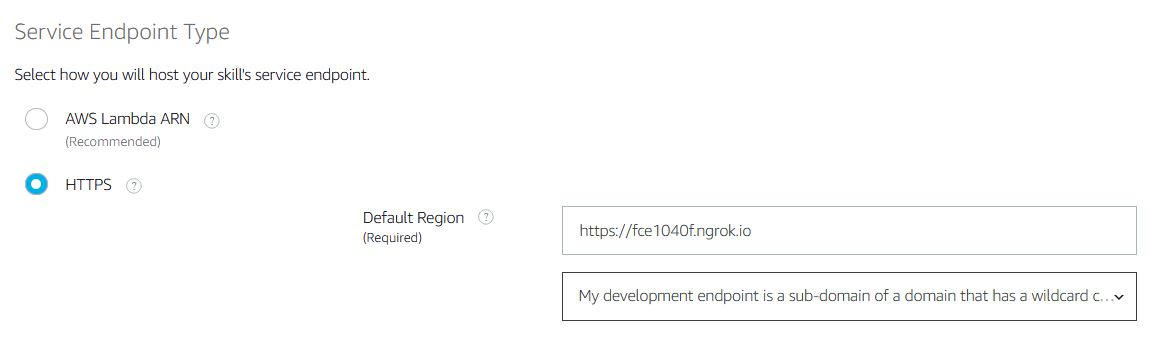
Last but not least, we have to specify the server URL to which the commands are sent. To do this, click on “Endpoint” on the left, select HTTPs and paste the URL of ngrok into “Default Region”. Also, choose the following option: “My development endpoint is a sub-domain of a domain that has a wildcard certificate from a certificate authority“.
Don’t forget to save it.
Test the New Raspberry Pi Alexa Skill – Locally and on Amazon Echo Devices
We now want to test the Raspberry Pi Alexa Skill. There are various options for this, which we will go into. Ideally, both are carried out in succession:
1. Amazon Developer Console – Test
In the Developer Console, there is the possibility to send commands via voice recording or text under the tab “Test”. To do this, you have to allow your browser to use your microphone. You can see that command on the right side.
2. Live Testing on Amazon Echo (Dot), Fire TV Stick, etc.
We want our developed skill to run permanently on Amazon devices. To do this, first, we have to add all devices to our account. How this works is, among other things, described here. You can see all Alexa devices either in the smartphone app (Android, iOS) or in the Amazon dashboard.
You can also easily add new devices in the apps. As soon as the device is linked to the account, the skill can already be used.
What projects do you have in mind? Further ideas and suggestions as comments are welcome.
26 Comments
When I test this the py script just keeps returning “I’m sorry this command is not possible.”
Checked everything many times.
What am I missing?
You can see in the console what was sent from the Amazon API. Did it contain one of your phrases?
Great tutorial! However, I cannot seem to get it to work. I have followed the entire tutorial and I am using the exact JSON code provided. WHen I try a command such as “ask raspberry pi light on”, “tell raspberry pi light on” or even “open raspberry pi”, I get the response “There was a problem communicating with the requested skill”
It does not seem to be accessing the ngrok link that I have set up on the pi, since I don’t see any change in the ngrok terminal, or the alexaskill.py terminal (which should log something if the link was accessed). What could I be doing wrong?
Can you manually try to reach your ngrok server (from inside and outside of your network)? This is where I would begin to search for the issue.
Thank you for the reply. Yes, I can manually access the ngrok server by entering in the URL into a browser (both in and out of the local network). The browser in both cases reports “Method Not Allowed” and ngrok prints the two lines:
GET /favicon.ico 404 NOT FOUND
GET / 405 METHOD NOT ALLOWED
Hi.. it works like a charm. But how i can turn on off all GPIO just saying a word like turn TV ON or turn IRRIGATION ON?
Need to change the python of alexa skill or start a lot of skills?
I’m getting this error when running – python3 alexaskill.py…
Traceback (most recent call last):
File “alexaskill.py”, line 5, in
from flask_ask import Ask, request, session, question, statement
ImportError: No module named ‘flask_ask’
I installed python3 -m pip install Flask-Ask
Also tried changing the from flask_ask import Ask, request, session, question, statement to ..
from flask-ask import Ask, request, session, question, statement
Says I need 3.5 or higher of Python to install anything but I have 3.7. Even running “Python –version” shows I have 3.7 so not sure how to resolve this.
There is something with the _ character, replace it with your own _
can someone tell me where to insert te code please?
inside the plataform of amazon just after create the intent slot
Great tutorial!
I’m able to test it successfully through the simulator in the console. But failing to do so through a physical echo dot device. I keep getting “Sorry, I’m having trouble accessing your Raspberry Pi skill right now “. Could you please help me out with this?
when i type sudo python3 alexaskill.py, i get python3: cant open file ‘alexaskill.py’: [Errno2] no such file or directory
I think the writer probably intended it to be something like `sudo nano alexaskill.py`. I think the `sudo` is probably unnecessary, too
Im unclear how to get the skill to run on the alexa.
No kidding! Did you get an answer?
I Followed this guide but unfortunately i am receiving this error. Just like a lot of people in the comment section it doesn’t work.
I hope someone can fix it 🙂
error:
”’
[2021-03-11 11:55:31,215] ERROR in app: Exception on / [POST]
Traceback (most recent call last):
File “/home/user/.local/lib/python3.8/site-packages/flask/app.py”, line 2446, in wsgi_app
response = self.full_dispatch_request()
File “/home/user/.local/lib/python3.8/site-packages/flask/app.py”, line 1951, in full_dispatch_request
rv = self.handle_user_exception(e)
File “/home/user/.local/lib/python3.8/site-packages/flask/app.py”, line 1820, in handle_user_exception
reraise(exc_type, exc_value, tb)
File “/home/user/.local/lib/python3.8/site-packages/flask/_compat.py”, line 39, in reraise
raise value
File “/home/user/.local/lib/python3.8/site-packages/flask/app.py”, line 1949, in full_dispatch_request
rv = self.dispatch_request()
File “/home/user/.local/lib/python3.8/site-packages/flask/app.py”, line 1935, in dispatch_request
return self.view_functions[rule.endpoint](**req.view_args)
File “/usr/local/lib/python3.8/dist-packages/flask_ask/core.py”, line 560, in _flask_view_func
result = self._map_intent_to_view_func(self.request.intent)()
File “/usr/local/lib/python3.8/dist-packages/flask_ask/core.py”, line 574, in _map_intent_to_view_func
view_func = self._intent_view_funcs[intent.name]
KeyError: ‘TVSourceIntent’
127.0.0.1 – – [11/Mar/2021 11:55:31] “POST / HTTP/1.1” 500 –
{
“context”: {
“Extensions”: {
“available”: {
“aplext:backstack:10″: {}
}
”’
Your tutorial is excellent. I was able to learn enough by completing it to write my own Alexa skill with Python. My next step is to do the same thing in C++. Thanks for taking the time and effort to put this together.
Hello , great tutorial thanks for posting.
A quick question I have is why go for Ngrok rather than the recomended (in alexa developemnt docs) AWS ? Just wondering..
There needs to be a way for the Alexa service (in the AWS cloud) to communicate with the program that has access to the GPIO hardware on the Raspberry Pi. The ngrok program must make a tunnel from the Pi to the ngrok servers. It then tells you the address of the endpoint at the ngrok servers. You give that ngrok endpoint to Alexa. Alexa then sends its commands to that endpoint at ngrok, which then sends the commands on to the local machine that can twiddle the GPIO bits. I think that if you just want to process data (say, look up meanings of baby names
like “Alexa, what does the name Erica mean?”), that could be all done in the cloud, because it does not require any access to a local pi machine. Ngrok also nicely takes care of the certificate for the HTTPS communication that Alexa rightly requires.
hi I ran the alexaskill.py program but getting this error message:
aceback (most recent call last):
File “/home/pi/alexaskill.py”, line 5, in
from flask_ask import Ask, request, session, question, statement
File “/usr/local/lib/python3.9/dist-packages/flask_ask/__init__.py”, line 9, in
from .core import (
File “/usr/local/lib/python3.9/dist-packages/flask_ask/core.py”, line 10, in
from werkzeug.contrib.cache import SimpleCache
ModuleNotFoundError: No module named ‘werkzeug.contrib’
Any idea please on what is causing it?
Thanks
You can get around this my downgrading to the older version of werkzeug
try
pip3 uninstall Werkzeug
then
pip3 install Werkzeug==0.16.0
Apply this command.
It will solve your problem
pip install https://github.com/johnwheeler/flask-ask/archive/master.zip
The installation went well.
The setting of the skill was ok.
I’m unable to apply a successfull command in the Test mode from the Amazon developer page.
The answer is “There was a problem with the requested skill’s response” or “Sorry, I didn’t find a group or device named raspberry pi light”.
Please note I’ve started alexaskill.py on the RPI3 first
Any idea ?
No comment on the author as all the other posters apparently had better luck, but something about the initial python package and pip package installs/upgrades totally trashed my entire python development environment. While I have some moderate experience with linux and python, I could find no solutions using google-foo to make repairs. Ended up wiping the disk (SD card actually since this was on an RPi) and restarting from scratch… hours lost (not days thankfully) and all prior projects thankfully backed up.
Incidentally python was at 3.9 and pip at 20-something (pip no longer lets me do pip -V.
Initial part of traceback was…
Traceback (most recent call last):
File “/usr/bin/pip”, line 33, in
sys.exit(load_entry_point(‘pip==20.3.4’, ‘console_scripts’, ‘pip’)())
File “/usr/bin/pip”, line 25, in importlib_load_entry_point
return next(matches).load()
File “/usr/lib/python3.9/importlib/metadata.py”, line 77, in load
module = import_module(match.group(‘module’))
File “/usr/lib/python3.9/importlib/__init__.py”, line 127, in import_module
return _bootstrap._gcd_import(name[level:], package, level)
I tracked down part of the problem, installing Flask-Ask or something it brings along as a dependency locally or with sudo causes the error (at least on my machine). Manually deleting .local/flask* Flask*/ jinja*/ Jinja*/ crypto*/ six*/ restored my ability to do pip -V and pip list. Going to the Flask-Ask webpage and doing their install duplicates the problem on a fresh os installation.
The following were not deleted:
aniso8601==1.2.0
pyOpenSSL==17.0.0
PyYAML==5.4
Werkzeug==0.16.1