
If you are looking for RGB LED strips, you will probably come across the WS2812 or the WS2801. These two LED strips are very different, but both can be controlled with the Raspberry Pi. After using the latter in a previous tutorial and using it in our Ambilight, this tutorial is about using the Raspberry Pi WS2812 RGB LED Strip.
The models WS2812B and WS2811 are also compatible and can be addressed with this guide.
It must be said that one should not be fooled by the “smaller” model number of the WS2801. This has – apart from the price – a few advantages, which will be discussed in more detail below.
Components

Anyone who has already used an RGB LED strip (such as Ambilight) can continue to use the accessories. This includes the following in addition to a Raspberry Pi:
- For beginners: power supply + connector (see picture right)
- For experienced: switching power supply 5V 10A + power cord
- Jumper cable, ebay
- Breadboard
The maximum power of the power supply depends on the number of LEDs. According to the data sheet, an LED under full load (= maximum brightness) needs about 60mA. At 5m and 30 LEDs / m, this is 9 amps. So, a power supply, which has up to 10A is suitable. If you have more LEDs in use, you may need more than one power supply (more on that later).
In addition, of course, the actual RGB LED strip of the type WS2812 (B) or WS2811 (also called NeoPixel) is required. These are available in three different versions, which differ in the number of LEDs per meter:
The length should be chosen depending on the project to be implemented. But mostly 5m rolls are a bit cheaper. My recommendation is the middle version with 60 LEDs/m. These have a higher density of lights and thus a higher brightness. In terms of price, however, they are still cheaper than a similarly long WS2801 strip with only 32 LEDs
NeoPixel WS2812B / WS2811 vs. WS2801 on a Raspberry Pi

In a previous tutorial we already saw how to control a WS2801 RGB LED strip. That stip differs from the WS2812B or WS2811 and has some advantages, which I would like to list here first:
- Having two data lines requires fewer calculations.
- As a result, a higher frequency can be achieved.
- The brightness of the WS2801 is higher.
- It is also possible to control the WS2801 and play music, which is not possible with the WS2812 (more on this below)
Now the question arises, why one should still use a WS2812 RGB LED strip on the Raspberry Pi, if the WS2801 nevertheless brings some advantages? The answer is quite simple: the cheaper price. In comparison, one meter of WS2801 is quite expensive, which is why you want to handle it more sparingly. At relatively low prices for several feet of a WS2812 strip, even a large projects can be realized without a huge budget.
However, it must be said that it is unfortunately not possible to simultaneously play sounds via the Raspberry Pi onboard sound card and control the strip. This is because the Raspberry Pi is not a real-time system like the Arduino or ESP8266 is. For the sound reproduction PWM is used, which is also needed to control the WS2812 on the Raspberry Pi. Using both at the same time is not possible, which is why someone who relies on the sound reproduction should just take the WS2801.
Connecting the NeoPixel WS2812 to the Raspberry Pi
Before we connect the Raspberry Pi to the WS2812 LED Strip, we finish the power supply. If your strip has less than 20-30 LEDs, external power is not required. If it has more LEDs, the power of the Pi, however, is no longer enough and an external power supply is required.
The power supply itself depends on the selected type. For a power adapter with additional DC adapter (beginners), only the DC adapter needs to be connected, which will be followed by the power cables of the WS2812B. Once you have chosen this method, you can jump to the next point. A switched-mode power supply (for experienced users), however, is a little more complex.
Before, however, the note: When working with 230V caution is necessary because of mortal danger! Get help from an electrician or get back to the safe version of the normal power supply! Perform all work with a separate network connection.
First, we need a standard power cable that can handle 10A. Mostly on the bottom of the plug is a corresponding note (230V, 10A). We cut this cable carefully with a utility knife or similar.It contains two or three cables with different colors. These cables must also be carefully stripped.
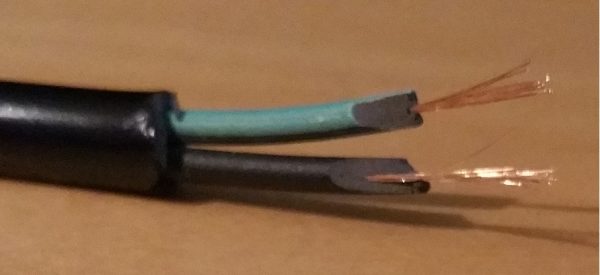
My cable has only two inner cables, but that’s enough. For connection to the switching power supply, the colors of the inner cables serve as orientation. The switching power supply has the connections “L”, “N” and “PE” or a grounding symbol.
- The black or brown inner cable comes to the outer conductor “L”.
The blue inner cable comes to the neutral conductor “N”.
The green-yellow inner cable is connected to the protective conductor “PE” or earthing symbol.

After the locking screws have been tightened, the power cord can be plugged into the socket and the voltage at the power supply can be measured with a multimeter. Although this is not mandatory, but can be made as a hedge. VCC is connected to V+ and GND to COM. If the voltage is not exactly 5V, this is not a problem.
Theoretically, it is also possible to power the Raspberry Pi from this power supply. Some users (according to comments in the WS2801 tutorial) also have done this. For reasons of space, this will not be discussed here.
Connection between Raspberry Pi and WS2812 NeoPixel stripes
If the power supply is set up so far, we connect the Raspberry Pi to the WS2812 RGB LED strip. The (switching) power supply must first be disconnected from the power.
Since there is only one data line, we only need one pin (GPIO 18). It is important that the ground connections of the Raspberry Pi and the switching power supply are connected, but not the 5V voltages! Overall, only two cables run from the Raspberry Pi to the WS2812 LED Strip: GPIO 18 (to DIN) and GND to COM of the PSU and GND of the strip.
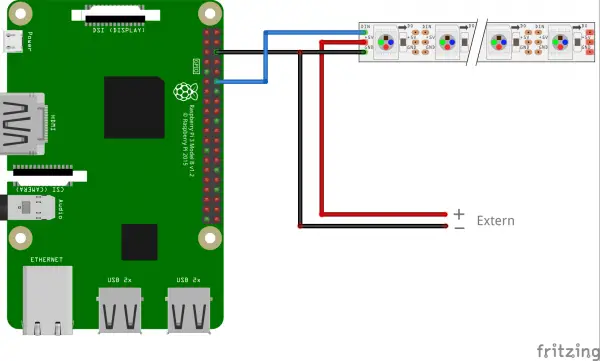
Depending on the length of the LED strip, the external power connection should be installed in several places. Ideally, the VCC and GND will be connected in parallel with the switching power supply on approximately every meter (so that many cables will lead to the power supply input).
Note: For lengths less than 1m, the power supply can also be omitted and the input voltage from the RV 5V pin of the Raspberry Pi come.
Preparation & Installation
Before we install the Raspberry Pi library for the WS2812 LEDs, some preparations have to be made:
- The package sources are updated:
sudo apt-get update
- We install the required packages (confirm with Y):
sudo apt-get install gcc make
build-essential python-dev git scons swig - The audio output must be deactivated. For this we edit the file
sudo nano /etc/modprobe.d/snd-blacklist.conf
Here we add the following line:
blacklist snd_bcm2835Then the file is saved by pressing CTRL + O and CTRL + X closes the editor.
- We also need to edit the configuration file:
sudo nano /boot/config.txt
Below are lines with the following content (with Ctrl + W you can search):
# Enable audio (loads snd_bcm2835)
dtparam=audio=on
This bottom line is commented out with a hashtag # at the beginning of the line:
#dtparam=audio=on - We restart the system
sudo reboot
Now we can download the library.
git clone https://github.com/jgarff/rpi_ws281x
In this directory are on the one hand some C files included, which can be easily compiled. The example code for this is easy to understand. In order to use them in Python, we need to compile them:
cd rpi_ws281x/
sudo scons
However, in this tutorial we are mainly interested in the Python variant and therefore switch to the Python folder:
cd python
Here we carry out the installation:
sudo python3 setup.py build
sudo python3 setup.py install
sudo pip3 install adafruit-circuitpython-neopixel
This will allow us to carry out a first test in the next step.
Test the Raspberry Pi WS2812 RGB LED Strip
In the example folder are some example files, with which the LED strips can be tested. In addition, even two WS2801 LED strips can be independently controlled by Raspberry Pi (multistrandtest.py).
We are initially interested in the simple version. For this we have to complete a few details before the test and therefore we edit the sample file.
sudo nano examples/strandtest.py
The file looks like this, where we have to state LED_COUNT (number of LEDs to be addressed) and LED_PIN (18 us).
Ein Fehler ist aufgetreten. Bitte versuchen Sie es später erneut. |
Then we save (CTRL + O) and return to the terminal (CTRL + X). Now the file can be executed (passing the path to the compiled files is important):
sudo python3 examples/strandtest.py
The LEDs of the WS2812 strip should light up as in the video below. In the upper code only a few effects (rainbow, etc.) are defined, however, it is also possible to create further effects analogously (everybody who wants to post his code for effects as a comment is welcome).
Something more

The WS2812 NeoPixel LEDs are also used in many other projects (mainly designed for Arduino), so you can certainly port some of them.
In addition, the Raspberry Pi Shop Pimoroni made an attachment for the Model B (from version B +) and the Raspberry Pi Zero and calls this unicorn pHAT. However, this RGB LED matrix uses its own software for operation.
Incidentally, the library I use is also offered by another developer as a server application.
187 Comments
Great Tutorial, Thanks!
I noticed you do not use a level converter between the PI and LED’s.
Is a level converter a good idea or not necessary in this application?
Thanks
It is not necessary 🙂
Doesnt the data input of the pixel strip be at 5v TTL level.
The PWM pin18 is output at 3.3V,
is it not safer to use a 74HC245
buffer in case led power shorts to data line?
Yes, you could but it is not needed. Until you don’t connect the 5V power to the data line, it should be save. Data level must not be at 5V.
I tried anyway and yes it worked first time, I had to change the ws2812 strip colour sequence to get correct colours tho. Strip is in a 40 x 15 layout to show animation/scrolling text.
Now writing code to map the strip laid out in an S type formation to an x,y matrix to make it easier to scroll pixels left,right,up and down.
I would like to use the faster/lower power banana pi with the raspian image, but need to find out the GPIO mapping to select the right pin for PWM
@Rixlumb do you already have a code for your matrix? I am trying to get a 62 by 4 matrix to run, but can’t find a good working code and/or setup.
I cannot agree with you on this if you are trying to run more than a dozen or so the leds further away from the raspberry pi have a good chance of not lighting up at all.
Two further points are:-
1. You should NEVER use one of these type of power supplies without having a ground wire connected from the mains cable a cable with only 2 wires should only be used with a double insulated device(made of plastic).
2. Along with a cover that prevents children’s little fingers getting to the live terminals. (the little plastic cover supplied with the psu doesn’t prevent children’s little fingers from getting into contact with the live terminals) (if you can fit something like a small screwdriver to any metal part of the terminal then a small child can get their finger into it as well)
I am not trying to put down your article but I have come across this problem before and small children cannot regrow their fingers once it is burnt off if they get away with just that and not killed by electrocution.
Except for them two small points this is a well instructed tutorial.
how to turn on my sound back on
Can we get an updated version of this? It doesn’t work on the Raspberry Pi 5 🙁
The program is running with no errors, but the LED strip is not lighting up. Is there a simple way to check whether the LED strip itself is working? Everything is set up like the video except the power to the LED strip is wired directly to an AC/DC power adapter plugged into a power strip for surge protection.
I am having this exact same issue and couldn’t find an answer online. Did you ever get it to work?
Make sure you connect to the right end of the data line. There will usually be an arrow.
I’m connected at the correct end and still no luck.
Hi,
Amazing tutorial!
Seeing the same issue as these folks. No errors when running strandtest. Maybe it’s my LED strip?
I’m using WS2812B IC
Color order : G R B(NOT RGB)
https://www.amazon.com/dp/B088FK8NG6?psc=1&ref=ppx_yo2_dt_b_product_details
Just not getting any lights to work. Strandtest running looping through commands just fine but not lights. Any ideas? Is that LED strip junk?
Been troubleshooting for days. Need help! 🙂
Stuck on the same issue as well, no errors on my Raspberry Pi 3b but the LEDs do not turn on
Great guide, thanks! Worked exactly as described. One question, what is the code to turn off all LEDs? Ctrl-C stops the program, but leaves the lights lit and sometimes sends the rpi into read only disk.
for i in range(strip.numPixels()): strip.setPixelColor(i, Color(0,0,0)) strip.show()I am also interested in this feature but where is it added in to the code?
For example in line 104.
Hours by hours an days by days of searching for this answer. Thank you so much ! ! ! ! ! ! !
You know if it works with a raspberry pi 4 or is different?
sudo PYTHONPATH=”.:build/lib.linux-armv7l-2.7″ python examples/strandtest.py -c clears all LEDs uppon script manual stop (ctrl + c on terminal)
is it possible to control from buttons(rainbow.chase,blue,white) via browser?if it is possibly pls do tutorial pls,pls
It is possible but I have not implemented it yet. You can have a look at this: How to setup a Raspberry Pi Node.js Webserver and control GPIOs
thanks,its very useful for me 😀
Please do a turorial from Lightberry beacase is a useful and easy to control led via mobile app
Just this hardware:
Raspberry
WS2812b led
Worked the first time!
Why do you have to turn the audio off?
Its because the pixel strip data is PWM and it cant be shared with the sound which also uses PWM. So Sound has to go…
Does that mean you cant use an LED strip like this, and also have the raspberry play any kind of audio through jack?
As a Raspberry (Linux/Python) noob, this was an awesome guide. Due to several fat fingers it took a bit to get it setup but wow. Thank you for the effort in creating this.
You are welcome 🙂
Brilliant tutorial! Would it be possible to connect at the front and of the led strip a 5V 10A switching power supply to meet the high A demand of a 5 meter strip?
I found copying and pasting code lines from the tutorial to the terminal instead of typing the code in directly….unless of course, you’re talking about wiring the WS2812…I always have trouble with those tiny jst pins. It would be easier if the ends of our fingers slimmed down to needle-nose plier size at the ends, eh?
I would like to set this project up as a “set it and forget it” type project. By that, I mean that I’d like to have a web page on the Pi where I can send a color to the Pi, have it set the color for three separate RGB strips and then leave the LEDs on at those levels indefinitely until the user either changes the color or turns them off. Can this be accomplished?
is there any c# library to control WS2811/2 with Raspberry pi and windows 10 IOT running on it ?
Hi did you get answer ?
What do I do if I don’t want to run the script as root?
I get the following error: RuntimeError: ws2811_init failed with code -5 (mmap() failed)
You can not run the script without admin right (you could try chmod +x, but GPIO acces needs root rights).
Thank you for the tutorial man :). I have one question though, why is it important to run the GND wire to the raspberry pi also? Why can we not just keep the data line connected to the raspberry pi? That part I dont understand.
Thanks!
Yes, the voltage of the data pin has to be grounded, else it doesn’t work.
How do you connect the raspberry pi to the GND and PSU at the same time?
A little clearer answer… For the LED strip to understand the voltage of the data input from the PI, it has to be in relation to something… The GND like establishes the base and the data line is a voltage in relation to GND. Without both the data line and GND, there is no actual signal going across the line. What you *don’t* want to do is connect the +5V from the power supply to the 5V line on the Pi. Short answer, your supplying power to the wrong side of the Pi power supply. The Pi has moderate protection for people that do this incorrectly, but for power supplies like the one mentioned here, it can override that pretty easily and destroy your Pi.
well in fact this is exactly what the wordclock project does see below:
https://rpi-wordclock.readthedocs.io/en/latest/doc_hardware_setup.html
you can see both gnd and 5V are shared btw pi and power supply and led strip.
That connection is to the 5v input to the pi, not the GPIO 5v pin. The latter would be bad.
This was an excellent tutorial and got me up and running quickly!
Now is there a tutorial somewhere on how I can implement a script for my ring of pretty lights to be used as a camera spot?
I use this pi3 for Octoprint and I want to use the WS2812 as a ring light over my camera and have it turn on when the camera streams and shuts off when done streaming.
Hi: This is not running for me and my ws2812, PI model 3, Raspian Jessie.
1) When power is applied the fifth LED glows green. Is this expected?
2) When running the script, the very first LED seems to run through the color patterns. I don’t seem to have control of the others LEDs.
Have you tested the strip with another device? Could be broken.
Has anyone tried this on Raspbian Stretch? Blacklisting and disabling the audio fully crashes (without being able to login anymore) my raspberry pi 3.
Without blacklisting the LED strip (a ws2812b strip) does absolutely nothing. Haven’t been able to get a single light working :(.
Hi, it doesn’t work for me, after launching strandtest.py script, I got an error message : “ImportError: No module named rpi_ws281x.rpi_ws281x”. I don’t how to fix it even if I followed this tutorial slowly and carefully… If you can help me, it would be really appreciated.
I tested this tutorial on a RPi 1 model B. Is it a problem ?
Could be, but I would not assume. However, I have tested it only with an Rpi3 and Zero.
When you installed it, did it return any error messages? The package is not installed, that’s why you get that error.
Well, I didn’t get any error message or anything bad… I’m going to try it with a RPi2, my RPi3 is already busy 🙂
Thanks.
I don’t know what I missed but I fail again with my RPi3 with a fresh install of Raspbian (stretch 2018-03-13)… same problem with my RPi1
This was great and helped me light up my Lego set assembly square! Your tutorial was very straightforward and I appreciate the work! https://twitter.com/smittyjaney/status/975156300962254848?s=19
Thank you 🙂
Hi,
I have the same problem than Mickael G.
“ImportError: No module named rpi_ws281x.rpi_ws281x”.
If you have an idea. Thank’s
The module was not installed correctly.
“Now we can download the library.
git clone https://github.com/jgarff/rpi_ws281x
In this directory are on the one hand some C files included, which can be easily compiled. The example code for this is easy to understand. In order to use them in Python, we need to compile them:
cd rpi_ws281x/
sudo scons
However, in this tutorial we are mainly interested in the Python variant and therefore switch to the Python folder:
cd python
Here we carry out the installation:
sudo python setup.py build
sudo python setup.py install
This will allow us to carry out a first test in the next step.”
Yes, you’re just quoting the tutorial. Followed it exactly and still get the same error, but no errors when running the commands given. How can one troubleshoot this?
great job, everything is working!
Any suggestions or link to how I could change animation by pressing a button. Each button press would initiate a different LEd animation. Animation that goes on and on until the button is pressed and thus switching to the next one.
that’s exactly what I’m looking to do as well! I wonder if there is some way to input numbers corresponding to different animations and achieve this. I hope to use the led strip for room lighting, but need more stable/predictable colors and animations than just the test file.
Do you think it is possible to get rid of the audio limitation with the w2812 using an extra audio card?
Hello, when I try to run:
sudo python setup.py build
sudo python setup.py install
I get the following error:
Extracting in /tmp/tmp4DhWJT
Traceback (most recent call last):
File “setup.py”, line 4, in
use_setuptools()
File “/home/pi/rpi_ws281x/python/ez_setup.py”, line 161, in use_setuptools
return _do_download(version, download_base, to_dir, download_delay)
File “/home/pi/rpi_ws281x/python/ez_setup.py”, line 120, in _do_download
_build_egg(egg, archive, to_dir)
File “/home/pi/rpi_ws281x/python/ez_setup.py”, line 62, in _build_egg
with archive_context(archive_filename):
File “/usr/lib/python2.7/contextlib.py”, line 17, in __enter__
return self.gen.next()
File “/home/pi/rpi_ws281x/python/ez_setup.py”, line 100, in archive_context
with ContextualZipFile(filename) as archive:
File “/home/pi/rpi_ws281x/python/ez_setup.py”, line 88, in __new__
return zipfile.ZipFile(*args, **kwargs)
File “/usr/lib/python2.7/zipfile.py”, line 770, in __init__
self._RealGetContents()
File “/usr/lib/python2.7/zipfile.py”, line 811, in _RealGetContents
raise BadZipfile, “File is not a zip file”
zipfile.BadZipfile: File is not a zip file
Do you have any idea why this is so? Thank you
I am receiving this error as well on a fresh install of latest stretch lite.
The Python directory in rpi_ws281x downloads setuptools-5.7.zip
examples ez_setup.py ez_setup.pyc neopixel.py README.md rpi_ws281x.i setup.py setuptools-5.7.zip
Any insight would be greatly appreciated.
Same issue here with Linux Stretch for raspberry pi zero =(
Any help?
So if anyone is still fighting this zip issue…
Looks to me after some googling that there’s an issue with python’s ’setuptools‘.
I ran these commands:
sudo apt-get update
sudo apt-get install python-pip
I’m not sure that we need pip specifically, but I think setuptools is bundled with this installation. All drivers installed properly after this. For the even lazier among you (such as I), this guy made a great tutorial and more importantly bash script that does everything automatically. Here:
curl -L http://coreelec.io/33 | bash
Then ran the strandtest.py and it’s working great.
Hope that works for you.
>sudo apt-get install python-pip
and then retry the build and install commands.
I am having the same issues with the inability to read the .zip file. I’ve tried using Tom’s instructions in regards to using the “curl -L http://coreelec.io/33 | bash” script , but that is giving me the same errors. I’m running a RaspberryPi Zero /w and a fresh install debian 8.0. I’ve attempted the setup.py build and install several times, and also tried deleting the rpi_ws281x directory and starting from scratch several times. Any one else conquer this Bad Zip file problem any other way?
apt install python-pip
pip install setuptools
I had this working as the instructions you provided. After a few fresh installs trying to get Hyperion working this strand test no longer works.
Setup: RPI B rev2 Ws2811 led strip.
RPI os: Raspbian Stretch latest revision.
Have I fried my gpio port 18? LED strip still works with a different source, just seems to be no data output on gpio 18.
Cheers
I’m experiencing all manner of random flashing LED’s when the code runs. The ./test application runs fine, but anything in python running under SUDO, I’m getting odd results. Someone mentioned power suppl? I’m running the Pi Zero on a Pi3 5A 15W PSU but I’m baffled if power could be the issue. I’ve disabled audio etc, but I’m loosing confidence with the WS2812 (Its a Waveshare RGB LED HAT with 32 LED’s)
Great guide, I was wondering hoy many LEDS is the theoretical maximum that we can control? I am currently working on a project where I need to control 221 LEDs but I don’t know if this setup will be able to handle it.
There are no replies about this type questions. So I will try mine: Others (https://github.com/FastLED/FastLED/issues/288) pointed noticeable delay control ( I would like to know more about this too ) and a memory bottle neck related to the quantity of RAM available in the Micro-controller. I don’t know how they calculate that too … but I will I do a simple relation to this info and our RapsberryPi: If a RaspberryPi 3 (model B) has 1 Gb RAM but finally 500KB available ( in my case ) -> If with Arduino Mega (3KBytes RAM ) they can address at least1000 LED, my calc is that with 500KB available I would be able to address at least 166,666 LEDs.
ok… about frameRate , Max Num of Leds and others FAQs -> https://github.com/jgarff/rpi_ws281x/wiki
+ info at readme [https://github.com/jgarff/rpi_ws281x]
“Both PWM and PCM use DMA transfer to output the control signal for the LEDs. The max size of a DMA transfer is 65536 bytes. Since each LED needs 12 bytes (4 colors, 8 symbols per color, 3 bits per symbol) this means you can control approximately 5400 LEDs for a single strand in PCM and 2700 LEDs per string for PWM (Only PWM can control 2 independent strings simultaneously) SPI uses the SPI device driver in the kernel.”
Hi, your tutorial was great, it works perfectly for me.
Only a question: I need to use audio too, can i use any external audio card (e.g. usb) ?
P.S. I’m on RPi3
Hi Fabrizio,
I think that it’s possible to use audio also without external audio card. In fact whit this library we can use other pin than GPIO 18.
In this github page (https://github.com/jgarff/rpi_ws281x), under the “Limitations” section, we can read:
“When using SPI the ledstring is the only device which can be connected to the SPI bus. Both digital (I2S/PCM) and analog (PWM) audio can be used”
I only used GPIO 18, but I’d like try ASAP the GPIO 10 (SPI GPIO). I need sound AND led strip for my project.
Anyone has already tried to use SPI GPIO?
PWM, PCM or SPI all will work with this chip
https://github.com/jgarff/rpi_ws281x
PWM, no Broadcom audio, PCM, no other I2S , SPI, no other SPI,
but SPI is your best bet.
Is there a way to run two equal length strips from another GPIO pin or are we stuck with only one?
Hi I have 1200 LEDs I am going to set up. I’ve got PSUs ready, and was planning on using buying a TEENSY 3.2 or similar.
However, I’ve stumbled across your post, and I have a Raspberry Pi lying around – I didn’t think it would do the job, but I’m curious, now you have proved it.
So the BIG question is, could your project scale up to 1200 LEDs?
Hi, I have a 30 LED strip and I am trying to mount it on a Raspberry pi model 3 b. I followed the tutorial and even tried the curl bash command, but for both the cases here is the error message that I am getting:
Traceback (most recent call last):
File “strandtest.py”, line 9, in
from neopixel import *
ImportError: No module named neopixel
Please let me know if I am doing something wrong. Any help is much appreciated! Thanks!
I am having the same problem.
Me too
If you are in the folder that contains the strandtest.py try running this: sudo python strandtest.py
is there a way to make this neopixel LED strip sound receptive?
Great tutorial! I would like to try to take this routine and run it on start up with the pi so that I don’t have initiate the script every time I turn on the pi. I have tried to search for methods on booting a python script online but none of them worked. Any thoughts or recommendations of where to look?
Hi,
what if I picked the 12V version of the WS2812B. Does the schematic – https://tutorials-raspberrypi.com/wp-content/uploads/2017/03/Raspberry-Pi-WS2812-Steckplatine.png – still apply, so GND and GND connectd, and 12V external isolated? Or is there a problem for the Pi or the control?
did you ever figure this out?
help
pi@raspberrypi:~/rpi_ws281x/python $ sudo python setup.py build
Extracting in /tmp/tmp6OITcv
Traceback (most recent call last):
File “setup.py”, line 4, in
use_setuptools()
File “/home/pi/rpi_ws281x/python/ez_setup.py”, line 140, in use_setuptools
return _do_download(version, download_base, to_dir, download_delay)
File “/home/pi/rpi_ws281x/python/ez_setup.py”, line 120, in _do_download
_build_egg(egg, archive, to_dir)
File “/home/pi/rpi_ws281x/python/ez_setup.py”, line 62, in _build_egg
with archive_context(archive_filename):
File “/usr/lib/python2.7/contextlib.py”, line 17, in __enter__
return self.gen.next()
File “/home/pi/rpi_ws281x/python/ez_setup.py”, line 100, in archive_context
with ContextualZipFile(filename) as archive:
File “/home/pi/rpi_ws281x/python/ez_setup.py”, line 88, in __new__
return zipfile.ZipFile(*args, **kwargs)
File “/usr/lib/python2.7/zipfile.py”, line 770, in __init__
self._RealGetContents()
File “/usr/lib/python2.7/zipfile.py”, line 813, in _RealGetContents
raise BadZipfile, “File is not a zip file”
zipfile.BadZipfile: File is not a zip file
pi@raspberrypi:~/rpi_ws281x/python $ sudo python setup.py install
Extracting in /tmp/tmpgkjX_D
Traceback (most recent call last):
File “setup.py”, line 4, in
use_setuptools()
File “/home/pi/rpi_ws281x/python/ez_setup.py”, line 140, in use_setuptools
return _do_download(version, download_base, to_dir, download_delay)
File “/home/pi/rpi_ws281x/python/ez_setup.py”, line 120, in _do_download
_build_egg(egg, archive, to_dir)
File “/home/pi/rpi_ws281x/python/ez_setup.py”, line 62, in _build_egg
with archive_context(archive_filename):
File “/usr/lib/python2.7/contextlib.py”, line 17, in __enter__
return self.gen.next()
File “/home/pi/rpi_ws281x/python/ez_setup.py”, line 100, in archive_context
with ContextualZipFile(filename) as archive:
File “/home/pi/rpi_ws281x/python/ez_setup.py”, line 88, in __new__
return zipfile.ZipFile(*args, **kwargs)
File “/usr/lib/python2.7/zipfile.py”, line 770, in __init__
self._RealGetContents()
File “/usr/lib/python2.7/zipfile.py”, line 813, in _RealGetContents
raise BadZipfile, “File is not a zip file”
zipfile.BadZipfile: File is not a zip file
pi@raspberrypi:~/rpi_ws281x/python $
Your tutorial is great! I am completely new to all of this and I was able to get the strand test to work (I have two 5M /150 pixel strips and was able to test both successfully plugged in end to end by changing the LED_COUNT to 300). But I am completely lost as to where to go for help for the next step which is to get the lights running my own patterns. I have found the Lightwork Editor at https://hohmbody.com/flickerstrip/lightwork/ and have been able to create my own patterns using this. When I save the patterns, they end up in my pi/downloads folder as .ino files. I am looking for somewhere to go to understand how to use these files. When I try to google search for information to control the LEDs, it leads me back to tutorials like this. Any help would be appreciated! Thank you!
Did you have any luck somehow making those .ino files work with this? I cant find any lightwork editors for python. I dont know much about this but would like to learn, and the step from running these examples to making your own seems very large at the moment!
Hello, Everything works great I was just wondering how I could make the whole strip turn the same color all at once, ( example red). I am planning on making a Discord bot to control my lights, so if I enter a command like !red the whole strip will turn red. So what Im am asking is there anyway to make the whole strip light up at once instead of each pixel like the strand test wipe color?
There are so many WS2812 LED used, most of them are soldered on a separated board for displaying. Many makers use the WS2812 LED in their own projects, but , no one will tell that there is a big mistake in your prototyping& small batch production.See why WS2812/SK6812 failures after SMT Soldering ?refer here
https://makerfab.blogspot.com/2018/09/w-hy-ws2812sk6812-failures-after-smt.html
There are so many WS2812 LED used, most of them are soldered on a separated board for displaying. Many makers use the WS2812 LED in their own projects, but , no one will tell that there is a big mistake in your prototyping& small batch production.details pls refer to my blog https://makerfab.blogspot.com/2018/09/w-hy-ws2812sk6812-failures-after-sm
Hi, quick question. I have WS2812B. does it work to connect it like in your tutorial for rpi zero w?
I have the 30 LED strip (WS2812) and I can run it with a Raspberry Pi Zero. I’m using pin 18 and a separate 2.5A power supply to supply the LED strip directly.
Hi, Thanks for for the guide. I’ve managed to get all the packages installed and the program is working however only on 3 of the 30 LEDs. any advice? powering direct from the PI at the moment but this also happens when powered externally. Thanks
Hi! Got mine to work, just a question though, isn’t a resistor between the GPIO pin and DIN of the LED strip required in order to not destroy the pin? Does the GPIO pin sink any current here?
Hi!
This project is just awesome!! I would like to use a ring with my Pi 3b+. Di you know if this ring described as WS2812B 5050 is compatible? Or is there specific thing to know to use that kind of LED ring?
https://www.amazon.fr/qualit%C3%A9-nouvelle-arriv%C3%A9e-pilotes-int%C3%A9gr%C3%A9s/dp/B07J4V6XCM/ref=sr_1_42
Thank you 🙂
Yes. I have the WS2812B 5050 24 led ring running fine.
Hi i’m two different python files. I’ve two different RGB Strips. The first file is connected to gpio 12 & second is connected to gpio 18. Now when i run the first file gpio 12 strips gets effected & When I run the second file both the strips are getting effected. How to resolve this?please help?
Hi!
Love this project, it works like a charm!
I was just wondering if there is any way to open this script in another way. I feel it’s not so practical to have to go in to the command prompt and type in the whole command to open strandtest.py. I would like to control the strip more conveniently.
Thanks for your awesome work!
Thanks for the tutorial….got everything working but if I close everything down I have to start again from
cd rpi_ws281x/
sudo scons
have I done something wrong?
does anybody have any links to other projects using these lights that aren’t just a test programme?
thanks
こんにちは。
パワハラ指切断でおなじみのド屑県香川のド屑企業フジフーヅでございます。
裁判も会社ぐるみで偽証をして無事乗り切ったド屑でございます。
餃子シュウマイなどをスーパーで販売しております。
店頭で見かけましたらそのときはご購入のほどどうかよろしくお願い致します。
The diagram shows the data pin of the strip connected to pin 12 (GPIO18), but the strandtest file has only options for led pin 10 or 18. Should I modify the uncomment line to 12? Or move the data line to 10 or 18 to match? Seems like I’ve tried every combination without success…
Thanks!
You can get audio out from the Pi and also control the LEDs if you take the audio from the HDMI port. Get an HDMI audio extractor.
I’m trying to control 12 led strips with GPIO 18 in raspberry PI with the same code of the example, only changing the number of leds, but it dosen’t work? Could you help me?
Did you/anyone get this to work? I am trying to control a strip with 10 LED’s, also using pin 18. I also am not getting any LED’s to light with no errors reported when strandtest.py is run.
One thing that was not clear based upon the Note in the instructions: Given that I have only 10 LED’s, can I simply run power to pin 4, ground to pin 6, and data to pin 18?
Works great! Thanks for the guide. I’m using these lights to illuminate the inside of my PC.
Quick tip: If you use DietPi instead of Raspbian, the audio output is disabled by default, so you don’t need to modify modprobe or config.txt.
Hi, almost newbie here. I was able to install and it works like a charm – also connected to 12 buttons – each one triggering a color wave. 1000’s thanks for the script.
Now… a question… how can I pass a “turn off the strip” on shutdown? Strip is powered by RPI 5v (only 30 led’s) but it remains on after shutdown… One of my “buttons” triggers the shutdown. Any clue would be appreciated.
Thank you – easy to follow, worked without fuss.
Instructions that work! Running from pin 18 exactly as described on a Pi4
Many thanks, brought a smile to my face!
Andy
Hi the 2812 strips I have are GRB and not RGB does this make any difference to the code?
You should try to change the values of green and blue in the code. However, I haven’t tested it with GRB stripes.
Hello everyone,
please, I start now from zero, and I need some help.
So, I intend, with 3 strips WS2818B, each 5m/150pixels, to build a spiral Christmas tree.
I watched this tutorial: youtube.com/watch?v=Pxt9sGTsvFk&t=81s and ran the test. Everything’s fine.
My questions are :
– it is possible to run automatically the program for a long time, about 4-5 hours, but with the change of effect’s colors?
– it is possible to set the program to shut down, itself?
May I ask you about some indications.
Thanks, a lot!
Lucian
works perfect thank you, just wondering, how i would go about adding more sequences and how to make it start on boot
Had to use python3 for a joint program. cannot read “_rpi_ws281x.so” at first. after “sudo pip install rpi_ws281x” it worked out.(see: https://github.com/rpi-ws281x/rpi-ws281x-python). thank you so much for this tutorial!
Hi it worked for me on Raspberian on rp 3b+, I installed ubuntu server 19 x64 and it just stopped working, test script fails with ws2811_init failed: Hardware revision is not supported. Any ideas? I actually am not sure if I properly disabled audio, tho I put all required blacklists in respective files from this tutorial
same error,do you have a solution?please
Fantastic! Had a problem, but when I realized that I had to connect the strip on the other end it worked like a charme. Thanks a lot!!
Oh my god THANK YOU! Was struggling for hours because of this. Who knew the proper connector would be at the center of the strip roll, and not the one available at the extremity of the roll.
Works for me on Rasberry 🙂 thank you so much. Anyone know how to get text to appear? Github doesn’t have any easy to use libraries – I see a lot of bad attempts.
I used this repo for text, works pretty well -> https://github.com/jwalanta/whiterabbit
you’ll need to adjust your rows columns and matrix fn – see issue for how to
It’s 2019, and there’s a native library for this on github, that doesn’t require compilation or disabling audio.
https://github.com/rpi-ws281x/rpi-ws281x-python
Hi, thanks for the clear instructions, it was really easy to follow.
Nevertheless, i still get this error message after trying to run the program:
Traceback (most recent call last):
File “examples/strandtest.py”, line 9, in
from neopixel import *
File “/home/pi/rpi_ws281x/python/neopixel.py”, line 5, in
import _rpi_ws281x as ws
ImportError: No module named _rpi_ws281x
I tried to reclone the git but that didn’t do the trick, anyone thoughts?
Nvm, got it. Just manually install the rpi:
sudo pip install rpi_ws281x
Why not to use raspberry’s pin2(5V) to get power to the led strip instead of using other power supply?
Hi, I bought a 16 X WS2812 5050 RGB LED Ring and have followed the instructions of the above tutorial and voila! Strandtest.py works like a champ.
I tried loading it up in Thonny (yes, I’m a beginner) and can edit the code but when I try to run it from Thonny, I get the following error:
Traceback (most recent call last):
File “/home/pi/Documents/Dan_wind_v1.py”, line 8, in
from neopixel import *
File “/usr/lib/python3/dist-packages/thonny/backend.py”, line 305, in _custom_import
module = self._original_import(*args, **kw)
ModuleNotFoundError: No module named ‘neopixel’
Yet, if I run the program from a terminal with sudo python strandtest.py it works fine. I’m logged in as pi and have added pi to the admin group. Feels like a permissions issue but I don’t know how to troubleshoot it further. I want to be able to alter the code via Thonny so that I can debug it too.
Thoughts please?
Dan
I have the same issue. I believe the issue is Thonny is running Python3 and the code is written for Python. I have looked all over for a way to convert the code, but as a beginner, I am not there yet.
Your use of “sudo”is the clue. You need elevated privileges to run the module. You can’t get that level of privilege by hitting F5 in Thonny.
Hi I’m only interested in using light when I press a key so what do I need to buy?
Thanks for the guide, this was the only way of getting my NeoPixel’s to work using the latest RPI4B inside of OctoPrint (Using the Enclosure Plug-In).
Super helpful, thank you.
Paul,
Could you please share the way you have managed to get Neopixel to work on Enclosure plug-in. I’m struggling for days to get this working.
16×16 Matrix (256 LEDs) works perfect. Thanks for this guide.
Hey guys, tried this a couple times and hitting this error:
pi@raspberrypi:~/rpi_ws281x/python $ sudo PYTHONPATH=”.:build/lib.linux-armv7l-2.7″ python examples/strandtest.py
Traceback (most recent call last):
File “examples/strandtest.py”, line 89, in
strip = Adafruit_NeoPixel(LED_COUNT, LED_PIN, LED_FREQ_HZ, LED_DMA, LED_INVERT, LED_BRIGHTNESS, LED_CHANNEL)
NameError: name ‘Adafruit_NeoPixel’ is not defined
I really wish I could figure this out myself, I’ve spent all day working on this code and it seems that it’s just refusing to be fixed.
I am suffering the same problem as Andrew 6-16-2020. I am not good(that should read no good) at coding so am reading what I can where I can. I built a project 18 months ago using Raspberry pi and Ws_2812 60 leds per m strip. It worked first time on recent and older model Rpi’s and so I thought I would build this small project again for my Grandchildren. I wired up the lights and tested them with their new Rpi’s and my already working SD card.(strandtest.py). All worked fine, hardware is ok . Then I tried recreating the code on a new sd card . After 3 weeks of frustration trying to get the code to work and deleting accidently the partition on the working card I am really back to square one. Something must have changed / been updated to cause a mismatch in the coding. Any comments would be most welcome (apart from I’m an idiot for deleting the working card)
If you’re getting the message
“NameError: name ‘Adafruit_NeoPixel’ is not defined”
try running
cd rpi_ws281x/python/examples
sudo python3 strandtest.py
After spending hours and hours searching this worked for me
Bless your soul, I remember that example to use I just got head strong on doing the original example. I am bookmarking this! Years of putting off this little project and procrastination. I got this now!!
Hi
I took these steps to solve this problem
1) pip install adafruit-circuitpython-neopixel
2) from neopixel import Adafruit_NeoPixel,Color
Hello, after
sudo nano examples/strandtest.py
And saving
When I do
sudo PYTHONPATH=”. :build/lib.linux-armv7l-2.7″ python examples/strandtest.py
I get the error
Traceback (most recent call last) :
File “examples/strandtest.py”, line 9 in
from rpi_ws281x import *
ImportedError: No module named rpi_ws281x
Pls be kind with me, this is my first time ever using rpi and I know pretty much 0 about programming
Dont run
sudo PYTHONPATH=”. :build/lib.linux-armv7l-2.7″ python examples/strandtest.py
Just put
sudo python3 strandtest.py
I am getting this error too.. seems this is happening recently since nobody have got this error before 🙁
Somebody please help
To all who have the problems from last comments:
I followed this guids to set up the LED-controll from the scratch (the second requires the first)
https://learn.adafruit.com/circuitpython-on-raspberrypi-linux
https://learn.adafruit.com/neopixels-on-raspberry-pi/python-usage
After going through this and had succsess, I tried to run the ws281x examples and they finally worked 🙂
This finally worked for me. Thank you!
did you try what I wrote?
n21brown, I tried what you suggested . But that resulted in a new problem:
pi@raspberrypi:~/rpi_ws281x/python $ sudo python3 examples/strandtest.py
Traceback (most recent call last):
File “examples/strandtest.py”, line 9, in
from rpi_ws281x import *
ModuleNotFoundError: No module named ‘rpi_ws281x’
I am having an issue with running this program. Do I have to use python 3 for this to work because I am using thonny python. I keep getting an error message the one I am having right now is it says “NameError: name ‘Adafruit_NeoPixel’ is not defined”
Not sure how to fix please help. 🙂
Had this same problem. We realized we were using “from neopixel import *”, but when changing to “from rpi_ws281x import *” it worked. Also check to make sure that your packages are under the correct python installation you are running your program on!
Is it possible to run this program without sudo in its instruction?
I also saw the ‘Adafruit_NeoPixel’ is not defined”
Had success with the original instructions, with one minor change to strandtest.py
Just added at the top:
from neopixel import *
Great Tutorial!! Thank you.
Anyone using this together with Google Assistant and IFTTT to control the LED strips with voice commands?
Any leads on how to do this will be helpful.
Hello, i got an error when i try to test the led strip:
pi@localhost:~/rpi_ws281x/python $ sudo PYTHONPATH=”.:build/lib.linux-armv7l-2.7″ python examples/strandtest.py
Traceback (most recent call last):
File “examples/strandtest.py”, line 90, in
strip = Adafruit_NeoPixel(LED_COUNT, LED_PIN, LED_FREQ_HZ, LED_DMA, LED_INVERT, LED_BRIGHTNESS, LED_CHANNEL)
NameError: name ‘Adafruit_NeoPixel’ is not defined
Any help pls?
Hi !
Do you know if we can put sensor with the WS2812 LED ?
Like a bunch of optical sensor who switch on the each LED individually ?
Example : the sensor 1 activate the first LED , and the second sensor activate the second LED
I’m kinda stuck with this part
(Thanks in advance ^^)
Works GREAT with a 600 light! Running code on a PI 3B, with current OS. Thank you!
Did someone find a solution to run this from Thonny instead using the command terminal?
Have you found a solution? I am also stuck in this problem, thank you!!
Just tried it. Worked first time. Brill 🙂
I don’t know if it helps, but I was getting the error “No module named rpi_ws281x”
and I found out that I forget to execute the line:
sudo pip3 install adafruit-circuitpython-neopixel
Thanks for this tutorial!
I didn’t have the blacklist file mentioned, but I found help here in leif81’s answer: https://superuser.com/questions/989385/how-to-make-raspberry-pi-use-an-external-usb-sound-card-as-a-default
Just add one line of text “blacklist snd_bcm2835” to file /etc/modprobe.d/raspi-blacklist.conf
Reboot and my problem went away and was able to get strandtest.py to work perfectly and I didn’t need the level shifter (as this article points out) that I had to wait for USPS to deliver after two weeks.
how to turn my sound back on??
I am currently running the code and the terms “Theater Chase Animation” and “Color Wipe Animation” is constantly appearing but the colour of the lights is not changing, any suggestons?
Just a heads up, the new(ish) Pi 4’s have seperate pwm’s for the audio jack now. you can have it play music now! (might wanna put a disclaimer for the pi4’s in the tutorial. i looked around for a while to find out it would work now)
Hi. My led strip’s led order is not RGB, I think its BRG. Is there a way to change the order in the code? If I want my strip lighting up as red (255,0,0), it lights up as blue.
Thanks in advance.
Hello Felix,
Excellent tutorial. Worked like a charm. I had absolutely no issues.
My configuration:
Raspberry Pi 3 B (also tested on Pi4)
Neopixel WS2813 mini (10 LEDs)
Connected to Pi on 5V and control on GPIO18.
I had to disable sound (removed the jack from Pi) as there was a screeching noise from the speaker synching with the LEDs lighting up. Though I followed steps to blacklist snd_bcm2835. wonder why?
Things i want to implement;
I have MagicMirror project wherein the display is triggered by PIR sensor and switches off display after a fixed interval (or no movement detected by PIR sensor), So i plan to trigger the LEDs when PIR detects motion and switch off when no motion detected. Anyone who can help me implement it.
Thanks
Update:
I finally could implement the idea. The MagicMirror display and the Neopixels get triggered with the PIR sensor and remain ON till the PIR sensor state is 1,thereafter both the mirror and the neopixel switch off. I included the python script in the rc.local file in the PI so that the code executes on boot and remains running in the background. Yay !
Hello Kevin,
Can you help me with that. Do you have a source code I can steal off you. I have been trying to do that as well.
Hi Kevin
I would also be very interested in how you did this if you could provide me with a sample of your program to please?
For reference to anyone with a similar issue to me:
I was having a fair few issues, such as
“`
File “/home/pi/led-strip/rpi_ws281x/python/ez_setup.py”, line 69, in _build_egg
raise IOError(‘Could not build the egg.’)
OSError: Could not build the egg.
“`
eventually, I had to install pip3, and then python’s setup tools. Also note that python3 version requires >=3.6 due to one of the libraries using updated string interpolation syntax (f string?)
“`
sudo apt install python3-pip && pip3 install setuptools
“`
Hello, I followed the tutorial and everything worked perfectly but now, I don’t know how to use the argument “-c” to clear the leds . Is it a command in the terminal, something directly in the python script or something else?. I’m new so a little bit of help would be very appreciated, Thanks.
Great article and looking forward to tackle it this weekend however it looks like the full file sample is missing (was showing before). I tried different browsers as well but shows the following every time:
The file looks like this, where we have to state LED_COUNT (number of LEDs to be addressed) and LED_PIN (18 us).
Ein Fehler ist aufgetreten. Bitte versuchen Sie es später erneut. (aka. An error has occurred. Please try again later.)
Am I just being a nut, or is anyone else experiencing the same?
there is no python folder inside rpi_ws281x anymore? Not sure how to cd python into it.
got the same problem can anyone help?
git clone https://github.com/rpi-ws281x/rpi-ws281x-python.git
Hi Thank you for the nice Tutorial
But got a big issue i dont understand.
I wired everything correctly
Brand new Pi Zero WH, Power supply 5V / 10A and LED Stripe 2m.
everything worked fine until i connected the supply to the rest.
red flickering light then nothing and HDMI signal is flickering green.
What is wrong? Its the second pi and I’m confused because wenn i disconnect the GND from the Pi
The Stripe Is trying to kill my eyes with rainbow flickering in every colour….
I did it like in the Tutorial and I cant help myself….
Send Help pls 🙁
I am trying to use this with five WS2812B 5050 LED light strips connected in series. These strips run on 12V, not 5V. Each light strip was wired so that there are 33 segments of 3 LED’s, so when you turn on one light I would expect for the first three lights to light up.
There is a setting that is not correct, but I am unsure as to what is wrong. When you turn on one light, various lights will illuminate through-out the segments. I cannot make the colors align – RGB, BRG, etc., none of the colors work properly. If I program the entire strand to any one color, the strand will light up with different colors through-out. It’s almost like as if the bit count is incorrect (24 bit, etc.)?
Hoping someone has some suggestions.
In researching the LED strip, I’ve discovered they are GS1903 chips – the strips were sold as WS2812B’s, but they are not. The StrandTest.py program works with them, but that’s it. The other examples do not work properly. I’d like to be able to program them myself – any suggestions?
I need torun two strips in a V configuration with the same lights coming on at the same time, how do I determine where to cut the strip to do this?
I have tried twice from a freshly formatted SD card but when I get to the step that references the python directory…none can be found. It would appear I’ve missed something since nobody else mentions this..
Hi, electrical newbie here 🙂
If I understand it correctly ground pin 6 and 9 of the raspberry are electrical connected. Would it work if I connect ground pin 6 with the minus pol of the “DC 5.5×2.5mm socket” and ground pin 9 with the ground cable of the led stripe?
Hi,
We have a team of 55+ highly qualified professionals certified in SEO and ISO standards, providing a wide range of SEO services to generate higher visitor traffic and top-page rankings for your website. Our SEO professionals ensure that your website gets higher rankings on Google. We offer SEO (with plan & activity) Services at much lower Cost.
I’d gladly send you our Package, Activity per Month, and Video Testimonials for reference.
Regards,
Nancy
Get higher rankings on Google with SEO at a much lower Cost
I am VERY new to Raspberry Pi… already an experienced user of Arduino. I’m going through this tutorial on how to drive the LED strip. I have already developed the WS2812b light strip code for arduino. Now that I’m curious on doing this on Raspberry Pi…
I’ve came across with this line: sudo apt-get install gcc make build-essential python-dev git scons swig
it failed that python-dev has no installation candidate… meaning it is missing from the package?
Please help!