
In large houses or outside, the connection of the Wi-Fi router usually does not reach all corners. Even normal W-LAN repeaters are not as cheap as one would expect. An ESP8266 access point or Wi-Fi repeater, however, is! This can either amplify the Wi-Fi signal or serve as an access point via a LAN cable. Instead of using expensive accessories, this self-made solution is ready for use in a very short time.
Required Hardware Parts
The ESP Access Point doesn’t need a lot of hardware parts and is therefore inexpensive. In my case I used:
- ESP32 NodeMCU
- 5V power supply micro usb with a micro USB cable
- a small housing (e.g. 3D printed)
- optional: ENC28J60
- optional: wire and antenna
A sufficient power supply is important here. If you use an ESP-01, you either need a power supply with a lower voltage or series resistors.
If the access point is outdoors, waterproof housing is very important. Here you can either print a housing yourself or e.g. just take a Tupperware box.
Flashing the ESP8266 Access Point Software
To bring the access point software to our ESP8266, we need the firmware binaries and a flash tool. The firmware is included in this GitHub project. The easiest way is to download this project as a ZIP file and then unzip it.
How we flash the firmware now depends on our operating system.
Linux / Mac OS
On Unix-based operating systems, the flash process is very simple. We use the ESPtool, which is installed via the Python Package Manager (pip).
pip install esptool
esptool.py --port /dev/ttyUSB0 write_flash -fs 4MB -ff 80m -fm dio 0x00000 firmware/0x00000.bin 0x02000 firmware/0x02000.bin
If you have an ESP-01, choose 1 MB instead of 4 MB.
Windows
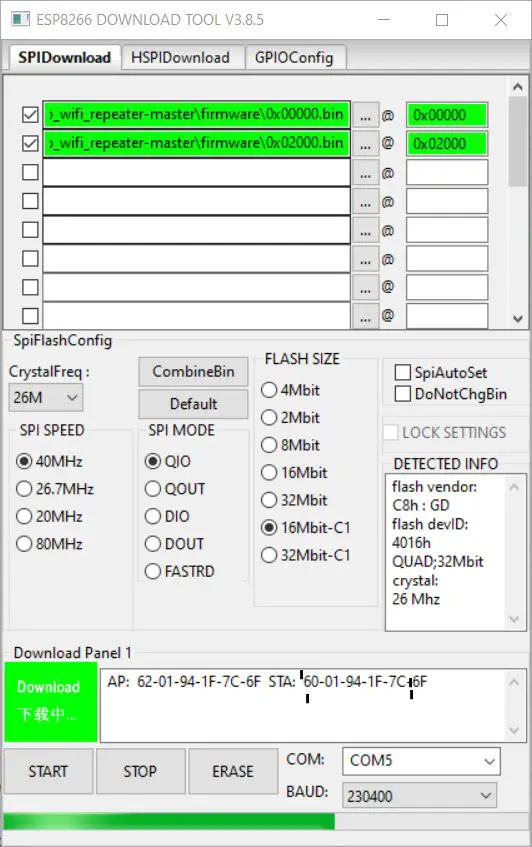
With Windows, we use the ESP Flash Tool, which can be downloaded here. After the download we open it and select Developer Mode> ESP8266 DownloadTool. Then we set it up as follows:
- …firmwarex00000.bin @ 0x00000 (set catch!)
- …firmwarex02000.bin @ 0x02000 (set catch!)
- CrystalFreq: 26M
- Spi Mode: QIO
- Flash Size: 32Mbit (with ESP-01 8Mbit)
- COM: select accordingly
Then we press start.
I had a problem with these settings on a Wemos NodeMCU (Lolin). So I tried this as an alternative:
…firmwarex00000.bin @ 0x00000(catch remote)- …firmwarex02000.bin @ 0x02000
- …firmwarex82000.bin @ 0x82000 (added)
- Spi Mode: DIO
With these settings, I was ultimately successful.
Configure the Wi-Fi Repeater
To configure the ESP8266 Access, we need a WiFi-enabled device (smartphone or laptop). Here we look for the available Wi-Fi networks and connect to MyAP (open). Then we open the IP 192.168.4.1 in a browser:
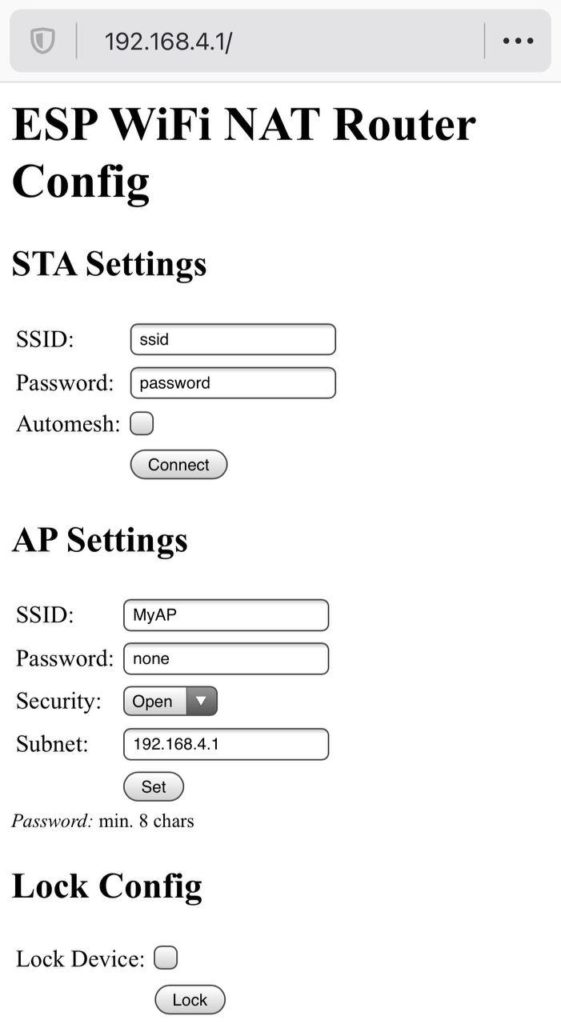
Here we set the following:
- Under STA Settings: Enter the SSID + password of our current WiFi network and click the Connect button. You may then have to reload the page.
- Under AP Settings: Here we can enter the data of our access point. The SSID and password may differ from the data above.
Important: Select WPA2 as security and don’t leave it open. - After these settings have been saved, the connection to this AP is automatically disconnected and you have to reconnect with the set access data.
All other devices in the vicinity can now also connect via the ESP8266 Wi-Fi repeater or access point.
Optional: Use LAN Connection
If you prefer a LAN connection, you can also use it. This requires an ENC28J60 adapter, which is connected to a NodeMCU via SPI, as described here:
NodeMCU/Wemos  ESP8266      ENC28J60

        D6     GPIO12 <---> MISO
        D7     GPIO13 <---> MOSI
        D5     GPIO14 <---> SCLK
        D8     GPIO15 <---> CS
        D1     GPIO5  <---> INT
	D2     GPIO4  <---> RESET
               Q3/V33 <---> 3.3V
               GND    <---> GND
The same adapter can also be used for a Raspberry Pi Zero. As we have seen, however, the data rate is not perfect, which is why I prefer the WiFi variant.
1 Comment
There is a much easier way – use any flavor of linux and install network manager. You can do ether -> wifi or vice-versa. And you can do other things with the Pi at the same time. I have had one up and running for 6+ months (a pi4) and also use it as a set-top box.