There are some sensors for the Raspberry Pi that can measure humidity, temperature and other values. Nevertheless, these modules are almost exclusively suitable for the air and not intended for use in the earth.
For some projects, such as an automatic plant supply, the moisture of the soil must be measured, then, e.g. refilled with water.
In this tutorial, I’ll show you how to skip the (analog) humidity reading with a sensor and convert it to a digital value so that the Raspberry Pi can interpret it.
Required Hardware Parts
I have used the following hardware parts:
Setup
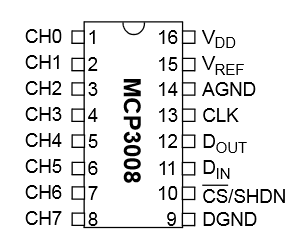
The MCP3008 IC is an analog-to-digital converter. Since the Raspberry Pi cannot detect intrinsically analog signals, you need a converter like the MCP3008.
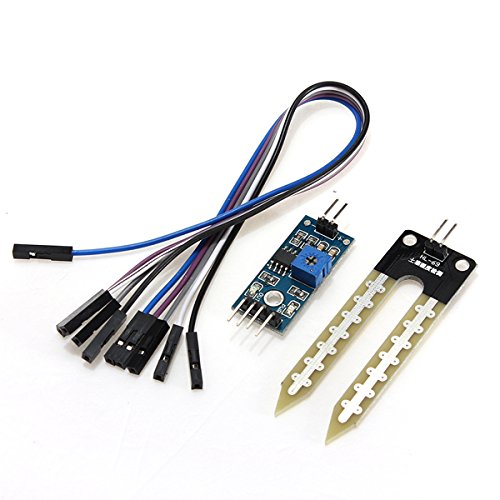
Although this sensor also provides a digital pin that can send a signal as soon as a threshold is exceeded, however, it is not exactly determinable. The threshold can be changed by rotating the wheel (if it has been reached, the green light will be on).
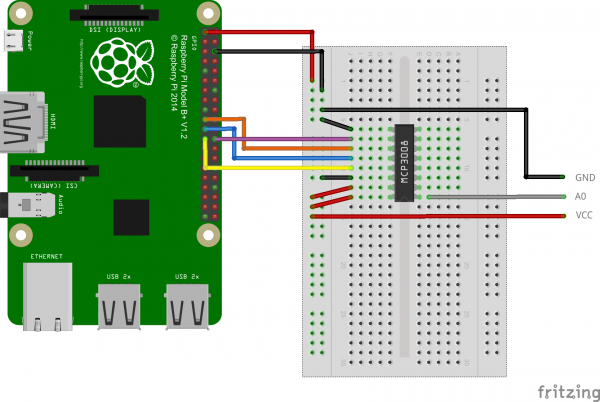
To read the analog pin, we connect it as follows:

The connections to the MCP3008 are as follows:
| RaspberryPi | MCP3008 |
|---|---|
| Pin 1 (3.3V) | Pin 16 (VDD) |
| Pin 1 (3.3V) | Pin 15 (VREF) |
| Pin 6 (GND) | Pin 14 (AGND) |
| Pin 23 (SCLK) | Pin 13 (CLK) |
| Pin 21 (MISO) | Pin 12 (DOUT) |
| Pin 19 (MOSI) | Pin 11 (DIN) |
| Pin 24 (CE0) | Pin 10 (CS/SHDN) |
| Pin 6 (GND) | Pin 9 (DGND) |
VCC of the sensor is also connected to 3.3V (pin 1) of the Raspberry Pi, GND and pin 6 (GND) and A0 comes to CH0 of the MCP3008.
Software
In order to be able to address the MCP3008, SPI must be activated. This works as follows:
sudo raspi-config
“8 Advanced Options” -> “A6 SPI” -> “Yes”.
Then confirm the restart.
Now you can install the spidev library if you have not already done so:
sudo apt-get install git python-dev
git clone git://github.com/doceme/py-spidev
cd py-spidev/
sudo python setup.py install
With the following script you can then address the sensor (sudo nano humidity.py):
|
1 2 3 4 5 6 7 8 9 10 11 12 13 14 15 16 17 18 19 20 21 22 23 24 25 26 27 |
#!/usr/bin/python import spidev import os import time delay = 0.2 spi = spidev.SpiDev() spi.open(0,0) spi.max_speed_hz=1000000 def readChannel(channel): val = spi.xfer2([1,(8+channel)<<4,0]) data = ((val[1]&3) << 8) + val[2] return data if __name__ == "__main__": try: while True: val = readChannel(0) if (val != 0): print(val) time.sleep(delay) except KeyboardInterrupt: print "Cancel." |
A value between 0 and 1023 is output. In my test, the sensor has often returned a 0, which would mean total wetness (conductivity). But since only values around 100-200 appear, if the sensor is completely submerged in water, a value of 0 is obviously wrong, so I filter this value in the script. In addition, values come out around ~ 1000 if there is nothing conductive (air) between the sensor plates.
Depending on the material (earth, water, sand, etc.), which is located between the plates, other values come out in the dry/wet state. Therefore, it makes sense to take multiple measurements and adjust the analog threshold for your application.


3 Comments
no response after running the program on python3(raspberry pi). just running …without doing anything…no out put….no error…..no warning…just running…………
It’s running, but only shows value of 1. Any idea how I can change it to show right soil moisture value?
I follow your tutorial, it works but the output value always is 895 or 1023. Does that mean I did something wrong? Please give me an advice.
Thanks