")
For some applications, such as games, a joystick can be useful or be even necessary. Since these usually work purely analogously, the signal has to be converted, which we do with the MCP3008 chip. Connecting and reading a joystick is shown in this tutorial.
These analogue joysticks have two axes, which allow a certain voltage to pass through two potentiometers (adjustable resistance). So that the position can also be read out digitally on the Raspberry, the MCP3008 is needed. The scheme of this module is as follows:
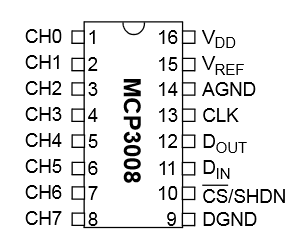
On the left side are 8 analogue inputs, of which we only need 3.
On the right side are the digital outputs, where the transmission takes place via DIN and DOUT.
The MCP3008 device is a 10-bit analogue-to-digital converter. This means that it can reach a maximum of 2 ^ 10, i.e. 1024 bit combinations (the values from 0 to 1023). With an input voltage of 3.3V, the approx. 3.2mV are steps that can be mapped (3.3V).
Accessories
- Joystick (analogue)
- MCP3008 IC (analog-to-digital converter)
- Breadboard
- Male – Female Jumper Kabel
- one 10kΩ resistor
Setup
Although the joystick has a 5V input voltage, it works without problems using 3.3V, which is even more important when using the MCP3008. The term SW is for the button that is activated when you press the joystick. For this to be either 0 or 1023 (pressed or not pressed) a 10kΩ resistor is attached to VCC. Without this resistance, invalid numbers are output that can not be clearly assigned.
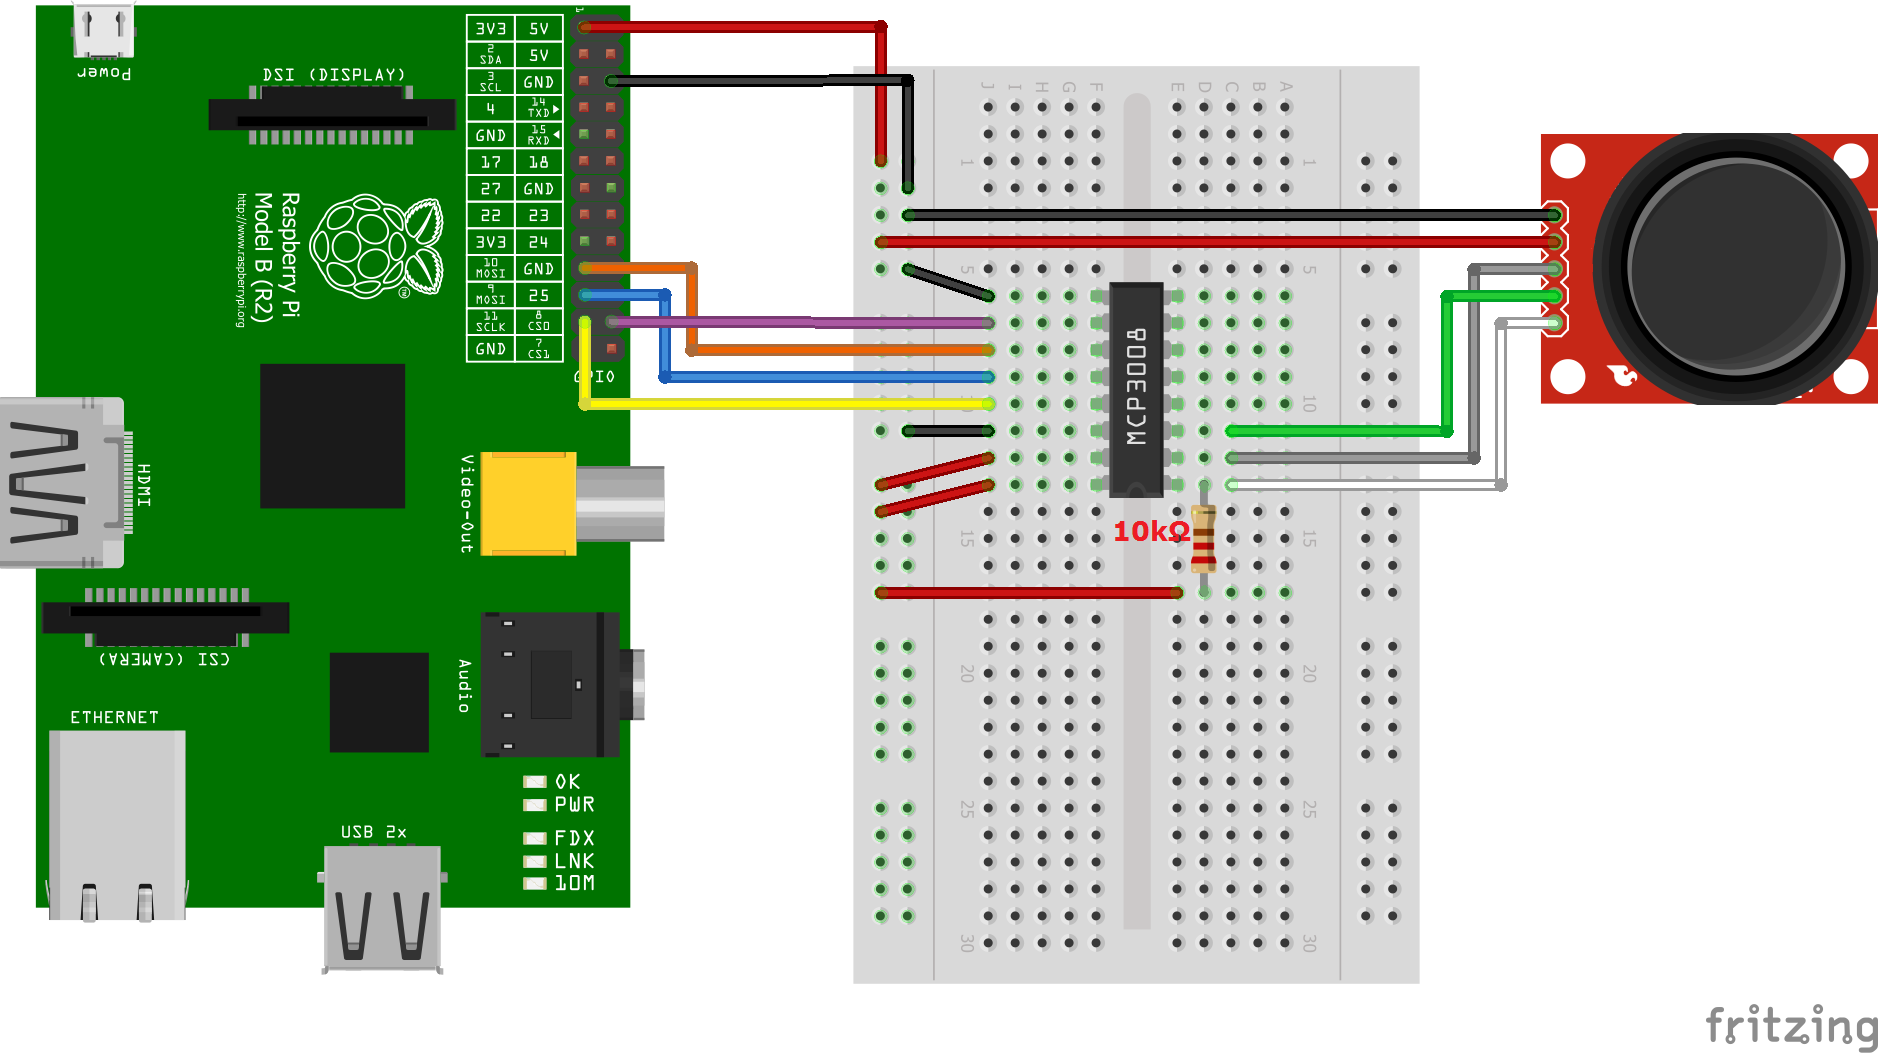
The pin assignment of the Raspberry looks like this:
| Raspberry Pi | MCP3008 |
|---|---|
| Pin 1 (3.3V) | Pin 16 (VDD) |
| Pin 1 (3.3V) | Pin 15 (VREF) |
| Pin 6 (GND) | Pin 14 (AGND) |
| Pin 23 (SCLK) | Pin 13 (CLK) |
| Pin 21 (MISO) | Pin 12 (DOUT) |
| Pin 19 (MOSI) | Pin 11 (DIN) |
| Pin 24 (CE0) | Pin 10 (CS/SHDN) |
| Pin 6 (GND) | Pin 9 (DGND) |
Following the connection to the joystick:
| RPi / MCP3008 | Joystick |
|---|---|
| Raspberry Pin 6 (GND) | GND |
| Raspberry Pin 1 (3.3V) | +5V |
| Pin 1 (CH0) | SW |
| Pin 2 (CH1) | VRx |
| Pin 3 (CH2) | VRy |
Testing
In my script, I use the SpiDev library. If you have not already installed it, you should do that before testing the joystick.
As mentioned earlier, the MCP3008 returns a value between 0 and 1023. If the joystick is in the “idle state”, ie in the middle, around 512 will be returned. 0 is returned at one end of one axis and 1023 at the other end (at which end it depends how you look at the joystick).
You can download the test file
wget http://www.tutorials-raspberrypi.de/wp-content/uploads/scripts/joystick_test.py
or create it yourself:
|
1 2 3 4 5 6 7 8 9 10 11 12 13 14 15 16 17 18 19 20 21 22 23 24 25 26 27 28 29 30 31 32 33 34 35 36 37 38 39 40 41 |
#!/usr/bin/python import spidev import os import time # Define Axis Channels (channel 3 to 7 can be assigned for more buttons / joysticks) swt_channel = 0 vrx_channel = 1 vry_channel = 2 #Time delay, which tells how many seconds the value is read out delay = 0.5 # Spi oeffnen spi = spidev.SpiDev() spi.open(0,0) spi.max_speed_hz=1000000 # Function for reading the MCP3008 channel between 0 and 7 def readChannel(channel): val = spi.xfer2([1,(8+channel)<<4,0]) data = ((val[1]&3) << 8) + val[2] return data # endless loop while True: # Determine position vrx_pos = readChannel(vrx_channel) vry_pos = readChannel(vry_channel) # SW determine swt_val = readChannel(swt_channel) # output print("VRx : {} VRy : {} SW : {}".format(vrx_pos,vry_pos,swt_val)) # wait time.sleep(delay) |
Then you can start the script by
sudo python joystick_test.py
and move the joystick. You’ll find that 1024 steps are most likely too much, as finger accuracy on a small joystick can hardly be achieved. Therefore, I would recommend setting areas in an application rather than testing for individual values (apart from 0/1023).
6 Comments
Same here. I get weird values that are not what is stated to appear.
Doesn’t work for me. Values are not what I expect. F.i. Switch value is 0 and 254 when pushed.
when I followed these instructions and run the python code it prints out 0 for all the values(x,y,button). I don tknow if that means its a problem with the code or the hardwire. If it is a problem with the hard wire then how do I check if a connection has been made from the joystick to the rasberrypi because when i run ls /dev/spidev it gave me /dev/spidev0.0 /dev/spidev0.1, so I assumed a connection was made.
Hello, I am running into the same problem and I was wondering if you ever figured out what the problem was?
can i do this without using the MCP3008
Hello, how can you do without the MCP3008?