
Stepper motors are ideal for applications where it is necessary to know the angle of rotation, for example in robotics. Unlike a normal motor, stepper motors can control the steps individually and can therefore detect the exact position.
For easy controlling such a motor, a driver IC like the L293D or the ULN2003 are needed. The use of both drivers is shown in this tutorial.
The more common of those two is the ULN2003, this is also often included on driver boards with the 28BYJ–48th There is a voltage of 5V and 12V possible.
The L293D however opens the possibility to connect an external power source, whereby for example a higher amperage (which in some motors is necessary) can be connected.
Accessories
- Stepper motor, e.g. the 28BYJ-48 with ULN2003 driver board (US / UK)
- L293D Driver IC (US / UK)
- alternatively, if no L293D is wanted: ULN2003 Darlington Array IC (US / UK)
- Jumper wire (US / UK)
- maybe an external power source, for example batteries
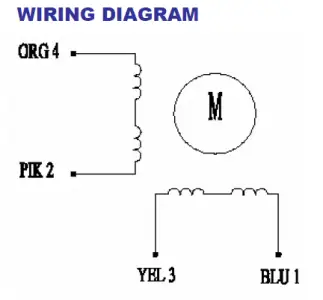
Of course, you can use any other stepper motor, but it is important to identify the possibly different wire colors when you connect them (see data sheet).
Those colors reflect in my case to the 28BYJ-48 (data sheet):
Wiring L293D
If you have a motor with ULN2003 driver board or the ULN2003 driver IC, you can skip this step.
The data sheet shows that an external power source is possible. The structure is thus as follows:
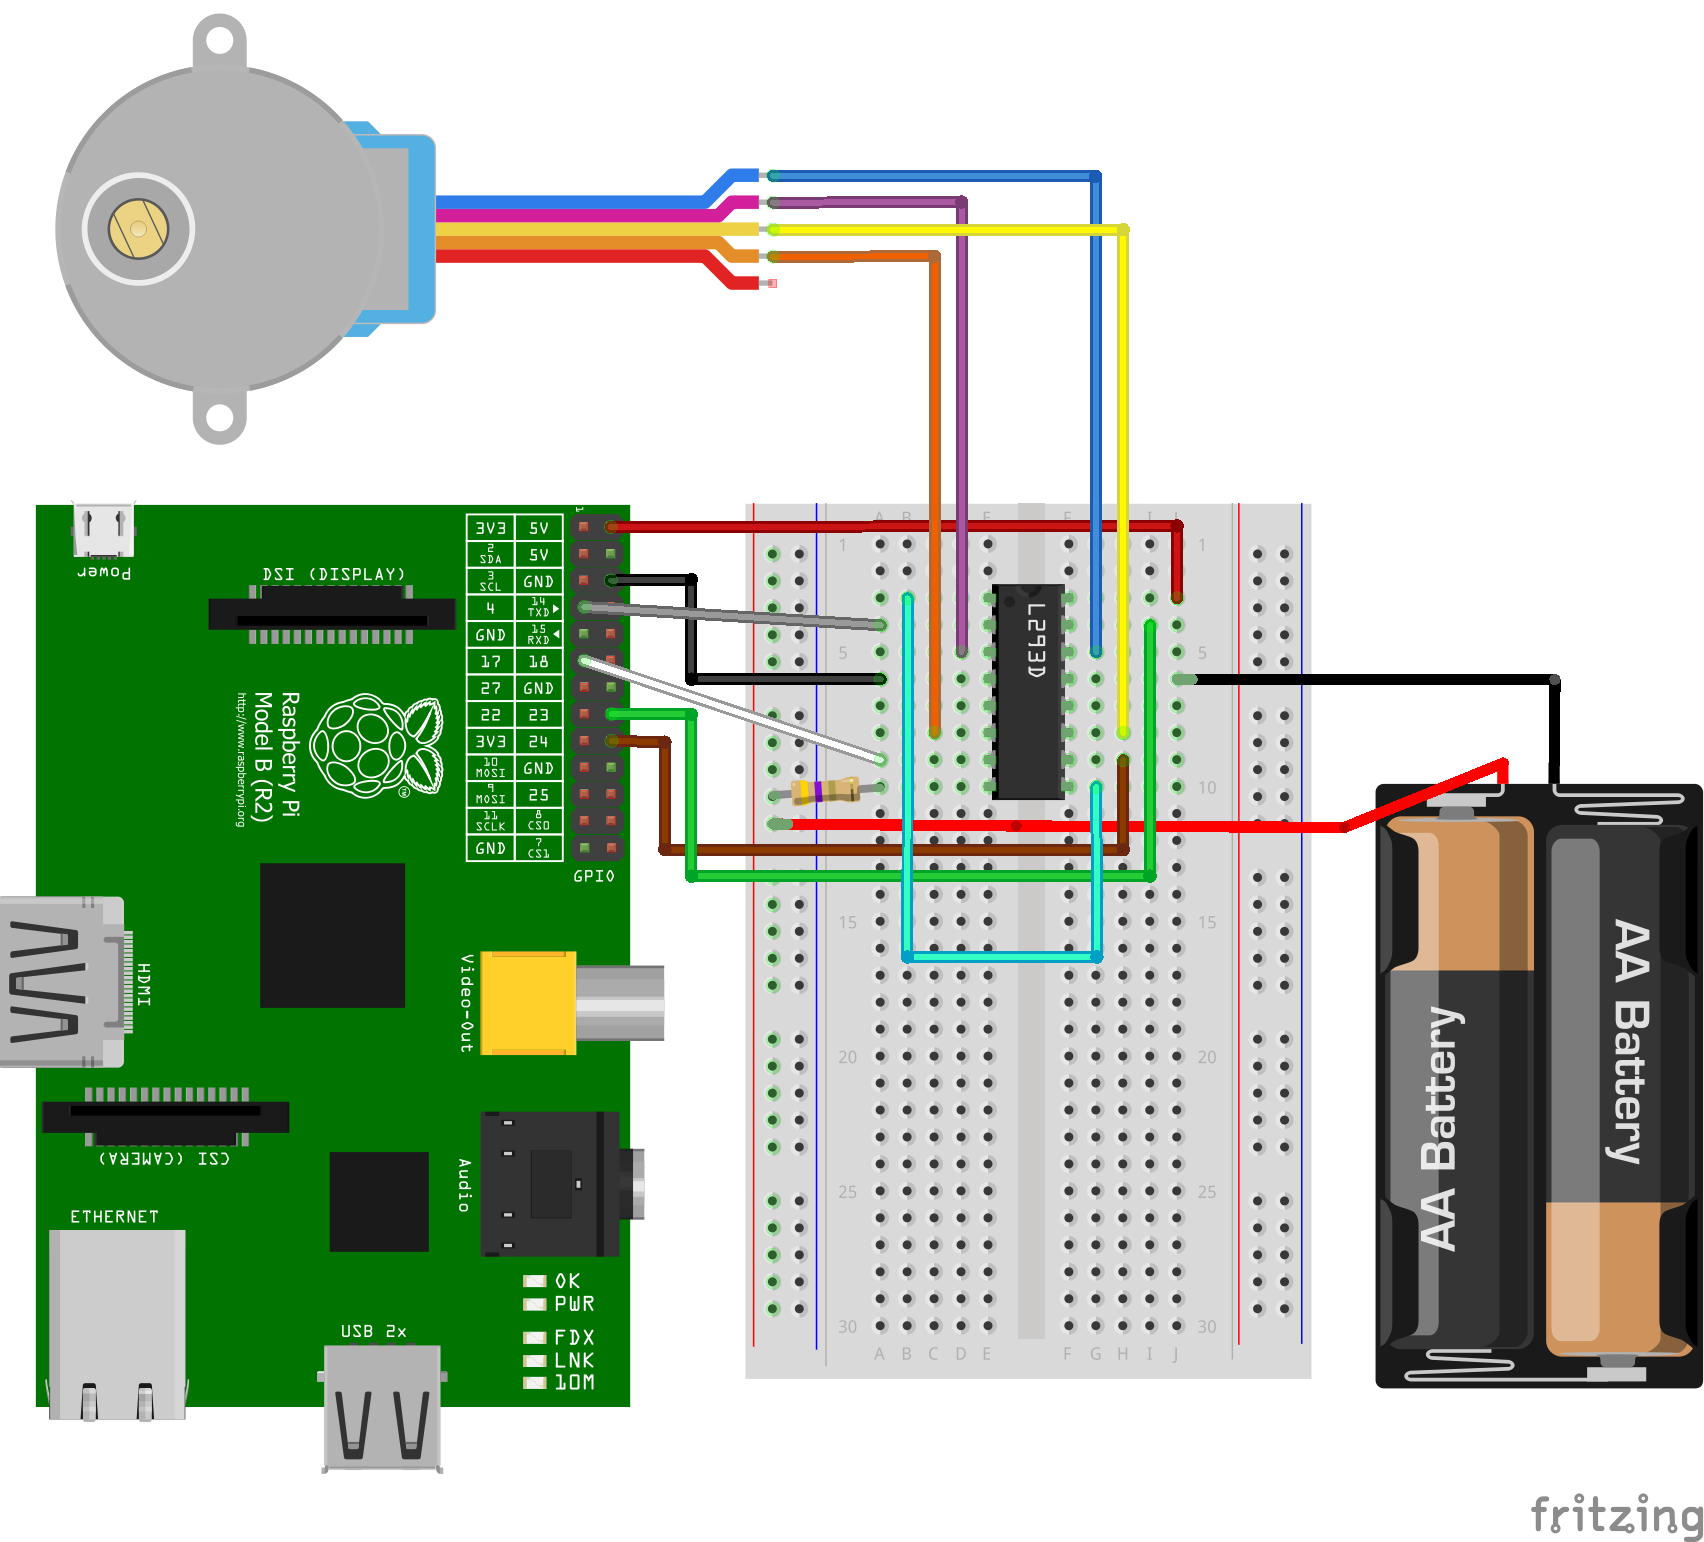
If the motor amperage required more than the Raspberry can deliver, you must have an external power source (a fixed current source is better than batteries). The pre-resistor is also specified in the data sheet. Pay attention that you have enough voltage and amperage, because that is the most common cause, why the engine later is not working as it should. With the 28BYJ-48 however, this is not the case.
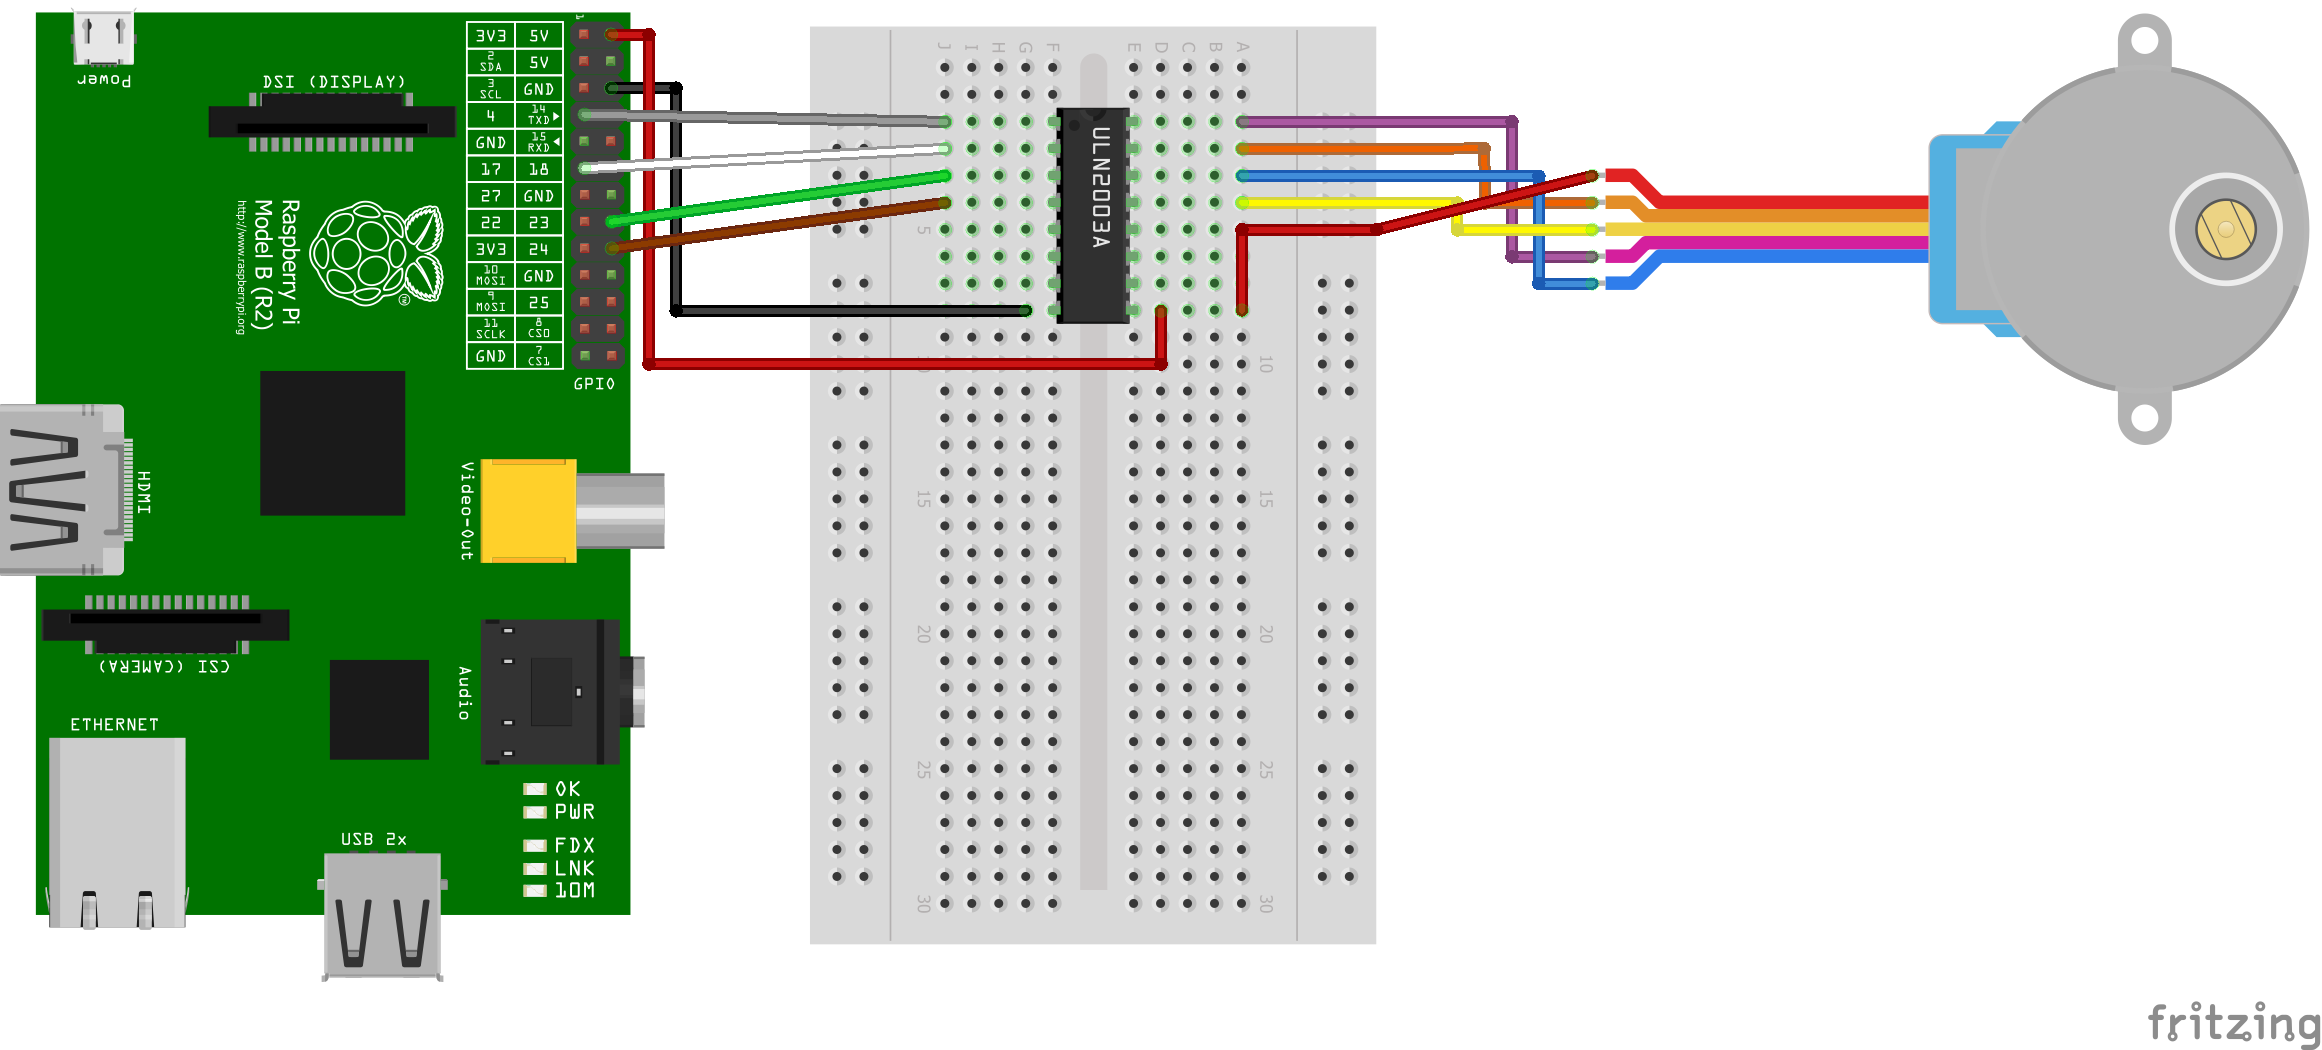
Wiring ULN2003
Unlike the L293D, here are only 5V or 12V input voltage allowed (data sheet). Since the Raspberry Pi only has 5V supplies, we can also only use stepper motors that require a maximum of 5V.
Testing
When using the 28BYJ–48, the sequence is as follows. If you are using a different motor, you have to adjust the sequence corresponding to your data sheet.
So we create a script:
sudo nano stepper.py
and add the following script:
|
1 2 3 4 5 6 7 8 9 10 11 12 13 14 15 16 17 18 19 20 21 22 23 24 25 26 27 28 29 30 31 32 33 34 35 36 37 38 39 40 41 42 43 44 45 46 47 48 49 50 51 52 53 54 55 56 |
import RPi.GPIO as GPIO import time GPIO.setmode(GPIO.BCM) GPIO.setwarnings(False) coil_A_1_pin = 4 # pink coil_A_2_pin = 17 # orange coil_B_1_pin = 23 # blue coil_B_2_pin = 24 # yellow # adjust if different StepCount = 8 Seq = range(0, StepCount) Seq[0] = [0,1,0,0] Seq[1] = [0,1,0,1] Seq[2] = [0,0,0,1] Seq[3] = [1,0,0,1] Seq[4] = [1,0,0,0] Seq[5] = [1,0,1,0] Seq[6] = [0,0,1,0] Seq[7] = [0,1,1,0] GPIO.setup(enable_pin, GPIO.OUT) GPIO.setup(coil_A_1_pin, GPIO.OUT) GPIO.setup(coil_A_2_pin, GPIO.OUT) GPIO.setup(coil_B_1_pin, GPIO.OUT) GPIO.setup(coil_B_2_pin, GPIO.OUT) GPIO.output(enable_pin, 1) def setStep(w1, w2, w3, w4): GPIO.output(coil_A_1_pin, w1) GPIO.output(coil_A_2_pin, w2) GPIO.output(coil_B_1_pin, w3) GPIO.output(coil_B_2_pin, w4) def forward(delay, steps): for i in range(steps): for j in range(StepCount): setStep(Seq[j][0], Seq[j][1], Seq[j][2], Seq[j][3]) time.sleep(delay) def backwards(delay, steps): for i in range(steps): for j in reversed(range(StepCount)): setStep(Seq[j][0], Seq[j][1], Seq[j][2], Seq[j][3]) time.sleep(delay) if __name__ == '__main__': while True: delay = raw_input("Time Delay (ms)?") steps = raw_input("How many steps forward? ") forward(int(delay) / 1000.0, int(steps)) steps = raw_input("How many steps backwards? ") backwards(int(delay) / 1000.0, int(steps)) |
Then just save with CTRL+O and CTRL+X and quit. You can start it with:
sudo python stepper.py
With setStep(0,0,0,0) you can set the stepper to idle, because otherwise power is consumed all the time (by the electromagnets in the motor).
Regard that if you choose a high delay value (per step), the motor is moving very slowly (e.g. with a 100ms delay one full turn would already take 51.2 seconds, because the engine has a total of 512 steps. Too small delay values may, however, have the opposite effect, so that the signals are transmitted too quickly and causing the motor to just “stuttering”. If you want a faster engine, choose a model with a larger step angle).
32 Comments
My stepper motor only rotates about a quarter of a turn, any siggestions?
Maybe you have another step size/more steps or other intervals. Check the datasheet.
The stepping sequence above is wrong for the 28BYJ-48 motor. The correct one is:
Seq[0] = [1,0,0,0]
Seq[1] = [1,1,0,0]
Seq[2] = [0,1,0,0]
Seq[3] = [0,1,1,0]
Seq[4] = [0,0,1,0]
Seq[5] = [0,0,1,1]
Seq[6] = [0,0,0,1]
Seq[7] = [1,0,0,1]
Works like a charm 🙂
Thanks
Thank you!! this is the correct sequence. You are a gentleman and a scholar!
The sequence above works but on the 28BYJ-48 motor it is reversed. According to the data sheet (https://tutorials-raspberrypi.de/wp-content/uploads/2014/08/Stepper-Motor-28BJY-48-Datasheet.pdf) forward direction is clockwise and the correct sequence is
Seq = [0,1,2,3,4,5,6,7]
Seq[0] = [0,0,0,1]
Seq[1] = [0,0,1,1]
Seq[2] = [0,0,1,0]
Seq[3] = [0,1,1,0]
Seq[4] = [0,1,0,0]
Seq[5] = [1,1,0,0]
Seq[6] = [1,0,0,0]
Seq[7] = [1,0,0,1]
just the reverse of yours.
The backward function dont work for me!???
Maybe your motor needs another sequence.
File “stepper.py”, line 23, in
GPIO.setup(enable_pin, GPIO.OUT)
NameError: name ‘enable_pin’ is not defined
i have this error what can i do?
You need to add following line before
enable_pin = 18
What is the point of this article? It is a direct copy of https://learn.adafruit.com/adafruits-raspberry-pi-lesson-10-stepper-motors/overview
And it does not even copied the diagram correctly.
Plagiarism, waste of readers’ time!
Traceback (most recent call last):
File “/home/pi/Desktop/stepper.py”, line 14, in
Seq[0] = [0,1,0,0]
TypeError: ‘range’ object does not support item assignment ===>i am getting error like this
Range objects do not support item assignment but lists do, so converting the range into a list should solve this problem.
try
Seq = list(range(0, StepCount))
instead of
Seq = range(0, StepCount)
DONT WASTE YOUR TIME WITH THIS TUT!
#CTRLC #CTRLV
I agree
I bodged this code like this and it works (although you may well need to adjust the pin sequence / use the change above if you use the 28BJY)
import RPi.GPIO as GPIO import time GPIO.setmode(GPIO.BCM) GPIO.setwarnings(False) coil_A_1_pin = 18 # pink coil_A_2_pin = 23 # orange coil_B_1_pin = 24 # blue coil_B_2_pin = 25 # yellow # adjust if different StepCount=8 Seq = [ [0,1,0,0], [0,1,0,1], [0,0,0,1], [1,0,0,1], [1,0,0,0], [1,0,1,0], [0,0,1,0], [0,1,1,0] ] GPIO.setup(coil_A_1_pin, GPIO.OUT) GPIO.setup(coil_A_2_pin, GPIO.OUT) GPIO.setup(coil_B_1_pin, GPIO.OUT) GPIO.setup(coil_B_2_pin, GPIO.OUT) def setStep(w1, w2, w3, w4): GPIO.output(coil_A_1_pin, w1) GPIO.output(coil_A_2_pin, w2) GPIO.output(coil_B_1_pin, w3) GPIO.output(coil_B_2_pin, w4) def forward(delay, steps): for i in range(steps): for j in range(StepCount): setStep(Seq[j][0], Seq[j][1], Seq[j][2], Seq[j][3]) time.sleep(delay) def backwards(delay, steps): for i in range(steps): for j in reversed(range(StepCount)): setStep(Seq[j][0], Seq[j][1], Seq[j][2], Seq[j][3]) time.sleep(delay) if __name__ == '__main__': while True: delay = input("Time Delay (ms)?") steps = input("How many steps forward? ") forward(int(delay) / 1000.0, int(steps)) steps = input("How many steps backwards? ") backwards(int(delay) / 1000.0, int(steps))@Ed Goss
Thank you, your code is working!
I just don’t get why is woring in reverse and not forward… I don’t get why it works in a direction and not in the other, given that the command are just sent backwards…
Did you figure it out?
Try this seq to fix forward/backward
Seq = [
[1,0,0,1],
[1,0,0,0],
[1,1,0,0],
[0,1,0,0],
[0,1,1,0],
[0,0,1,0],
[0,0,1,1],
[0,0,0,1]
]
Thank you. It works perfect with your code. I just had to flip A1 and B1 pin numbers.
This was exactly what i was looking for!