
This tutorial is about a simple Traffic Light Circuit using the programmable GPIO Pins via Python. In the next tutorial, we will extend the circuit by a few functions (including an Input).
Accessories
We need the following:
- Breadboard
- Jumper Cable
- LED’s red-green-yellow Ø 5mm
- Transistors (BC547)
- Resistors (470 Ω and 10k Ω)
- regular Wire (for example for the Garden)
Preparation
First, we need to update the packages and paths.
sudo apt-get update
sudo apt-get upgrade
So that the library works properly afterwards, we need python-dev.
sudo apt-get install python-devAfterwards, we load the Python GPIO library (the newest version is available here, maybe adapt version: https://pypi.python.org/pypi/RPi.GPIO)
sudo wget https://pypi.python.org/packages/source/R/RPi.GPIO/RPi.GPIO-0.6.1.tar.gz
Unpack now
tar zxvf RPi.GPIO-*
and switch to the Directory
cd RPi.GPIO-*
Now the Library can be installed.
sudo python setup.py install
Should it come to Mistakes, they are written in the Comments. Luckily, most Mistakes are pretty well described.
Setup
The setup of the first Circuit looks like this:
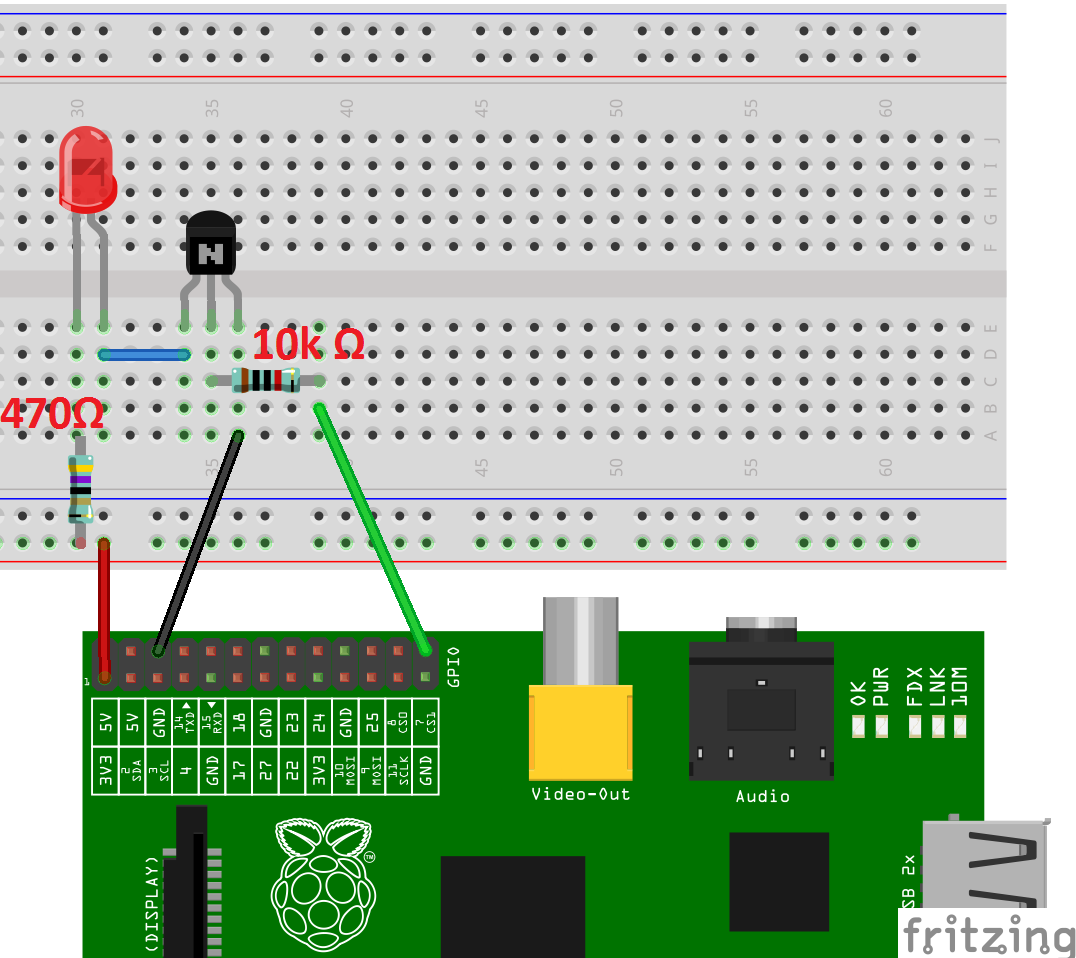
As a tip: each LED has a long and a shorter end. The longer belongs to the Positive (3.3V), the shorter to the Negative (GND). As a series resistor, the LED gets 470 Ω.
A Transistor works in such a way that as soon as the middle Pin has Power, the Line is released from left to right. However, to make sure that the Power is not too high, we will switch a 10k Ω Resistor.
Before connecting the Cables to the Pi, check the Circuit again.
Programming
After everything is set up and connected, we need a Script that makes the LED blink. We create a Script
sudo nano ampel_skript1.py
with the following content
|
1 2 3 4 5 6 7 8 9 10 11 12 13 14 15 16 17 18 19 20 |
#Bibliotheken einbinden import RPi.GPIO as GPIO import time #GPIO Modus (BOARD / BCM) GPIO.setmode(GPIO.BOARD) #Richtung der GPIO-Pins festlegen (IN / OUT) GPIO.setup(26, GPIO.OUT) #unendliche Schleife while True: #Pin 26 HIGH Pegel GPIO.output(26, True) #eine halbe Sekunde warten time.sleep(0.5) #Pin 26 LOW Pegel GPIO.output(26, False) #eine halbe Sekunde warten time.sleep(0.5) |
Attention: Here the number of the Pin is important and not the GPIO Number. The Pin Number is 26, where it is GPIO Pin 07. If the GPIO Number is to be specified, line 6 must read:
GPIO.setmode(GPIO.BCM)
We save and exit the Editor (CTRL + O, CTRL + X) and execute the Script.
sudo python ampel_skript1.py
To abort the Script, press CTRL + C.
In Part 2 we build the Phases of a Traffic Light.