Everyone has been talking about cryptocurrencies for some time0. They can not only be used as a means of payment but can also be generated using your own computing power. Therefore, it is also possible to operate Bitcoin Mining with the Raspberry Pi. Other cryptocurrencies can also be mined. However, mining has the disadvantage that the electricity costs are usually higher than the value generated. Therefore, let’s look at how we can build a cost-neutral, profitable crypto miner using solar cells and a Raspberry Pi.
Required Hardware Parts for the Raspberry Pi Bitcoin Miner
We want all electricity used for Bitcoin mining to be generated by a solar cell. Since the Raspberry Pi should run permanently, we have to temporarily store the generated electricity in a battery, as not enough electricity is generated at night.
Raspberry Pi accessories for the Bitcoin Miner are either already existing modules (e.g. this), or we can build the circuit ourselves. For this we need the following::
- Raspberry Pi Pico
- 6V solar panel (you can use several smaller ones instead)
- Battery: 2x Li-Ion type 18650B (each with 3.7V)
- if necessary, a holder for two batteries
- A charging module for the battery: type TP4056
- Capacitors (I used a 100 uF capacitor for this, but you can also use slightly different values)
- L7805 regulator
- 2x 10μF capacitor
- optimal: 470 Ω resistor
- optimal: green LED
We also need soldering utensils and of course a Raspberry Pi (the model does not matter). Note, however, that the hash rate varies from model to model.
Excursus: What are Cryptocurrencies like Bitcoin, Monero and Mining?
Simply put, cryptocurrencies such as Bitcoin are purely digital currencies with which transactions can be carried out – just like with real money. Unlike our paper money, such “coins” are not printed but generated by making your computing power available.
Since all transactions take place in a peer-to-peer network, they have to be “verified” in a certain way, which is why you need third parties (the “miners”) who take on this job and are rewarded for their computing power (by using Bitcoins receives). Such a transaction is written in a subsequent “block” and shared with the network. Since these blocks are linked to one another (the so-called “blockchain”), no previous transaction can simply be deleted. Plus, anyone who has the entire blockchain knows what transactions have taken place.
Here you will find a good, clear explanation on the subject:
What Advantage Does Monero Offer?
Now that we know what cryptocurrencies and blockchain in general are, the question arises, which currency is the best? Bitcoin was the first cryptocurrency, but there are countless others that have small differences.
A decisive disadvantage of Bitcoin is that although the sender and recipient addresses are anonymous (hash values), every transaction in the blockchain can be precisely tracked – and as a result, Bitcoin is not quite as anonymous as one might think.
A coin that regulates this differently is Monero. It is also based on a blockchain and can be mined, but here the transactions are concealed in such a way that they can not be traced. This is one of the reasons why you can not trade Monero on most exchanges and the easiest way to get it is by mining.
In addition to Bitcoin and Monero, there are also many other currencies – both technically improved coins (Ethereum) and fun coins (Dogecoin). Many of them can also be mined with the Raspberry Pi.
Setup and Connection of the Solar Cell
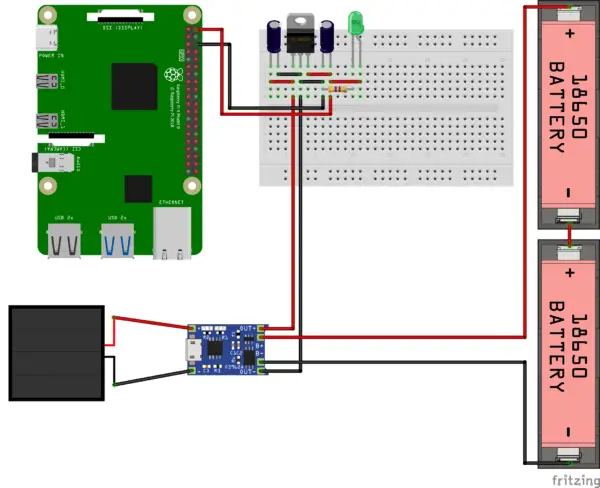
The instructions on how to set up the solar cell can be found in this article. Since we need a permanent 5V voltage, we take two 3.7V Li-Ion batteries of the type 18650 and connect them in series. A voltage regulator (L7805) ensures that the voltage for our Raspberry Pi Bitcoin Miner is constant at 5V. We also use the TP4056 charging module to charge the batteries when the sun is shining, so that the voltage comes from the batteries in the dark.
The setup is as follows:

The additional LED is not necessary. It is only there to indicate that voltage is present. After everything is connected, you can test the voltage with a multimeter and connect it to the Pi. The Raspberry Pi can be supplied with power via its GPIOs (pin 2 = 5V, pin 6 = GND) – you don’t need an extra USB cable.
Raspberry Pi Crypto Mining Software – Preparation
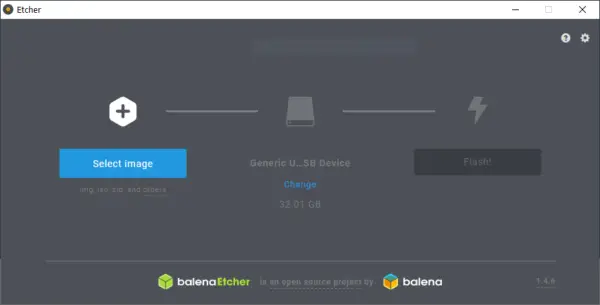
We’ll start by installing the operating system. We will use Raspberry Pi OS Lite for this. The Lite version does not contain a desktop and can only be controlled via Terminal/SSH. Download the image file. We then use the balenaEtcher tool to flash the SD card.

The flash process will take some time. Don’t remove the SD card after that, though, as we still need to create a few files.
First of all, let’s enable SSH. To do this, we simply create an empty text file with the name ssh (without file extension) on the SD card.
If you don’t use an Ethernet cable, we would also like to configure the WiFi. For this, we create another file on the SD card called wpa_supplicant.conf (no further file extension). This has the following content.
ctrl_interface=DIR=/var/run/wpa_supplicant GROUP=netdev
update_config=1
country=US

network={
 ssid="YOUR WLAN NAME"
 psk="WLAN PASSWORD"
 key_mgmt=WPA-PSK
}
Here you have to adjust your network name, password and, if necessary, the country. Then save the file on the SD card. Then we’re done and the SD card can be inserted into the Raspberry Pi.
Download the Mining Software and Join the Miner Pool
We’ll start by logging in via SSH. For this, we use the standard username and password (pi/raspberry). Ideally, we change it after the first login (a note is displayed in the console -> passwd).
Now let’s install a few required packages:
sudo apt-get install git automake autoconf libcurl4-openssl-dev libjansson-dev libssl-dev libgmp-dev
Then we can clone the CPU miner project:
git clone https://github.com/tpruvot/cpuminer-multi
We carry out the installation in this directory.
cd cpuminer-multi
sudo ./autogen.sh
sudo ./configure
sudo ./build.sh
We’re almost done with this! Since the Raspberry Pi does not have enough computing power to mine on its own, we will join a mining pool. Minergate, which supports many different coins, is recommended here. As soon as you are signed in, we can proceed. To mine Bitcoin, enter the following command (replace EMAIL with the email address you used to register):
./cpuminer -a cryptonight -o stratum+tcp://bcn.pool.minergate.com:45550 -u EMAIL
As already mentioned, I find other coins such as Monero also interesting because you get results much faster here. Again, you can easily join a pool. All you have to do is change the URL. A list of all coins with supported algorithms can be found here.
./cpuminer -a cryptonight -o stratum+tcp://xmr.pool.minergate.com:45700 -u EMAIL
By the way: If you want to have several Raspberry Pi’s mining, you can do this in parallel.
Then the output on the Raspberry Pi is something like the following.

So we calculate with about 3 hashes per second with each of the 4 CPUs (that is very little). As a comparison: With an Intel i5 CPU, you get hash rates of around 1000H/s per CPU. However, the power consumption is also higher.
In Minergate you will then be shown the current and past hash rate. This overview is particularly interesting if several devices are mining for your account.

Of course, you are not forced to use Minergate. Countless other pools (e.g. MineXMR) do exactly the same thing. All you have to do is adjust the URLs and credentials.
Raspberry Pi Conclusion: Bitcoin Mining Hash Rate Very Low
In terms of technology, we have built a completely cost-neutral crypto miner. The software used will also run on other Linux systems and can be used in the same way. A major disadvantage of this structure, however, is the hash rate. If the prices of the cryptocurrencies are assumed to be constant, Bitcoin mining with the Raspberry Pi is not worthwhile. The acquisition costs of the hardware alone are higher than the annual profit from mining. If you speculate on extremely rising prices, things might look different. The same applies to those who have the hardware lying around unused. All in all, a small setup is not worth it.

