
With the Raspberry Pi and some sensors, it is easy to measure the temperature without much effort. In addition, however, the humidity in certain situations or projects (such as a weather station) can be enlightening. Sensors such as the DHT11 and DHT22 are not only available for a few euros, but they can also measure the temperature as well as the humidity.
Accessories
As the sensors already carry (almost) everything, apart from a resistor, not many additional accessories are required. I have used this:
You can see the difference between DHT11 and DHT22 here. As a result, the DHT11 (blue) is cheaper, but the DHT22 (white) is more precise and lasts longer. For applications in “extreme” areas (0-20% or 80-100% humidity), the DHT22 should be used, as it also supports these areas in contrast to the DHT11. For example, I have a DHT22 sensor in my fridge to measure and log temperature and humidity. In general, the 11er model should also be enough.
Setup of Raspberry Pi Humidity Sensor
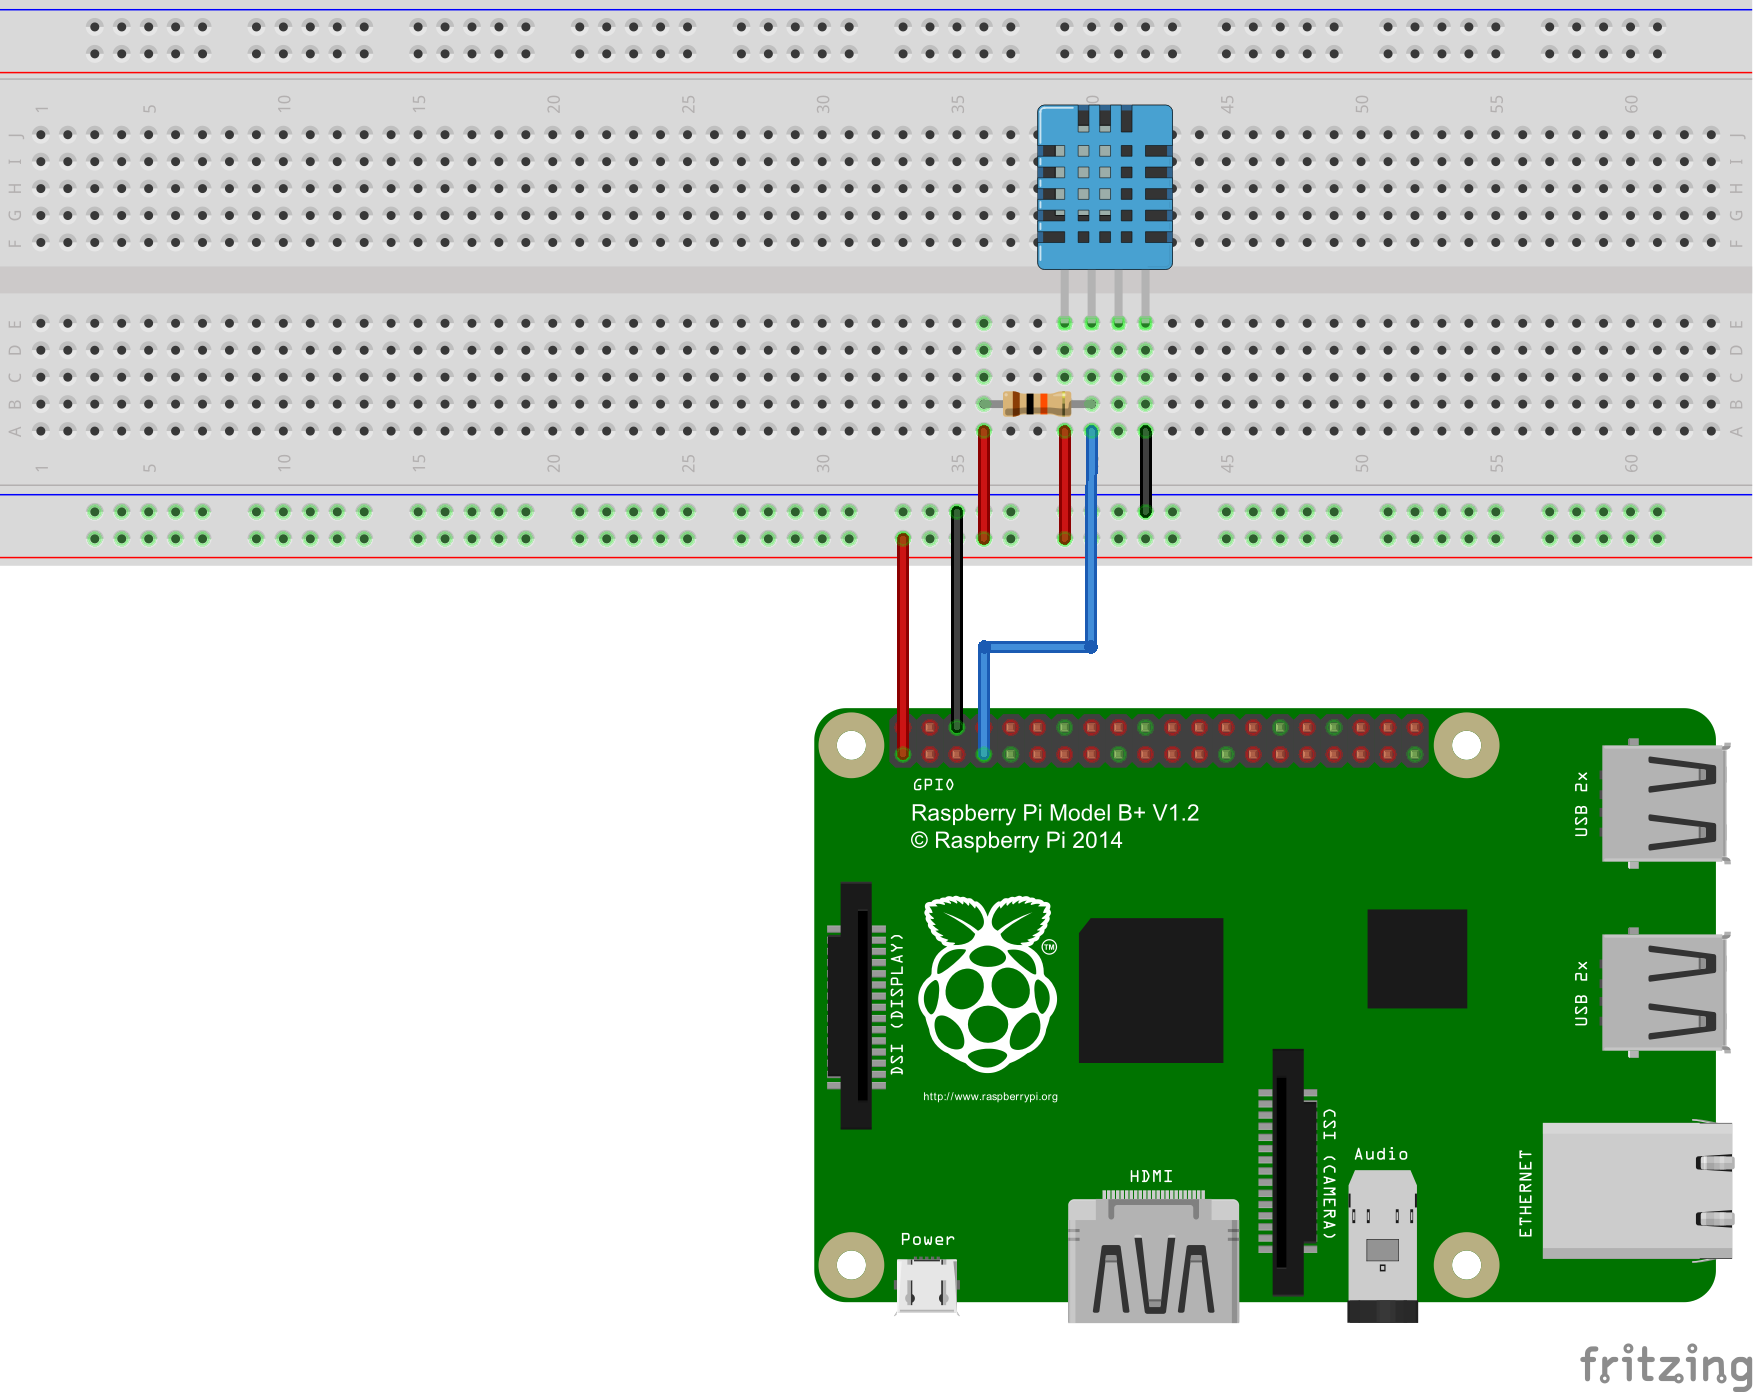 The left pin of the sensor is connected to 3V3 of Pi (pin1), the second sensor pin via a pull-up resistor (4.7k – 10kΩ) with a free GPIO of the raspberry (GPIO4, pin7) and the right senior pin comes at GND (Pin6) from the Pi. The second pin from the right of the sensor remains free.
The structure is identical for DHT11 or DHT22 since the pins are assigned the same way.
Raspberry Pi Humidity Software Installation and Testing
First of all, some packages have to be installed:
sudo apt-get update
sudo apt-get install build-essential python-dev python-openssl git
The library for the sensors can now be loaded. I use a ready-made library from Adafruit that supports various sensors
sudo pip3 install adafruit-circuitpython-dht
sudo apt-get install libgpiod2
Then we create a new file with our code:
sudo nano dht_example.py
|
1 2 3 4 5 6 7 8 9 10 11 12 13 14 15 16 17 18 19 20 21 22 23 24 25 26 27 28 29 30 31 32 33 34 35 |
import time import board import adafruit_dht # Initial the dht device, with data pin connected to: # dhtDevice = adafruit_dht.DHT22(board.D4) # you can pass DHT22 use_pulseio=False if you wouldn't like to use pulseio. # This may be necessary on a Linux single board computer like the Raspberry Pi, # but it will not work in CircuitPython. dhtDevice = adafruit_dht.DHT22(board.D4, use_pulseio=False) while True: try: # Print the values to the serial port temperature_c = dhtDevice.temperature temperature_f = temperature_c * (9 / 5) + 32 humidity = dhtDevice.humidity print( "Temp: {:.1f} F / {:.1f} C Humidity: {}% ".format( temperature_f, temperature_c, humidity ) ) except RuntimeError as error: # Errors happen fairly often, DHT's are hard to read, just keep going print(error.args[0]) time.sleep(2.0) continue except Exception as error: dhtDevice.exit() raise error time.sleep(2.0) |
Note that you replace adafruit_dht.DHT22 with adafruit_dht.DHT11 if you are using a DHT11 temperature sensor.
We save the file with CTRL + O and exit the editor with CTRL + X. Then we execute our code:
sudo python dht_example.py
Earlier version
There is also another repository from Adafruit, which should no longer be used. For the sake of completeness, I’ll show it here anyway (you can skip this part if everything worked before):
sudo apt-get update
sudo apt-get install build-essential python-dev python-openssl git
Now the library for the sensors can be loaded. I use a pre-built Adafruit library that supports a variety of sensors:
git clone https://github.com/adafruit/Adafruit_Python_DHT.git && cd Adafruit_Python_DHT
sudo python setup.py install
This creates a Python library that we can easily integrate into our projects.
If everything went well, we can already read the temperature and humidity. The easiest way is to first use the demo files:
cd examples
sudo ./AdafruitDHT.py 11 4
The first parameter (11) indicates which sensor was used (22 for the DHT22) and the second, to which GPIO it is connected (not the pin number, but the GPIO number). This produces an output like the following:
$ sudo ./AdafruitDHT.py 11 4
Temp=24.0*  Humidity=41.0%
Attention: The sensors are only ready every two seconds. Be careful not to start a query every second.
To integrate the Raspberry Pi humidity library into other (Python) projects, you only need the following:
|
1 2 3 4 5 6 |
import Adafruit_DHT ... sensor = Adafruit_DHT.DHT11 pin = 4 humidity, temperature = Adafruit_DHT.read_retry(sensor, pin) ... |
Log data permanently
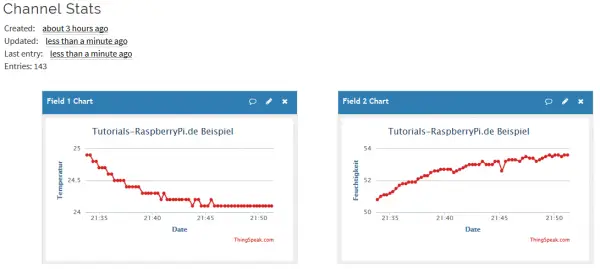
For weather stations and similar projects for monitoring the temperature and humidity, it is useful to store these values at regular time intervals so that they can be analyzed later. One possibility would be to save in local database, but this has the disadvantage that under certain circumstances, the SD card could be charged too much.
Therefore, I have chosen a different method that stores the data on an external server. This service is free for normal use and it is very easy to save data, as shown here:
38 Comments
I get to the line git clone https://github.com/adafruit/Adafruit_Python_DHT.git & sudo python setup.py install and I get the following python: can’t open file ‘setup.py’: [Error 2] No such file or directory
[1]+ Exit 128
What should I check next or should I erase and start over and if start over do I have to delete?
Found the answer. The line in the tutorial “https://github.com/adafruit/Adafruit_Python_DHT.git & sudo python setup.py install” . After it ran and I got the errors. I changed Directory cd Adafruit_Python_DHT the sudo python setup.py install. Then sudo ./Adafruit.py 11 4 and it worked!
Cyril, ‘git clone https://github.com/adafruit/Adafruit_Python_DHT.git‘ creates Adafruit_Python_DHT dir and clones there. So, you have to change dir to that one with the ‘cd’ command.
Yeah, that guy is fucking stupid.
“on an external server.” which server/service ? thank you
The example shown is using API calls to Thingspeak to publish the values. It could be a whole tutorial on its own.
I set DHT11 with my Raspberry.
Normally seems it shows correct results eg. 22*/46%, but after 10 lines goes mad eg. 7*/105%. Than again turns to normal. Is it about a bad sensor?
The manufacturers do not recommended that you read data from the sensor more than once per 2 seconds. If you do you may get incorrect readings.
python3?
Thanks
I have done what you have done, (Raspberry Pi 3 B), but after running
pi@raspberrypi:~/projects/Adafruit_Python_DHT/examples $ sudo ./AdafruitDHT.py 22 4
it prompts the following error
Failed to get reading. Try again!
please help.
Same problem…
hi, i would like to work on raspberry pi ans some sensors like temp, humidity, Nitrogin and PM 10 so when ordering the pi what else i should order, do i need A/D converter and which one , also in order to send data do i need other components to carry out with my work, like what are the components required with the pi
pi@raspberrypi:~/foxfiles/Adafruit_Python_DHT $ git clone https://github.com/adafruit/Adafruit_Python_DHT.git && Adafruit_Python_DHT on setup.py install
Cloning into ‘Adafruit_Python_DHT’…
remote: Enumerating objects: 308, done.
remote: Total 308 (delta 0), reused 0 (delta 0), pack-reused 308
Receiving objects: 100% (308/308), 91.74 KiB | 0 bytes/s, done.
Resolving deltas: 100% (168/168), done.
bash: Adafruit_Python_DHT: command not found
pi@raspberrypi:~/foxfiles/Adafruit_Python_DHT $
When I run the example, I get the error ImportError: No module named ‘Adafruit_DHT’. That is probably related to the bash error above. Any help would be appreciated. Thanks.
I am certainly no expert but have had similar problems in the past. It looks like it might be a problem with the DHT library, try removing and installing it again. There also might be a problem with where the files were installed. If they are too deep in the structure it won’t work.
Hi All,
what’s the maximum distance between the sensor and Raspberry?
How many sensors I can connect to one Raspberry?
Thank you!
Also curious how many sensors you can connect in this configuration, and whether they are serialized or must have a unique pin for each assigned?
Hey guys,
I got everything right. I did all the commands that was on this page twice, copied the program on this page, and it said both times:
Traceback (most recent call last):
File “/home/pi/Desktop/programs/Temp-humidity sensor.py”, line 1, in
from Adafruit_DHT import example
ImportError: No module named ‘Adafruit_DHT’
I was getting the No Module error until I typed (retyped?) the command
sudo python setup.py install
Hey, I have a big problem.
When I write sudo ./AdafruitDHT.py 2302 4, I have “failed to get reading. Try again !”
Why pleaaaase ?
Have you tried multiple sensors? Also, for the 2302, I just use 22. I had one bad sensor. Drove me nuts till I just plugged in the other sensor. Of note, if you buy the sensors already mounted on a small PC board with only 3 lines coming out, skip the breadboard with the resistor. It’s already on the PC board. Just hook up 3.3, Gnd, and GPIO4.
Try a decoupling capacitor
Hi
Someone asked already but I hope for a reply too:
1. how do I connect multiple DHT11 or DHT22 sensors?
2. What’s the limit how many can I add to the series?
3. What’s the Max distance between Raspberry and the sensor for a simple wire without any extra electronic components ?
4. How to deal with distances longer than a max for simple wires, like what kind of circuits would extend the range or digitize it?
Thank you!
How to controll the over heat protection auto cutoff circuit baker, I used DHT11 Sensor for room temperature auto cutoff chemni for detections Humidity & Temperature with auto ON & OFF but the value of serial print code was not working how to read the Serial data for DHT11 Sensor relay ON & OFF based on temperature & humidity.
Could you please give some instructions on how to do this on a mini breadboard?
Great tutorial, thank you! I used a DHT11 and some parts from an Arduino UNO kit to get up-and-running with your code. After initial setup I worked with your google_spreadsheet.py file to create a basic remote-monitoring station for my home temperature. A welcome set of data in the winter for monitoring the operation of our heating system. Muchas Gracias!
Any succesfull experience with RPI4B and Buster 10?
Whatever I do I get “Failed to get reading. Try again”
What was the external server you set you data logging up on?
Can you please elaborate on this? This is the key issue that I have been trying to solve and you stop just at the crucial bit!
I’ve followed the guide connecting DHT22 to GPIO 6 intead of 4 because 4 it’s already taken.
switching the setup accordingly (sudo ./AdafruitDHT.py 22 6) it doesn’t show any reading but if i connect it via Raspcontrolled app from mobile it works…… i really cannot get how to run it from pi terminal…..
I guess this is not for newbies, I can’t even get the script to run following the steps.
pi@raspberrypi:~ $ sudo python dht_example.py
Traceback (most recent call last):
File “dht_example.py”, line 2, in
import board
ImportError: No module named board
issue I had was because of python, need to run using > python3 dht_example.py
CW, how did you resolve this exactly? I am having the same issue with no module “board” error.
It works fine, you only have to run it with “$ python3 dht_example.py”.
I’m having a problem with the newer version where when i run the file it says:
“ File “dht_example.py”, line 25
except RuntimeError as error:
^
IndentationError: unindent does not match any outer indentation level”
How can I fix this? Im new to python so I don’t know anything of what that means.
btw I’m using a DHT11.
and I’m using a Raspberry Pi 4 B.
Can i use many sensors with one raspberry? I want to take measurements from different points of a big room
Smithy:
I have the SAME question. I got one DHT22 to work using GPIO pin 7 but now I want to read a second DHT22 at the same time and cannot get the program to read the second sensor.
Have you come across a solution?
Barry
FLYADIVE@GMAIL.COM
Hello, great article! You mentioned a free external server/service that you use to record and plot your data. Could you provide a name and/or link to that site? Thanks in advance!