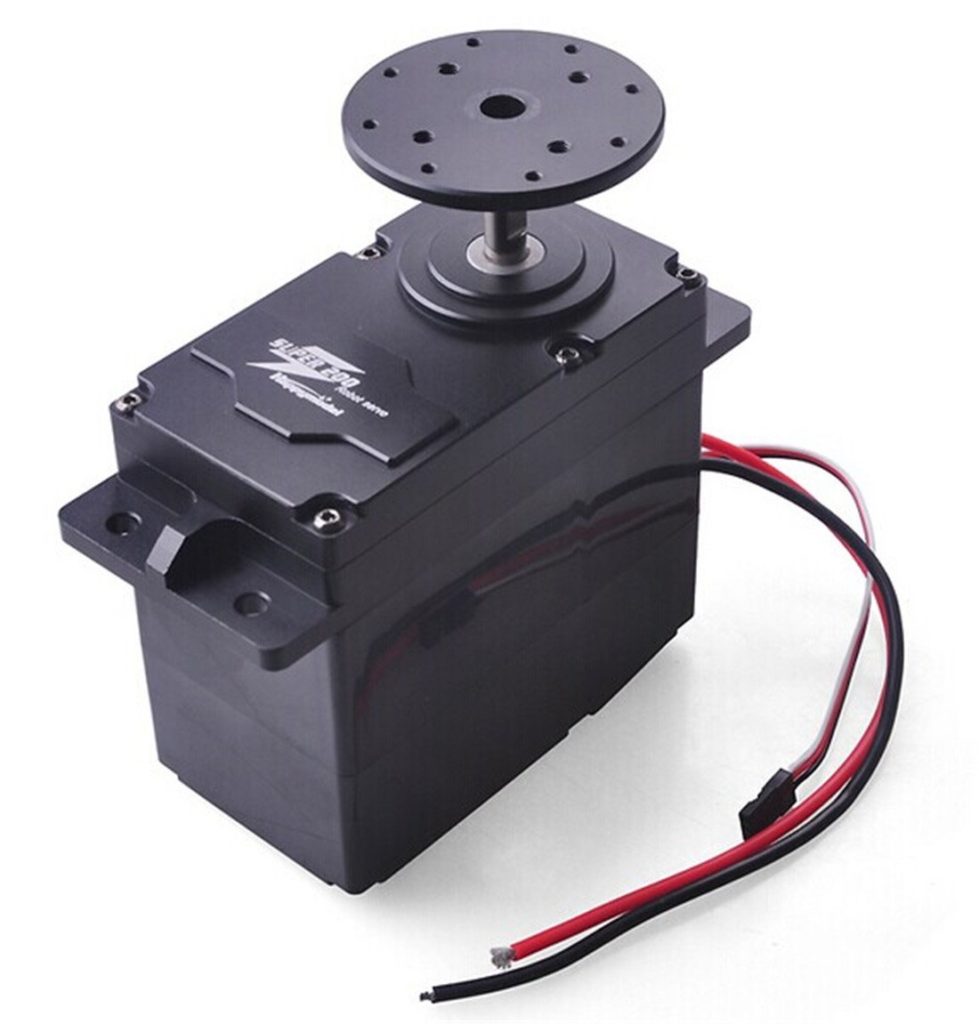
In addition to stepper motors, there are also small and cheap servo motors. The control of Raspberry Pi servo motors is very simple and thanks to the small size and weight they are used in many areas.
Unlike stepper motors, servomotors can be controlled with a single GPIO.
In this tutorial, I’ll show an example of how to use Python to control one or more servo motors.
Required Hardware Parts
- Servo motor
- Jumper cable
- (Breadboard)
- if necessary, a battery holder + (rechargeable) batteries, as an external power supply
Of course, it is possible to supply the servo motor with an external power source, but this only makes sense when using several motors. For that, rechargeable batteries/regular batteries would still be needed.
Setup
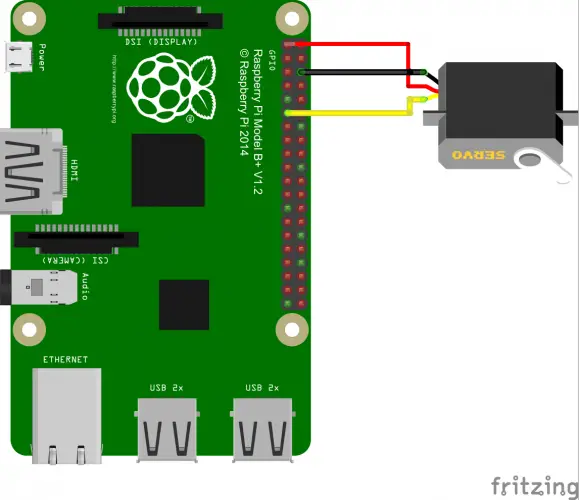
In most cases, the colors of the servo are as follows and are connected to the Pi:
Black – comes to GND (pin 6) from the Pi
Red – comes to 3V3 (pin 1) from the Pi
Yellow/Orange – to a free GPIO pin (e.g., GPIO17, pin 11)

If you want to play it safe, you can set a ~ 1kΩ resistor between the data pin (yellow/orange) and the Pi. Normally this is not necessary.
If the servo motor does not rotate correctly, this may also influence the power supply of the Raspberry Pi (just look at the datasheet, what the engine consumes). In such a case an external power source makes sense (usually it is 4 to 6V).
Software for controlling the Raspberry Pi servo motors
Unlike stepper motors, servo motors don’t occupy many GPIO pins to command a movement. For this, the rotation is controlled by the length of the pulse.
The angle of the motor is set along the length of the pulse, so PWM is particularly useful, which sends repetitive signals at even intervals (the Raspberry Pi Python library must be installed).
We either start python (sudo python) or open a new script (sudo nano servomotor.py) with the following content:
import RPi.GPIO as GPIO
import time

servoPIN = 17
GPIO.setmode(GPIO.BCM)
GPIO.setup(servoPIN, GPIO.OUT)

p = GPIO.PWM(servoPIN, 50) # GPIO 17 for PWM with 50Hz
p.start(2.5) # Initialization
try:
  while True:
    p.ChangeDutyCycle(5)
    time.sleep(0.5)
    p.ChangeDutyCycle(7.5)
    time.sleep(0.5)
    p.ChangeDutyCycle(10)
    time.sleep(0.5)
    p.ChangeDutyCycle(12.5)
    time.sleep(0.5)
    p.ChangeDutyCycle(10)
    time.sleep(0.5)
    p.ChangeDutyCycle(7.5)
    time.sleep(0.5)
    p.ChangeDutyCycle(5)
    time.sleep(0.5)
    p.ChangeDutyCycle(2.5)
    time.sleep(0.5)
except KeyboardInterrupt:
  p.stop()
  GPIO.cleanup()
If the servo motor shakes a bit while it is not moving, you can pause the pulse with ChangeDutyCycle(0)
For servo motors and their driver boards, the indication of the period and the duty cycle is usually made in the datasheet. In the example of a MG996R we have the following: The period is 20ms long. In addition, a duty cycle of between 5% and 10% of the period is expected. Thus the pulse duration is between 1ms and 2ms. Usually, servos can rotate between 0 and 180°. So we have to adjust the pulse length in between. A length of 1.5ms (7.5%) thus gives an angle of 90 °. And all at precisely 50x per second (50Hz).
If it bothers you that the servo (SG90) can not rotate 360 °, there is a “hack“.


18 Comments
Thanks a Lot!
Very nicely presented, You site is the first one I have seen that puts links to show us newbies details, most sites just expect the readers know and are good at Unix based systems like Rasbian.
What version of Python are these programs written in? i’m not familiar with the brackets but i’m learning.
(i’m 82 yrs old and having great fun with all this Raspberry pi 3 B stuff. But the Picar V software still has be on a steep upward slope.
Thanks again
Sincerely
Dan G
Hi Dan,
older tutorials are using Python 2.7, newer ones Python 3.
Best Regards
Felix
How do we power the servo without the pi losing significant power that it shuts down.
I am a noob so I really don’t understand much of how rpis and servos interact but I do obviously know how a servo works and all.
you need external power to power up servo
how do I determine the angle at which the pi moves?
Excellent Training – I have more to learn.
Just on question – When connecting the Servo to an externa l 4.5 volt battery supply, the servo does not work??
Does the signal need to referenced to the Pi Ground signal??
Hi Tim, most servos should work fine with 4.5v but to be sure 5v is the standard voltage of a servo. And make sure to ground the servo with raspberrypi with external power supply. One more thing, make sure to power the positive wire seperately with external power supply while grounding it with raspberrypi.
Hope this helps.
Regards
Ismail
So can the servo motor rotate in both directions at the same time like those in a stepper motor?
Yes, but no full rotation.
You should use the 5V pin instead the 3.3V pin to power the servo (red). (Really you should power it externally, but if you’re using the raspberry as the powersource then the 5V is the correct way to do it.)
We offer a wide rage of ceramic cpu scrap for gold recovery. Very high yield Ceramic cpu scrap.
Intel 486 & 386 Cpu/Intel Pentium 1/DLP Cpu… and more
Intel I960 & Motorola Cpu… and more
Intel Pentium Pro Cpu… and more
AMD 486 & 586 Cpu … and more
Gold Top Cpu / Gold Top & Bottom Cpu… and more
We are so glad with the quality of product we offer to our customers worldwide .
WhatsApp +15304610009
https://computerscrapchamps.com/product/intel-pentium-ceramic/
Great Article.
https://ben.akrin.com/?p=9158
Please read this if you face jitter in the Servo
“Explore our professional website design services to elevate your online presence.
Boost your business with our comprehensive digital marketing strategies.
Engage your audience with our social media marketing strategies.
Launch your online store with our e-commerce website development services.
“
“Small Business Websites Greater Noida
Professional Web Design Greater Noida
Lead Generation Greater Noida
Affordable Digital Marketing Greater Noida
Digital Marketing & Web Design Greater Noida
Best Website Designer Greater Noida
Digital Marketing Consultant Greater Noida
Local SEO Greater Noida
E-commerce Website Development Greater Noida
Business Website Design Greater Noida
“
“Social Media Management Greater Noida
Facebook Advertising Greater Noida
Web Development Services Greater Noida
Affordable Website Design Greater Noida
Instagram Marketing Greater Noida
Brand Building Greater Noida
Performance Marketing Greater Noida
Website Design Greater Noida
“
“Yoga Classes Greater Noida
Best Yoga Studio Greater Noida
Yoga Classes Near Me Greater Noida
Online Yoga Classes Greater Noida
Yoga for Beginners Greater Noida
Private Yoga Instructor Greater Noida
Yoga for Weight Loss Greater Noida
Meditation Classes Greater Noida
Hatha Yoga Greater Noida
Prenatal Yoga Greater Noida
“
“Website Design Greater Noida
Web Design Services Greater Noida
Website Development Company Greater Noida
Affordable Website Design Greater Noida
Professional Website Designer Greater Noida
E-commerce Website Development Greater Noida
WordPress Website Design Greater Noida
Corporate Website Design Greater Noida
Responsive Website Design Greater Noida
Small Business Website Design Greater Noida
SEO-Friendly Website Design Greater Noida
Custom Website Design Greater Noida
Mobile-Friendly Website Development Greater Noida
Dynamic Website Design Greater Noida
Creative Website Design Greater Noida
Website Redesign Services Greater Noida
Website Maintenance Greater Noida
Website Hosting and Support Greater Noida
Website Security Services Greater Noida
Backup and Maintenance for Websites Greater Noida
Best Web Design Company Near Me Greater Noida
Website Design Agency Greater Noida
Web Developers Near Me Greater Noida
Local Website Designer Greater Noida
Freelance Web Designer Greater Noida
“