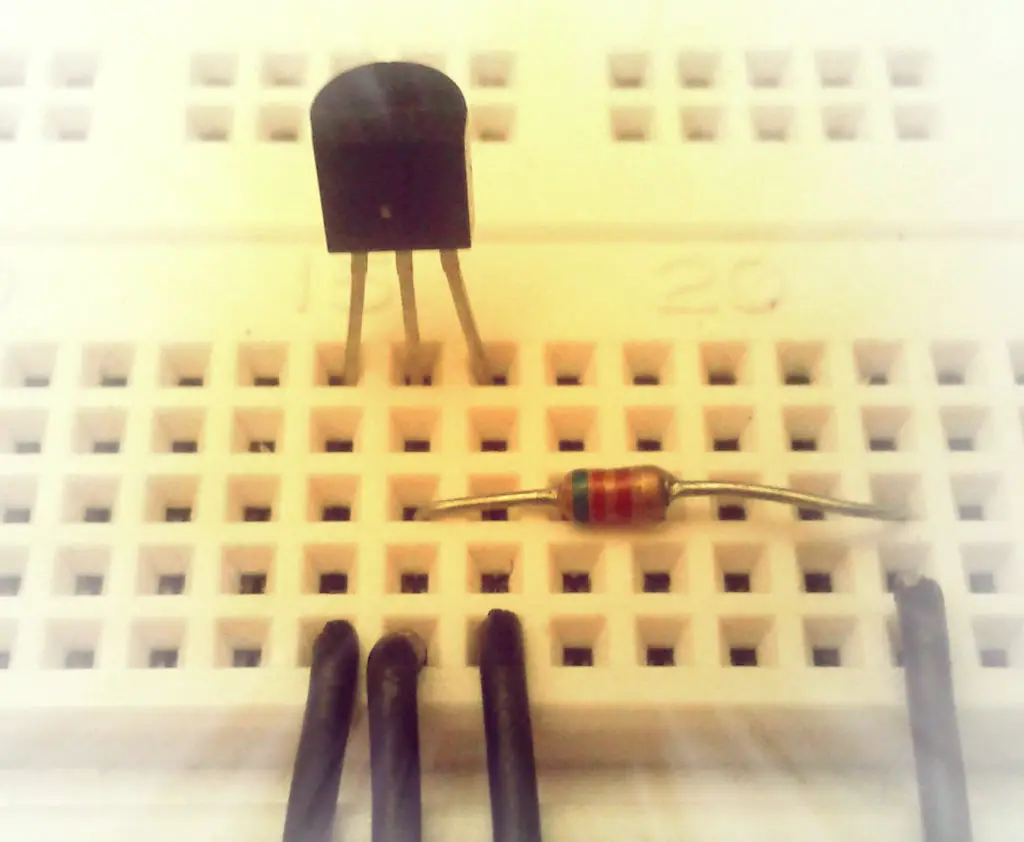
One of the many applications of a Raspberry Pi is measuring the temperature. In projects like weather stations you want to know the exact value. Using a 1-Wire Raspberry Pi temperature sensor makes it very easy to read it out and you will only need one GPIO pin.
In this tutorial it is described how to use the DS18B20 Raspberry Pi temperature sensor and what software you will need. In other projects, you could use this sensor even as a trigger for cooling your Raspberry Pi case and turning a fan on.
Components
For this tutorial I have used the following parts:
- Raspberry Pi
- Temperature Sensor (US / UK)
- Breadboard (US / UK)
- Jumper Wire (US / UK)
- 4.7k Ω Resistor (US / UK)
The temperature sensor DS18B20 is also available as a waterproof version.
If you want a more advanced sensor, which can measure also humidity, you should take a look at the DHT11 or DHT22 sensor, which measures both – temperature and humidity.
Description of the 1-Wire Raspberry Pi Temperature Sensor
The temperature sensor returns a 9 to 12 bit long value which can be read and converted. However, this is (so far) only possible on GPIO pin 4 (pin 7). But you can also switch several sensors in series (because it is based on the 1-Wire protocol).
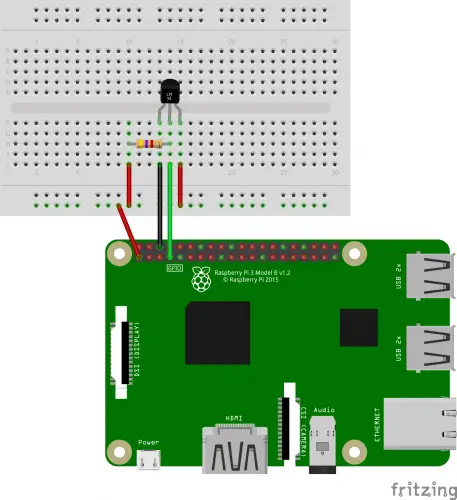
Wiring of the Temperature Sensor
Shown is the wiring of or DS18B20 temperature sensor, including a resistor. I have taken a 4,7k Ω pre-resistor:

If everything is wired accordingly, we can enable the 1-Wire protocol with it:
sudo modprobe w1-gpio
sudo modprobe w1-therm
We can find out if it worked by entering the following:
lsmodThe modules should now be listed, if not a GPIO pin other than 4 is used or an error occurred while activating.
So that the modules are loaded at every start, we enter them into the file /etc/modules:
sudo nano /etc/modules
and last add the following two lines:
w1_gpio
w1_therm
For the next step, we first need the ID of the sensor. If you plan to connect several in series, it is best to test each one individually and make a note of the ID so that you do not confuse it later.
We change the directory and print the files
cd /sys/bus/w1/devices/
ls
One of the files is called 10-000802b4ba0e (different for you) and is the ID we use to query the sensor (please adjust ID):
cat /sys/bus/w1/devices/10-000802b4ba0e/w1_slaveIn the output we see the last indication of the temperature (in “milli degree”)
31 00 4b 46 ff ff 05 10 1c : crc=1c YES
31 00 4b 46 ff ff 05 10 1c t=24437
Divided by 1000, makes it 24,437 ° C.
Script for extracing the temperature value of the DS18B20
To read the temperature easier (e.g. using it in smart home projects like openHAB), I wrote a little script. If you later want to get the output by simply typing in temperature, you should put it in /usr/bin/:
sudo nano /usr/bin/temperature
The content:
|
1 2 3 4 5 6 7 8 9 |
#! /bin/bash # Read Temperature tempread=`cat /sys/bus/w1/devices/10-000802b4ba0e/w1_slave` # Format temp=`echo "scale=2; "\`echo ${tempread##*=}\`" / 1000" | bc` # Output echo "The measured temperature is " $temp "°C" |
Now give appropriate rights:
sudo chmod +x /usr/bin/temperature
and now if you go to the console and type in
temperature
then, the currently measured temperature appears. If an error message comes, then you have to install bc.
sudo apt-get install bc
Finally, a little tip: If you want to measure with the sensor outside (for example, hanging from the window) and you can not use large wires through the window sea, a ribbon cable is suitable, too (old IDE or floppy drive cable). Well packaged in a cling bag, the whole is then weatherproof (let air out and glue well, then it affects the measurement even minimal). Or you just buy a waterproof sensor, then you could e.g. also measure the temperature of your water boiler.


14 Comments
I tried this example using the raspberry pi 3b+ but at the part :
cd /sys/bus/w1/devices/
ls
One of the files is called 10-000802b4ba0e (different for you) and is the ID we use to query the sensor (please adjust ID):
cat /sys/bus/w1/devices/10-000802b4ba0e/w1_slave — HERE APPEAR ERROR
THE FILES ARE THAT: ls
00-400000000000 00-c00000000000 w1_bus_master1
SO IF i TRY DOES DO THE “CAT” COMMAND( cat /sys/bus/w1/devices/00-200000000000/w1_slave) ALWAYS PRESENT ERROR. WHAT MUST BE WRONG???
I am using Raspbian buster and found the device path for 1-wire has changed to /sys/devices/w1_bus_master1/28-xxxxxxxxxxxx
How do you connect series of sensors and read both temperature and humidity from each one, connected at the same time?
hi, so i have a little question.
I am a beginner in Raspberry pi and need some help with this temp reader.
When i do this command:
cd /sys/bus/w1/devices/
ls
i find 2 sometimes 3 adresses that pop up like this:
22-xxxxxxxxxxxx
And if i try to slave them some times some work and sometimes some don’t.
but the problem is that they keep changing and i don’t know why.
Could someone help me with this?
Also forgot to say that the 1 time in 5000 try’s it works i dont get any temp, it just says 0 everywhere.
Hi,
The DS18B20 sensor family should have folders named “28-………”
If you see folders named “00-………” instead, then you probably have unreliable electrical connections or you connected sensor’s terminals the opposite way (GND to 3.3V and 3.3V to GND).
I was under the impression that when using 3 wires (non parasite mode) the system could send the command to have the ds18b20 start reading their temperature all at the same time. Thus, reading all the ds18b20 can be done without any further delay. Right now, there are a significant delay for each read. That delay was the price to pay if you wanted to use only 2 wires. Any idea how to read them all without that delay?
-waterproof model with a black, red and yellow wire. I assume the yellow is like the middle foot of this example
-no devices in /sys/bus/w1/devices/
-3.29 V between the yellow/midlle and ground
-3.30 V between red and black
I used specs and I don’t see difference with the picture above and my sensor+raspberry.
it worked simply going in (sudo) raspi-config / interafacing options / 1 wire
(with raspberry pi 4 but this tutorial was not working with pi 1 either)
I have been unsuccessful – I show my steps below
********** ENABLING THE 1-WIRE PROTOCOL *********
benhughesdon@raspberrypi:~ $ sudo modprobe w1-gpio
[sudo] password for benhughesdon:
benhughesdon@raspberrypi:~ $ sudo modprobe w1-therm
benhughesdon@raspberrypi:~ $
benhughesdon@raspberrypi:~ $
benhughesdon@raspberrypi:~ $ lsmod
Module Size Used by
rfcomm 49152 4
cmac 16384 1
bnep 20480 2
hci_uart 40960 1
btbcm 16384 1 hci_uart
serdev 20480 1 hci_uart
bluetooth 389120 29 hci_uart,bnep,btbcm,rfcomm
ecdh_generic 28672 2 bluetooth
fuse 110592 3
8021q 32768 0
garp 16384 1 8021q
stp 16384 1 garp
llc 16384 2 garp,stp
binfmt_misc 20480 1
joydev 20480 0
evdev 24576 13
brcmfmac 315392 0
brcmutil 16384 1 brcmfmac
vc4 176128 6
v3d 73728 4
drm_kms_helper 184320 2 vc4
gpu_sched 28672 1 v3d
cfg80211 651264 1 brcmfmac
snd_soc_core 192512 1 vc4
drm 442368 12 v3d,vc4,gpu_sched,drm_kms_helper
snd_bcm2835 24576 4
rfkill 28672 6 bluetooth,cfg80211
snd_compress 20480 1 snd_soc_core
snd_pcm_dmaengine 16384 1 snd_soc_core
snd_pcm 102400 4 vc4,snd_pcm_dmaengine,snd_bcm2835,snd_soc_core
drm_panel_orientation_quirks 16384 1 drm
snd_timer 32768 1 snd_pcm
bcm2835_codec 36864 0
syscopyarea 16384 1 drm_kms_helper
sysfillrect 16384 1 drm_kms_helper
sysimgblt 16384 1 drm_kms_helper
raspberrypi_hwmon 16384 0
snd 73728 13 snd_compress,snd_timer,snd_bcm2835,snd_soc_core,snd_pcm
v4l2_mem2mem 24576 1 bcm2835_codec
fb_sys_fops 16384 1 drm_kms_helper
bcm2835_v4l2 45056 0
bcm2835_mmal_vchiq 32768 2 bcm2835_codec,bcm2835_v4l2
videobuf2_dma_contig 20480 1 bcm2835_codec
v4l2_common 16384 1 bcm2835_v4l2
videobuf2_vmalloc 16384 1 bcm2835_v4l2
videobuf2_memops 16384 2 videobuf2_dma_contig,videobuf2_vmalloc
videobuf2_v4l2 24576 3 bcm2835_codec,bcm2835_v4l2,v4l2_mem2mem
videobuf2_common 45056 4 bcm2835_codec,bcm2835_v4l2,v4l2_mem2mem,videobuf2_v4l2
videodev 200704 6 bcm2835_codec,v4l2_common,videobuf2_common,bcm2835_v4l2,v4l2_mem2mem,videobuf2_v4l2
media 36864 3 bcm2835_codec,videodev,v4l2_mem2mem
vc_sm_cma 36864 1 bcm2835_mmal_vchiq
rpivid_mem 16384 0
uio_pdrv_genirq 16384 0
uio 20480 1 uio_pdrv_genirq
w1_therm 16384 0
w1_gpio 16384 0
wire 45056 2 w1_gpio,w1_therm
cn 16384 1 wire
hwmon 16384 2 wire,raspberrypi_hwmon
i2c_dev 20480 0
ip_tables 24576 0
x_tables 32768 1 ip_tables
ipv6 454656 44
********* THE MODIFIED modules FILE *********
GNU nano 3.2 /etc/modules
# /etc/modules: kernel modules to load at boot time.
#
# This file contains the names of kernel modules that should be loaded
# at boot time, one per line. Lines beginning with “#” are ignored.
i2c-dev
# The below lines were added on 15 July 2020. This is to enable the GPIO pins for temperature sensors use, at start up.
w1_gpio
w1_therm
J’ai suivi le protocole décrit ci dessus
Le répertoire /sys/bus/w1/devices est vide !
Ou se trouve donc alors l’information de l’ID de ma sonde de t° ?
pi@octopi:/sys/module $ cd /sys
pi@octopi:/sys $ ls
block bus class dev devices firmware fs kernel module power
pi@octopi:/sys $ cd /sys/bus
pi@octopi:/sys/bus $ ls
amba event_source iscsi_flashnode mmc_rpmb serial w1
clockevents genpd mdio_bus nvmem snd_seq workqueue
clocksource gpio media platform spi
container hid mipi-dsi scsi usb
cpu i2c mmc sdio usb-serial
pi@octopi:/sys/bus $ cd /sys/bus/w1
pi@octopi:/sys/bus/w1 $ ls
devices drivers drivers_autoprobe drivers_probe uevent
pi@octopi:/sys/bus/w1 $ cd /sys/bus/w1/devices
pi@octopi:/sys/bus/w1/devices $ ls
pi@octopi:/sys/bus/w1/devices $
I have slightly different device with the same marking “DS18B20”. https://www.aliexpress.com/item/32573374156.html
Anybody knows if the instruction above works with it?
I can read the temperature BUT when I add the script to just type the word temperature it says access denied.
I had missed running the the permissioning : sudo chmod +x /usr/bin/temperature
then worked perfect.
Guys having problams dont forget to change the ID in the temperature script that you write and place in usr/bin directory. Swap his sample ID out with your own.
Using Raspberry Pi 0 W. No files listed in /sys/bus/w1/devices/. Fix mentioned looking for /sys/devices/w1_bus_master1/28-xxxxxxxxxxxx. I have no w1_bus_master1 directory. Any suggestions?