")
RFID is a technology whereby data is transmitted without touch, which is used in chip cards. Access cards can be read out with a Raspberry Pi RFID module (RC522) and thus e.g. access to doors or locks can be given. Current smartphones have similar ones.
In this tutorial, I will show how to read RFID tags with the RC522 and the Raspberry Pi and also write chip cards. The code presented can also be used for other projects (door opener, access control).
NFC is a related technology, the differences of which can be found here. Both RFID and NFC transmit on a frequency of 13.56 MHz, which is why the modules are compatible with each other.
Hardware Parts Used
I have used the following (building) parts for this tutorial:
- Raspberry Pi 4 (also works with all previous versions)
- Mifare RC522 RFID Module (incl. KeyCard)
-
- Soldering Utensils
There are also RFID USB readers, but I have not tried them.
If you want to use the card reader as an entrance control, etc., it makes sense to give every user a card. You can also buy these chip cards in smaller and larger quantities for small money and then individually write RC522 in on each card (instructions below)
Setup
The pin strip of my module was not yet soldered on, so I had to solder it first before I could connect the pins.
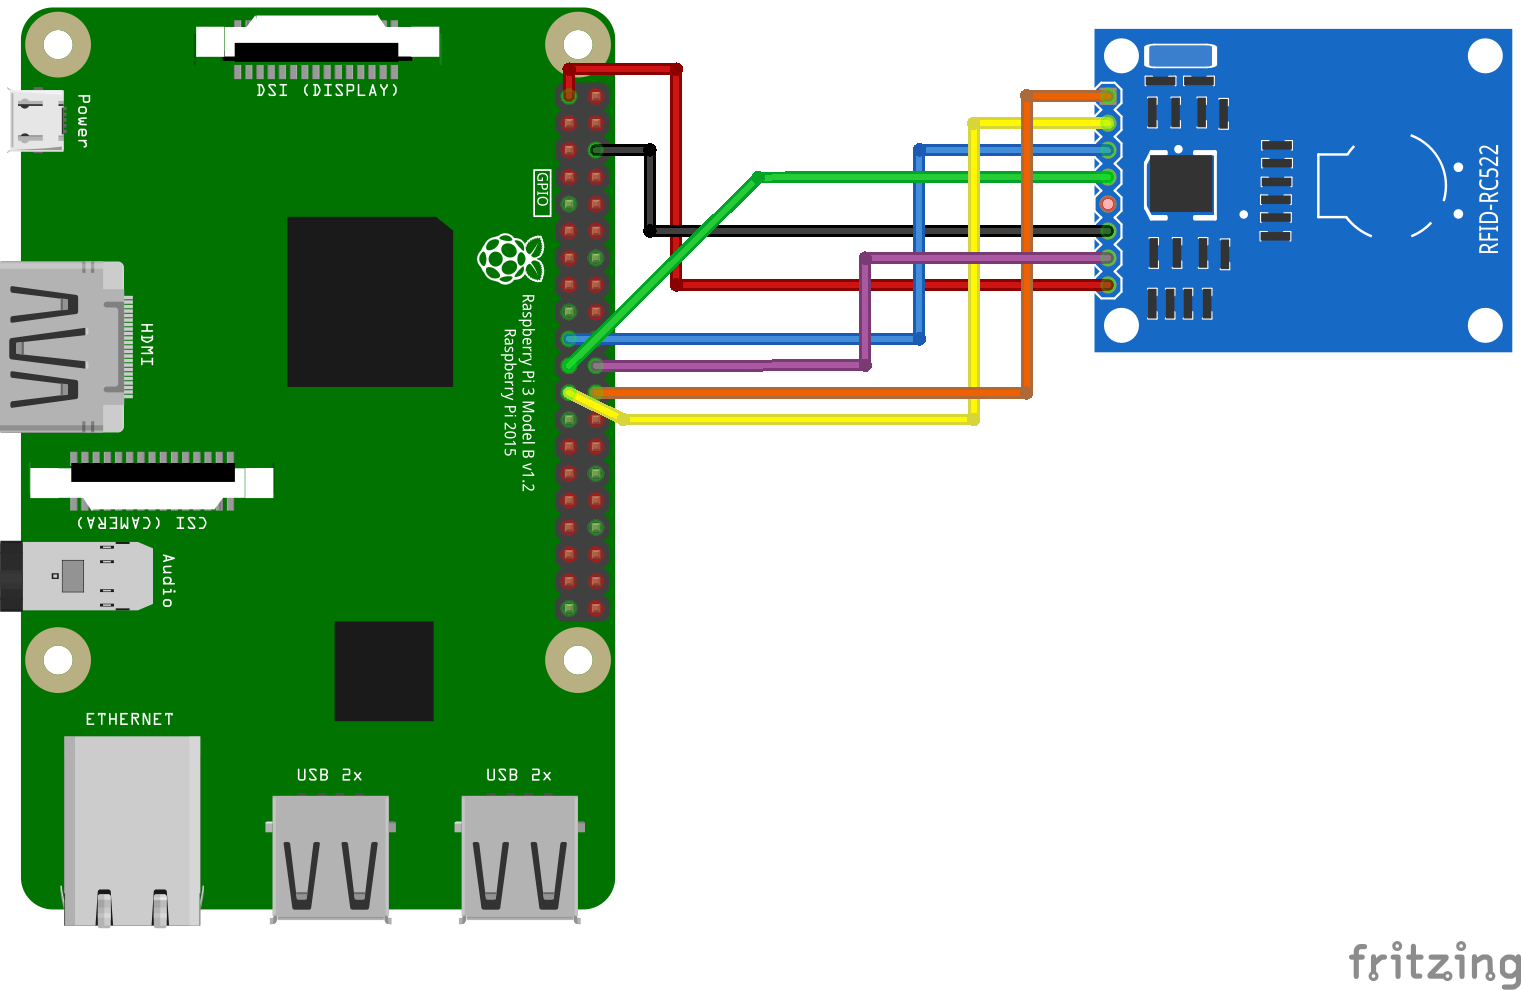
The wiring is as follows:
| RF522 Module | Raspberry Pi |
|---|---|
| SDA | Pin 24 / GPIO8 (CE0) |
| SCK | Pin 23 / GPIO11 (SCKL) |
| MOSI | Pin 19 / GPIO10 (MOSI) |
| MISO | Pin 21 / GPIO9 (MISO) |
| IRQ | — |
| GND | Pin6 (GND) |
| RST | Pin22 / GPIO25 |
| 3.3V | Pin 1 (3V3) |
The whole thing looks like this schematically:
Activating SPI and Software Installation
In order to use the RFID RC522 Shield, we need the SPI bus. So that the Kernel is loaded at startup, we edit the config file:
sudo nano /boot/config.txt
The following content is added to the end of the file:
device_tree_param=spi=on
dtoverlay=spi-bcm2708
You save and exit with CTRL + O, CTRL + X. Then we activate SPI:
sudo raspi-config
Activate under “Advanced Options”> “SPI” and confirm the restart (alternatively usesudo reboot now).
Then you can use dmesg | grep spi to checked whether the module has been loaded. The output should look like this:
pi@raspberrypi:~ $ dmesg | grep spi
[   10.784368] bcm2708_spi 20204000.spi: master is unqueued, this is deprecated
[   10.813403] bcm2708_spi 20204000.spi: SPI Controller at 0x20204000 (irq 80)
Now the packages have to be installed so that we can access the SPI bus and load a corresponding library from GitHub.
sudo apt-get install git python-dev --yes
Firstly we install the Python SPI module
git clone https://github.com/lthiery/SPI-Py.git
cd SPI-Py
sudo python setup.py install
cd ..
and then the Raspberry Pi RFID RC522 library:
git clone https://github.com/mxgxw/MFRC522-python.git && cd MFRC522-python
Testing the Raspberry Pi RFID Reader/Writer
In addition to the RC522 module, a white card and an NFC-compatible key fob are usually supplied. These parts can be used as authentication because they are writable and readable. An NFC-enabled (Android/iOS) smartphone could also be used (which most newer cell phones are).
To run the first test of the card/key fob, we run the script:
sudo python Read.py
As soon as the chip card is held to it and recognized, you will see an output like this:
pi@raspberrypi:~/MFRC522-python $ sudo python Read.py
Welcome to the MFRC522 data read example
Press Ctrl-C to stop.
Card detected
Card read UID: 69,245,238,117
Size: 8
Sector 8 [0, 0, 0, 0, 0, 0, 0, 0, 0, 0, 0, 0, 0, 0, 0, 0]
In order to change the stored data (numbers) on the chip, we edit the “Write.py” file (sudo nano Write.py). To do this, edit the code from line 55 as follows (you can freely choose the 16 numbers from data between 0 and 255. I represented a word with ASCII characters)
|
55 56 57 58 59 60 61 62 63 64 65 66 67 68 69 70 71 72 73 74 75 76 77 78 79 80 81 82 83 84 85 86 87 88 89 90 91 |
# Variable for the data to write data = [114, 97, 115, 112, 98, 101, 114, 114, 121, 45, 116, 117, 116, 111, 114, 0] # Fill the data with 0xFF #for x in range(0,16): # data.append(0xFF) print "Sector 8 looked like this:" # Read block 8 MIFAREReader.MFRC522_Read(8) print "\n" #print "Sector 8 will now be filled with 0xFF:" # Write the data MIFAREReader.MFRC522_Write(8, data) #print "\n" print "It now looks like this:" # Check to see if it was written MIFAREReader.MFRC522_Read(8) print "\n" """ data = [] # Fill the data with 0x00 for x in range(0,16): data.append(0x00) print "Now we fill it with 0x00:" MIFAREReader.MFRC522_Write(8, data) print "\n" print "It is now empty:" # Check to see if it was written MIFAREReader.MFRC522_Read(8) print "\n" """ |
Using NFC/RFID reader in Raspberry Pi projects (door lock, etc.)
The two Python files “Read.py” and “Write.py” contain some sample code for reading and writing a chip which can be used in other projects. The most important file is “MFRC522.py”, which can be copied into another project.
The following excerpt can be used in other projects, e.g. as a check of a code lock or door lock. I use one authentication level (you could also set several) with a certain initial code. The last digits provide information about the holder of the card (if that data is stored somewhere). You could only identify the user by the UID, but I assume that several cards can belong to one user. If you don’t like this solution, you can, of course, change it.
I have made a small change in the “MFRC522.py” file so that the MIFAREReader.MFRC522_Read function has a return value:
|
331 332 333 334 335 336 337 338 339 340 341 342 343 344 |
def MFRC522_Read(self, blockAddr): recvData = [] recvData.append(self.PICC_READ) recvData.append(blockAddr) pOut = self.CalulateCRC(recvData) recvData.append(pOut[0]) recvData.append(pOut[1]) (status, backData, backLen) = self.MFRC522_ToCard(self.PCD_TRANSCEIVE, recvData) if not(status == self.MI_OK): print "Error while reading!" i = 0 #if len(backData) == 16: # print "Sector "+str(blockAddr)+" "+str(backData) return backData |
The sample code then looked like this (the previous changes are important, otherwise no comparison can take place):
|
1 2 3 4 5 6 7 8 9 10 11 12 13 14 15 16 17 18 19 20 21 22 23 24 25 26 27 28 29 30 31 32 33 34 35 36 37 38 39 40 41 42 |
#!/usr/bin/env python # -*- coding: utf8 -*- import RPi.GPIO as GPIO import MFRC522 def sample_func(sample_var): # Beispiel Funktion # Skript starten, Daten loggen, etc. print("Test Funktion wurde aufgerufen") # ... MIFAREReader = MFRC522.MFRC522() authcode = [114, 97, 115, 112, 98, 101, 114, 114, 121] # die ersten 9 Ziffern sind der Authentifizierungscode try: while True: # Scan for cards (status,TagType) = MIFAREReader.MFRC522_Request(MIFAREReader.PICC_REQIDL) # If a card is found if status == MIFAREReader.MI_OK: # Get the UID of the card (status,uid) = MIFAREReader.MFRC522_Anticoll() # This is the default key for authentication key = [0xFF,0xFF,0xFF,0xFF,0xFF,0xFF] # Select the scanned tag MIFAREReader.MFRC522_SelectTag(uid) # Authenticate status = MIFAREReader.MFRC522_Auth(MIFAREReader.PICC_AUTHENT1A, 8, key, uid) # Check if authenticated if status == MIFAREReader.MI_OK: # Read block 8 data = MIFAREReader.MFRC522_Read(8) if data[:9] == authcode: sample_func(data) #elif ... except KeyboardInterrupt: print("Abbruch") GPIO.cleanup() |
As you can see, the code is very simple and, as I said, should only serve as an impetus to start your own, more sophisticated, applications. The code in line must, of course, be adjusted.
What projects are you planning to do with it? I am considering building a door lock or a drawer lock/small safe with the Raspberry Pi RFID reader.
5 Comments
Thank you for wonderful tutorial
I have changed the key a default password, after that I am unable to access that sector (either for reading nor for writing) I got (error while reading ) this error is in line (360 in the MFRC522..py).
Would you help in this please
There is something wrong with the Read.py script. See below. Python version is 2.7.16.
sudo python Read.py
Traceback (most recent call last):
File “Read.py”, line 41, in
MIFAREReader = MFRC522.MFRC522()
File “/home/pi/MFRC522-python/MFRC522.py”, line 135, in __init__
self.MFRC522_Init()
File “/home/pi/MFRC522-python/MFRC522.py”, line 406, in MFRC522_Init
self.MFRC522_Reset();
File “/home/pi/MFRC522-python/MFRC522.py”, line 138, in MFRC522_Reset
self.Write_MFRC522(self.CommandReg, self.PCD_RESETPHASE)
File “/home/pi/MFRC522-python/MFRC522.py”, line 141, in Write_MFRC522
spi.transfer(((addr<<1)&0x7E,val))
TypeError: function takes exactly 2 arguments (1 given)
@jian, did you come right with this error? I seem to be having the same.
Did you resolve this issue?
https://github.com/mxgxw/MFRC522-python/issues/69
see abrakhim’s post