")
In addition to being used as a GPS tracking system, the HMC5883L module can also be used to build a Raspberry Pi compass. This indicates the angle at which it is currently located. The HMC5883L compass module can be addressed via I2C, like many other sensors. Complete position and position systems can be built together with the rotation sensor.
In this tutorial, we want to configure our own electronic Raspberry Pi compass so that it always shows the deviation (in degrees) to the north.
Compass Components
In this tutorial I used the following components:
For visualization, e.g. a servo motor can be used, which points in the corresponding direction and thus readjusts the compass needle. I’ve built something similar with an Xbox 360 controller before, which could serve as inspiration.
Raspberry Pi Compass Connector
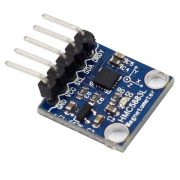
The HMC5883L module usually has five connections, of which we only need four. The “DRDY” or “RDY” termination remains free.
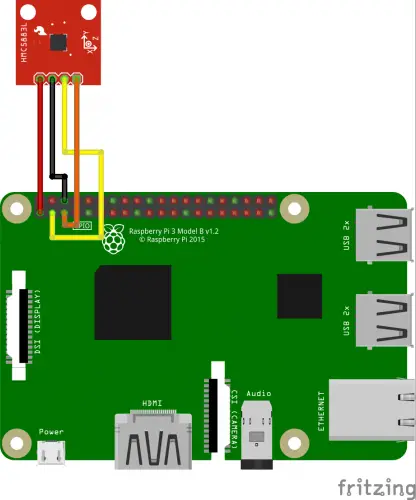
The remaining four pins of the sensor are connected to the Pi as follows: VCC -> 3.3V (Pin 1), GND -> GND (Pin 6), SCL -> GPIO3 (Pin 5), SDA -> GPIO2 (Pin 3) . Some sensors have six pins. If you have one (with 3vo and VIN), both are connected to the 3.3V pin of the Pi.
You can find an overview of the pin assignment on the Raspberry Pi here. The connection to the Raspberry Pi looks like this:
Note: Since this question came up several times, I would like to point out that you can also operate several I²C devices on the Raspberry Pi at the same time. To do this, the connections (SDA, SCL) are connected in parallel. The module is recognized via the fixed hardware address (more on this below). Only two devices with the same I2C address cannot be operated. With many sensors, however, the address can be changed using jumper cables on the circuit board. If something like this is required, I recommend taking a look at the datasheet.
Raspberry Pi Compass – Preparation
Before we can use the compass, some software packages are required. Among other things, the git client, the I2C tools and Python3 must be installed. To do this, we open the SSH terminal and enter the following:
sudo apt-get install git i2c-tools python-smbus python3 python-pip python-virtualenv python3-setuptools
After the successful installation, I2C still has to be activated, if not already done. To do this, enter in the command line:
sudo raspi-config
Activate it under “Advanced Options”> “I2C”.
If the compass module is already connected, we can already see whether it is recognized. To do this, enter sudo i2cdetect -y 1. The output should look like this:
pi@raspberrypi:~ $ sudo i2cdetect -y 1
     0  1  2  3  4  5  6  7  8  9  a  b  c  d  e  f
00:          -- -- -- -- -- -- -- -- -- -- -- -- --
10: -- -- -- -- -- -- -- -- -- -- -- -- -- -- 1e --
20: -- -- -- -- -- -- -- -- -- -- -- -- -- -- -- --
30: -- -- -- -- -- -- -- -- -- -- -- -- -- -- -- --
40: -- -- -- -- -- -- -- -- -- -- -- -- -- -- -- --
50: -- -- -- -- -- -- -- -- -- -- -- -- -- -- -- --
60: -- -- -- -- -- -- -- -- -- -- -- -- -- -- -- --
70: -- -- -- -- -- -- -- --
If nothing was detected, you should check the connection of the sensor.
Normally root rights must be available to read out the I²C bus. However, since the library that will be used later does not have this, we have to activate it first. For this we create a file
sudo nano /etc/udev/rules.d/99-i2c.rules
with the following content:
SUBSYSTEM=="i2c-dev", MODE="0666"
With CTRL + O we save this and with CTRL + X we exit the editor and return to the terminal.
Set up the Raspberry Pi Compass Library (HMC5883L)
To be able to use the compass module, we need two Python 3 libraries, which we will now install:
git clone https://github.com/quick2wire/quick2wire-python-api
cd quick2wire-python-api
Here are some files that we need to add to the Python path variables. If you have renamed the folder or in a different directory, you can use pwd to show which folder you are in. To update the Python path, let’s edit the Profiles file:
sudo nano /etc/profile
At the top add these two lines (adjust path if necessary):
export QUICK2WIRE_API_HOME=/home/pi/quick2wire-python-api
export PYTHONPATH=$PYTHONPATH:$QUICK2WIRE_API_HOME
After saving the file, we restart the Pi.
sudo reboot
After we have reconnected via SSH, we quickly check whether the path has now been set:
echo $PYTHONPATH
This should now contain our specified path. In addition, an I2C device should be recognized (compass module must be connected):
ls /dev/i2c-*
You have to remember the displayed number because it will be needed soon (for me it is 1).
Back in the library directory, we can now start the installation:
cd quick2wire-python-api
sudo python3 setup.py install
Now we can finally install the actual library, which can read the HMC5883L compass.
git clone https://bitbucket.org/thinkbowl/i2clibraries.git
There are also other I2C libraries such as available for the ITG-3205, ADXL345 and LCD displays.
If you want, you can also add the path of the libraries to the Python path variable (analogous to the one shown above).
Testing the Raspberry Pi Compass
Now it’s time to test the electric compass. To do this, we call the Python3 console:
sudo python3
The following are some sample codes that describe the functions. If your I2C device does not have the number 1 (like mine), you have to adjust this in line 3.
|
1 2 3 4 5 6 7 8 |
from i2clibraries import i2c_hmc5883l hmc5883l = i2c_hmc5883l.i2c_hmc5883l(1) hmc5883l.setContinuousMode() hmc5883l.setDeclination(2, 15) print(hmc5883l) |
You should set the declination for the highest possible accuracy (line 6). For me this is 2 ° and 15 ‘(arc minutes). The “Magnetic Declination” is different in each place and can e.g. can be found out via this page.
In the example, we are interested in the last value, which can also be read out via hmc5883l.getHeadingString(). A value of 0 means that the sensor is pointing straight north.
Reading Out Axes
In addition to the angle, it is also possible to read out the rotation of the axes:
|
1 2 3 4 5 6 7 8 |
from i2clibraries import i2c_hmc5883l hmc5883l = i2c_hmc5883l.i2c_hmc5883l(1) hmc5883l.setContinuousMode() # To scaled axes (x, y, z) = hmc5883l.getAxes() |
Unfortunately, the website with the complete documentation is now offline, but fortunately, it can still be accessed via the Wayback Machine.
3 Comments
Nice!
On my Raspberry Pi 4, I enabled I2C using “3 Interface Options” of the ‘sudo raspi-config’ utility (not the ‘Advanced Options’)
Thank you for a VERY helpful tutorial. I bought a compass board that was very inexpensive, but it came with absolutely no documentation, and I had never used an I2C peripheral before. Your explanation made my purchase useful
Thanks!
This is a pretty good primer for something I’m planning later this year, a magnetometer compass and a temperature senor rotating an image around a pivot and driving some gauges, think of something like an Aliens Motion Tracker or a Ghostbusters PKE Meter.