 – Tutorial")
Often you want to be able to control (household) devices with a higher voltage with the Pi. Raspberry Pi wireless-controlled sockets are ideal for this because they are very easy to control and you do not have to interfere with the circuit. For that and many other projects, there are wireless sockets, as they can be easily remotely controlled from a distance in the house with small radio transmitters.
In this tutorial, I will show you how to set up and configure Raspberry Pi wireless-controlled sockets and how they can be controlled with the Pi.
Required Hardware Parts
- Wireless-controlled sockets (set)
- 433Mhz transmitter and receiver (also available on eBay)
- Jumper cable
- Breadboard
For the wireless-controlled sockets, it is important to be able to set the code by means of a DIP switch. There are also models with a generic code. I once tried such a device and could neither read the correct code nor send a correct signal. Although there are now tables with the codes, anyone who wants to be on the safe side can just take, for example, the above linked (without generic codes).
Setup
The setup does not really differ from the one shown here.
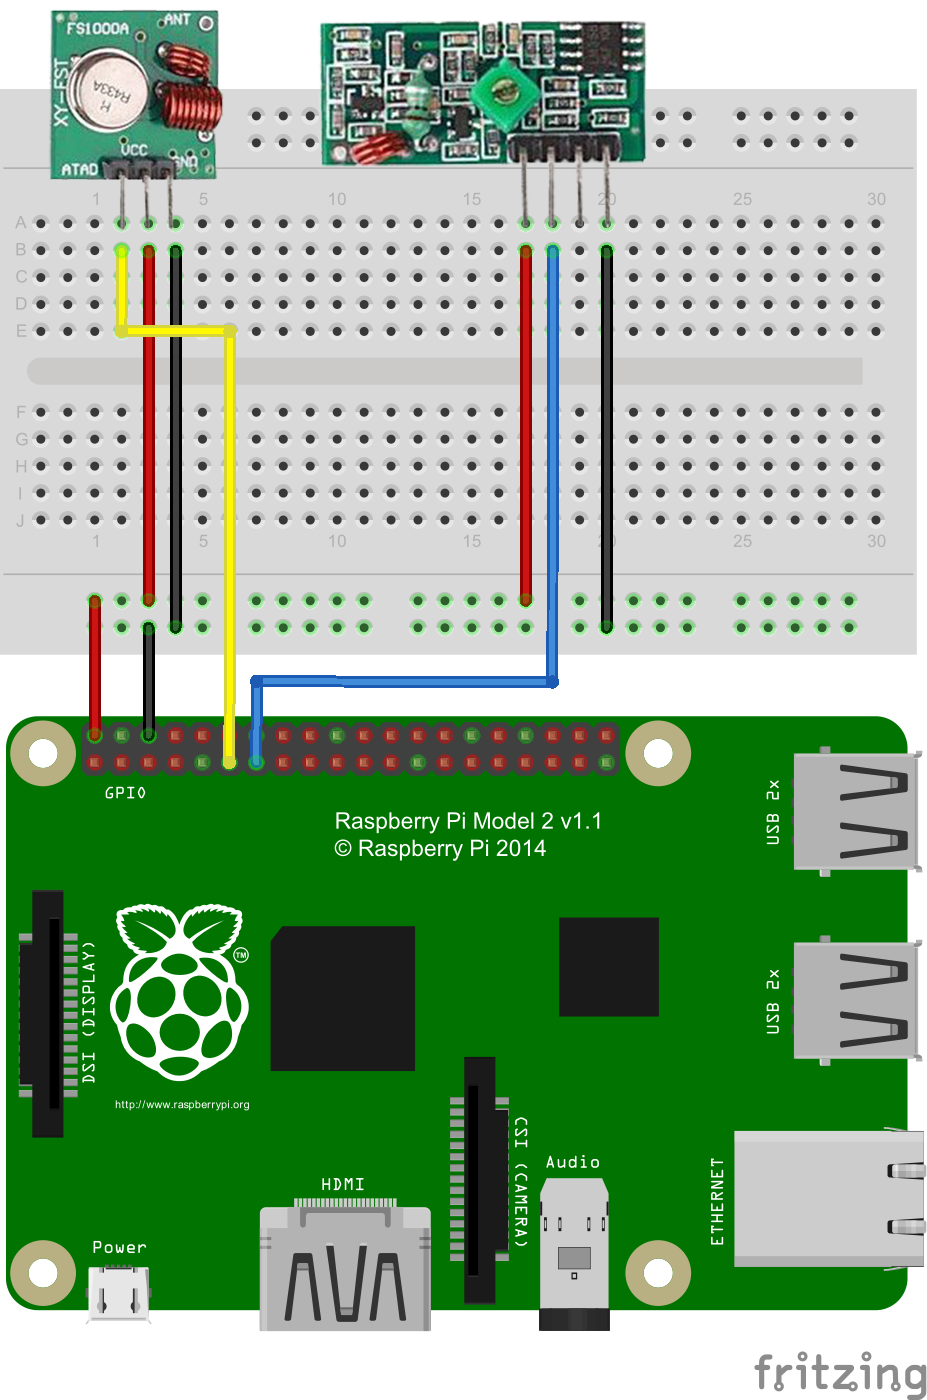
Let’s get to the setting of the sockets and remote control:
In the remote control, a 5-digit code can be set by setting the DIP switches. You must also set this code in the sockets (opening on the back side). In addition, a name (A-E) must be specified. In my example, I have taken the 00011 as code and marked the socket as E.
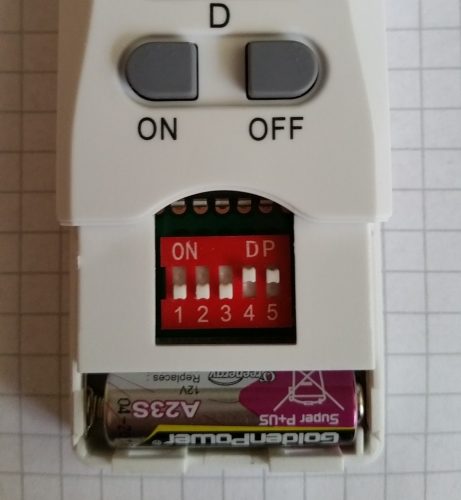
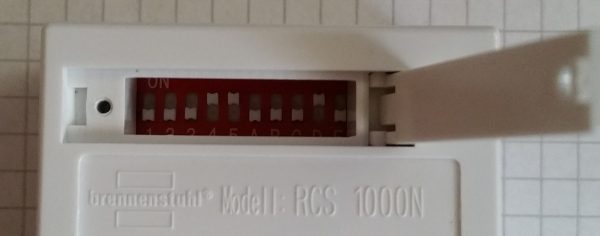
Due to the different codes, it is possible to remotely control almost any number of sockets.
Software for controlling the 433 Mhz Raspberry Pi wireless sockets
It is important that you already have wiringPi installed. If it’s not already done, here is described how it works.
Now we update all packages and install git, if it’s not already available:
sudo apt-get install git-core
sudo apt-get update
sudo apt-get upgrade
Now we get the 433Mhz library from Ninjablocks and compile:
git clone --recursive https://github.com/ninjablocks/433Utils.git
cd 433Utils/RPi_utils
make all
First, the code of the remote control must be read out. If you already know this, you can skip the step. Otherwise, we start
sudo ./RFSniffer
and press the corresponding buttons on the remote control. The received code is now displayed (for me it is 5510417 for on and 5510420 for off). After reading the code, you can also remove the 433Mhz receiver if it bothers you.
Now we create a new C ++ file with the following content:
sudo nano control.cpp
|
1 2 3 4 5 6 7 8 9 10 11 12 13 14 15 16 17 18 19 20 21 |
#include "../rc-switch/RCSwitch.h" #include <stdlib.h> #include <stdio.h> int main(int argc, char *argv[]) { int PIN = 0; // cf. wiring Pi pinout int codeSocketDon = 5510417; int codeSocketDoff = 5510420; if (wiringPiSetup() == -1) return 1; RCSwitch mySwitch = RCSwitch(); mySwitch.enableTransmit(PIN); if (atoi(argv[1]) == 1) { // you can set your own conditions here mySwitch.send(codeSocketDon, 24); } else { mySwitch.send(codeSocketDoff, 24); } return 0; } |
Afterwards, the file has to be compiled:
g++ -DRPI ../rc-switch/RCSwitch.cpp control.cpp -o control -lwiringPi
And by means of
sudo ./control 1
you can turn the socket on. Of course, you can think of other things here and for example, integrate the file via Python. Your creativity is in demand 🙂
7 Comments
Hi,
I this with a set from Conrad.
When I try your tutorial https://tutorials-raspberrypi.com/remote-control-a-raspberry-pi-with-433mhz-radio-transmitter/ , I get key-codes like 248425728, 30321920, 651078912 ….
When I set up the hardware according to this tutorial I get -1899057920, -2117161728, -1496404736 …. for the same keys ?
It is impossible to send these keys, as descibed above, since the transmitter seems to only take integers as arguments.
Any ideas?
TIA. Karl
Here’s a clue:
-1899057920 = 0x8ECEAD00
248425728 = 0x0ECEAD00
-2117161728 = 0x81CEAD00
30321920 = 0x01CEAD00
-1496404736 = 0xA6CEAD00
651078912 = 0x26CEAD00
i.e. the negative numbers are the same as the positive ones but with the top bit set.
Rob.
Hello!
I would like to discuss the issue of cooperation with You. Interested in placing a banner on Your website on a regular basis. The theme of the banner is mobile phones, gadgets. We work on an advance payment.
Please write to the free places for accommodation, their formats and cost.
I’ll wait for Your reply on my email. mail. Sincerely, Anna.
—
Hallo!
Ich möchte mit Ihnen über die Zusammenarbeit diskutieren. Interessiert ein Banner auf Ihrer Website laufend. Das Thema des Banners ist Mobiltelefone, Gadgets. Wir arbeiten an der Vorauszahlung.
Bitte melden Sie sich für freie Plätze, deren Formate und Kosten ab.
Ich werde auf Ihre Antwort auf meine El warten. Mail. Mit freundlichen GRÜßEN, Anna.
Thank you for your tutorial.
All works flawlessly on my Pi 2B
Thanks for this nice tutorial – everything works well on my Pi 2B!
I wrote a little web application to be able to control the sockets via a mobile friendly web interface. Feel free to check it out: https://github.com/mbarde/sloth-tools
bonjour merci pour votre tutoriel apres avoir installé 433Utils et tapé cd 433Utils/RPI_utils je recois “aucun fichier ou dossier de ce type” auriez vous un moyen d eviter ce probleme
hello thank you for your tutorial after installing 433Utils and typed cd 433Utils/RPI_utils I receive “no file or folder of this type” would you have a way to avoid this problem