Home assistant (hass.io) is an open source home automation software, which gives us free tools to convert our home to a smart home. All you need to do is to set up Home Assistant on a Raspberry Pi (Raspi) and connect our home appliances with it. With proper configuration, we will be able to analyze, control and schedule, every thing in your home with your smartphone. The first step towards achieving your smart home goal, is to install the Home Assistant software. So let’s get started.
In general, Home Assistant is one of different smart home systems that are freely available. Another commonly used software is OpenHAB, which you can find here.
Tools Needed
For the beginning, we only need few parts:
- Raspberry Pi 3B+ or later
- 16 GB Micro SD Card and USB adaptor
- A USB Stick
- A Laptop
- Android Phone or Apple phone
Download Hass.io for Raspberry Pi
First we need a computer to be the brain of our home automation system. And it should be small enough to occupy in our room without getting noticed and should cost less. Raspberry Pi satisfies all these requirements and shall run on a 5V battery! It is a single board computer that lets you create a variety of embedded systems. And the heart of the Raspi is an ARM core, which shall run a Linux OS. In fact, Raspi supports various Linux flavors (distros) like Raspbian. We shall select one of them and flash the image on Raspberry. After flashing the Linux image, we have to install applications like hass.io on top of that. And it would be a tedious task to configure all these options.
To make our life easier, hass.io provides a Raspberry Pi Linux image with hass.io applications pre-installed. After checking the version of your raspberry, download the Linux image:
The image will be over 200 MB and will have an extension img.gz.
Flash Raspberry Pi Home Assistant Image
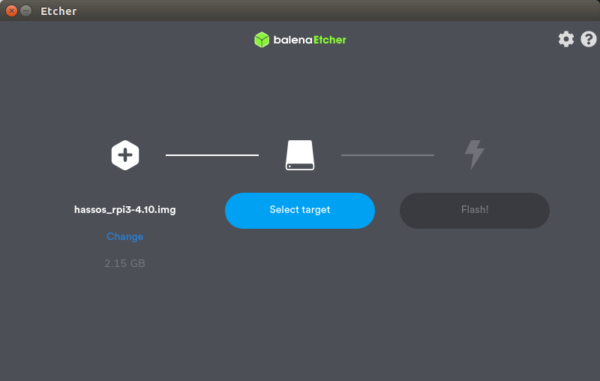
Now we have the image, we need to write it to the SD card. First, put the SD card into the adaptor and plug it in the laptop. You should see a new drive in your file explorer, once you connect the adaptor. For writing the image, we need to install an image writer. Hass.io recommends balenaEtcher. It’s a simple, lightweight cross-platform image writer. Install and run balenaEtcher. In the first step we need to specify the image to write to the disk. Go to the location of the image file, you downloaded previously, and select the image file. In the second step select the SD card adaptor drive. Note that the drive would be automatically selected for you by the software, if you have a single USB device attached. And finally flash the image on the card by clicking flash.

Wi-Fi Configuration
Once the flashing is over, we have to configure Wi-Fi, so that we can communicate with the device. For that take a USB stick (2 GB pen drive would also do the trick) and format it to FAT32 partition with volume name CONFIG.
Disk Partition In Ubuntu
In Ubuntu, you shall create partition using gparted. It’s a well known software, which is actually used during the Ubuntu installation process. First, install gparted using the command:
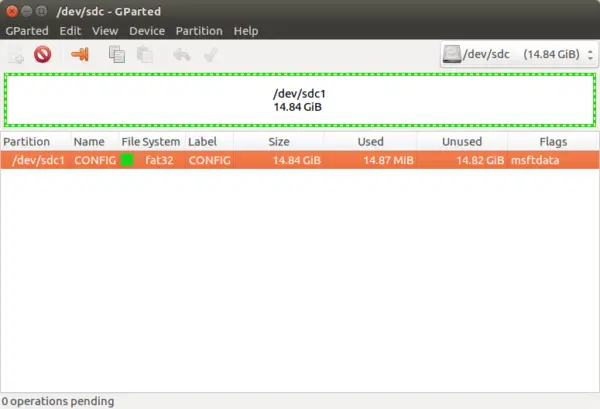
sudo apt get install gpartedOpen gparted from the applications search. Since partitioning of disks is a privileged task, you would be prompted to enter password for the super user. Once you open the app a GUI similar to the image given below will appear.

First you need to select the disk you want to partition. In Linux the disks are stored as files in /dev folder. The files of hard disk would be named as sda and flash drives are usually sdc. Remember that you don’t want to touch the disk in which your Ubuntu OS is installed. Therefore, you need to select the correct disk label which you shall identify by the size. Usually hard disks are more than 100 GB in size. Select your disk (which would mostly be /dev/sdc as shown in figure) from the drop-down list on the upper right corner of the gparted.
When you right click on the disk’s contents, which would usually be a single folder like /dev/sdc1 in the image, you will see a context menu with various option like delete, format etc. Here you need to create a FAT32 partition. For that select format from the context menu and enter FAT32 as the disk type and CONFIG as the volume name. Finally, apply changes by clicking on the tick mark on the toolbar. Note that, you may need to unmount the disk from the context menu, if any of the options are not enabled.
Disk Partition In Windows
In windows, you shall accomplish the disk partition using the file explorer. First open file explorer (shortcut: Windows + E) and right click on the USB Drive. Once the context menu comes up, select format. Then give the necessary options like FAT32 as the file system and CONFIG as the volume label. Finally, click Format to create a FAT32 partition in your pen drive.
Configuration File
We have created the partition in the USB stick. Now we need to add our WiFi credentials to the partition. For that first create a new file named network/my-network in the FAT32 USB drive. Next we need to add the following contents to the file. Before writing the file, replace MY_SSID and MY_WLAN_SECRET_KEY with your Wi-Fi credentials.
[connection]
id=my-network
uuid=72111c67-4a5d-4d5c-925e-f8ee26efb3c3
type=802-11-wireless

[802-11-wireless]
mode=infrastructure
ssid=MY_SSID
# Uncomment below if your SSID is not broadcasted
#hidden=true

[802-11-wireless-security]
auth-alg=open
key-mgmt=wpa-psk
psk=MY_WLAN_SECRET_KEY

[ipv4]
method=auto

[ipv6]
addr-gen-mode=stable-privacy
method=auto
Finally, insert USB stick and the SD card in the Raspi board and power it on. Now the raspberry will boot with the hass.io Linux image. The first time the board boots up, device will update and install the Raspberry Pi Home Assistant app. The update will take around 20 minutes. If you access the application before that, it would show the screen, which informs you to wait for some time. Meanwhile, it will also try to connect to the Wi-Fi. Since you have provided the credentials in the USB, it will use the same with WPK security. Now let’s see how to access hass.io using the mobile app.
Use Home Assistant on Mobile
There are two ways to access home assistant:
- Website
- Mobile App
In this tutorial, will use mobile app, because it’s more convenient and portable. First, we need to install the home assistant app in your mobile. Download the app from the app store of your mobile. Currently, hass.io supports both Android and Apple phones. It’s available in Google Play Store and Apple Store. Secondly, the mobile and Raspberry should be in the same network, so that we shall discover the device. It will generally use multicast DNS or bonjour to discover the device. If the board is powered on, it should be discovered by the app.
On the first boot wait for 20 minutes for the hass.io update and configuration. Now you should be able to see the device discovered on the app. Once the device is discovered, create credentials to access hass.io. And finally, we are ready to create some cool home automation solutions.

Now, you shall find and configure various IOT devices, if you have any, and get acclimatized with various options in the app. We will discuss how to build home automation using hass.io in the upcoming tutorials.


1 Comment
Waiting for my RasPi 4 B