")
Thanks to the inexpensive Raspberry Pi Zero, Internet of Things (IoT) projects will continue to grow. One disadvantage which the Zero (not W) and A+ models have is the lack of Ethernet connectivity. That would not be a problem, if not just a single (micro) USB port onboard.
In order to connect these models with the network by Ethernet cable without a WLAN adapter, one can do this over the GPIOs: All you need is the “ENC28J60” module, the connection of which is shown in this tutorial.
Why Ethernet?
The Raspberry Pi Model Zero has only a single USB port just like the Model A+. If you connect a keyboard, then you will need another USB hub for your other USB devices (active), which also need to be powered on and that can also cause cable clutters. To give up on a keyboard and control the Pi via SSH, you will need a network connection. You can either connect it via USB a WLAN adapter, or use the GPIOs:
The Raspberry Pi has a 40-headed GPIO bar, which can even be extended, so there are hardly any restrictions here. With the ENC28J60 module, it is possible to create a network connection via an Ethernet cable. The advantage is that the only free USB port can be used elsewhere and you can still connect a USB device – without a hub.
Required Hardware Parts
You will need the following parts:
Although the whole thing would also work with a Raspberry Pi Model B, all B models have an integrated Ethernet port, which is why it makes little sense to additionally connect an external one as well.
Connection
There are several versions of this module, some are larger and some are smaller. So that there are no confusions, the connection of the pins is only shown in tabular form and not as a picture, since the position of the module pins also varies. I’ve written all known pin names in a line separated by slashes:
| ENC28J60 Module | Raspberry Pi |
|---|---|
| VCC / 3.3 / Q3 | 3V3 (Pin 1) |
| GND | GND (Pin 6) |
| CS | CE0 (GPIO8, Pin 24) |
| SI | MOSI (GPIO10, Pin 19) |
| SCK | SCKL (GPIO11, Pin 23) |
| SO | MISO (GPIO9, Pin 21) |
| INT / IRQ | GPIO25 (Pin 22) |
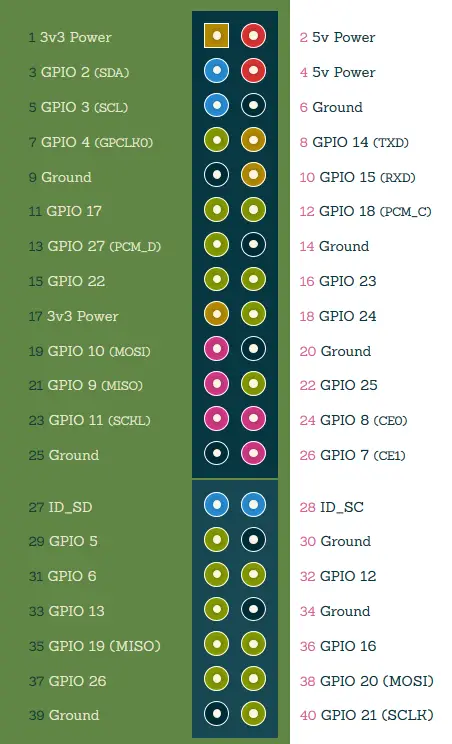
As an aid here is the Raspberry Pi GPIO occupancy (this has, except for the very first Model B of the revision 1, remained the same for all models):
Software
A word in advance: If you have another Raspberry Pi, it is easiest to perform the steps first on it and then put the SD card in the Pi Zero. Otherwise, you will need a Micro HDMI and a Micro USB Adapter, which connects your screen and keyboard.
The Ethernet module uses SPI, so we’ll need to unlock it first, if it’s not already done:
sudo raspi-config
Under “Advanced Options “, there is the entry “SPI”, which we activate. A restart would possibly be necessary.
sudo nano /boot/config.txt
At the end of this file we insert the following line:
dtoverlay=enc28j60
You can now restart and remove the WLAN stick (if you used one) afterwards.
sudo reboot
That’s it! Your Raspberry Pi can now be connected to the Internet via an Ethernet cable.
A final word: In terms of speed, an SPI-powered Ethernet port can not connect to a built-in Ethernet port. Even a Wi-Fi connection is faster. In my tests, I had a download speed of about 5Mbit/s.