
Mainly in mobile applications, a static power supply is not always guaranteed or there is no outlet nearby. A Raspberry Pi battery pack or a mobile power supply is beneficial in many cases. In this tutorial, I want to show one way to operate the Pi using normal AA batteries or rechargeable batteries.
Of course, there is the option to buy a USB Powerbank, but this has to be fully charged every time. Batteries, on the other hand, have the advantage that they can be replaced immediately, and that rechargeable batteries can also be recharged. If you prefer to choose a power bank, I recommend paying attention to as many mAh as possible (for example, 12000mAh like this) so that the Pi can run for a few hours.
Accessories
Let’s get to the required parts. Since batteries deliver a different voltage, but the Raspberry wants 5V at at least 700mA, we need a switching regulator.
- LM2596 Switching Module
- Battery compartment for 6 AA batteries
- AA batteries or rechargeable batteries (maximum ampere hours)
- USB jack (or you cut a Micro USB cable and solder it directly)
- optimally another switch, but it is not necessary
- Multimeter for measuring and adjusting the voltage
- Soldering tools (alligator clips do it too)
In principle, the construction with any Raspberry Pi model is possible, but should the batteries last a long time, I recommend the more economical Model A.
If you do not have a multimeter (which is one of the standard utensils) can also take a DC-DC converter with a display. The values are always visible, but the module costs more.
Depending on the batteries, Raspberry model and applications, the runtime can vary a lot (you can increase the runtime, for example by connecting two battery compartments in parallel).
Setup – Raspberry Pi battery regulator
Attention: Any reproduction is of course at your own risk, I can not provide any guarantee/liability!
After the batteries are inserted, you can already measure the voltage. This should be around 9V (6 x 1.5V) for normal batteries and about 7.2V (6 x 1.2V) for rechargeable batteries.
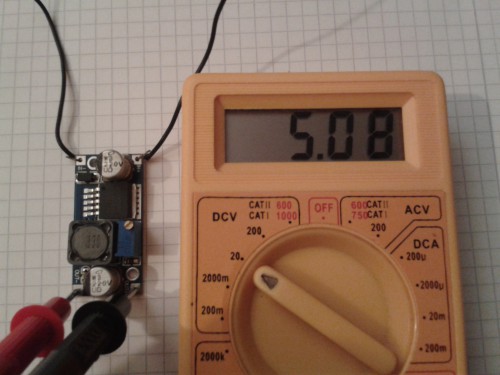
The LM2596 module has IN +, IN-, and OUT +, OUT- respectively left and right. At IN you connect the ends of the battery holder according to the polarity. Now you can put the multimeter on the two OUT contacts and measure. By turning the small golden screw you can change the voltage until it is at ~ 5V. The best way is with a (very fine) flat screwdriver or a (carpet) knife.
Let us now come to the USB socket. Each standard USB port has 4 pins, two of which are data pins and the other two provide the voltage. We are only interested in the latter, since no data should be transmitted.
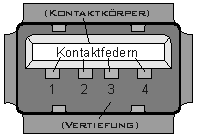 On the right you see the structure of a USB socket (type A). Here Pin 1 and Pin 4 are important. At pin 1 (VCC), OUT + from the LM2596 module is connected, at pin 4 (GND) comes OUT-.
Who, like me, has an on/off switch, should best place this between the battery and the DC-DC converter. In addition, of course, you can build the whole in a small plastic/wood case (3D printer or just glue it together with hot glue). Now only connect Micro USB cable and thus supply the Pi with power.
It is advisable to switch off all unnecessary services and applications in a battery-powered mode so that as little power as possible is required by the Raspberry Pi battery.
4 Comments
WTF? are you totally without grey matter? I am an electronics engineer and you are spouting nonsense. Has nobody else noticed the crap this guy is pushing?????
“Who, like me, has an on/off switch, should best place this between the battery and the DC-DC converter.”
What does this mean? Hello? Is there anyone home?
The author is probably not a native English speaker. It’s pretty clear they recommend if you want to add a power switch, it should be done between the voltage regulator and the batt pack. Lighten up, Francis!
As you say, not a native English speaker, but it’s pretty obvious what he means if you read and think.
And massive kudos for the Stripes reference!!!
He’s probably writing for an audience mostly non-engineers. What is obvious to you may be less so to people with less experience.
Anyway, I am curious how much power the convertor itself draws, and how long it may run, let’s say, a RPi Zero W, on a set of batteries. I know AA batteries can provide 2000-3000 mAh typically. Can one reasonable expect 2 – 3 hours, including maybe also powering a couple of small motors and a few sensors connected to the Pi?