The Raspberry Pi Foundation has released a pure microcontroller at a super low price: the Raspberry Pi Pico. This differs from its “siblings” but is easier to program than seldom before. We can write our first small application using MicroPython and/or C++. In addition, the Pico comes with many GPIOs on board and even one or the other sensor.
In this article, we will first look at the differences between other Raspberry Pi models and then create our first little program for the Pico.
What Can the Raspberry Pi Pico Do?
The new device from the Raspberry Pi Foundation differs from its predecessors. The tiny microcontroller sells for $4 excluding taxes and shipping, making it more than competitive. Its direct “competitors” are other microcontrollers such as Arduino or ESP8266.
The officially published specifications of the Pico are as follows:
- RP2040 microcontroller chip
- Dual-core arm Cortex M0 + processor, flexible clock speed of up to 133 MHz
- 264 KB SRAM and 2 MB built-in flash memory
- Direct soldering on the board is possible
- USB 1.1 with device and host support
- Energy saving mode and hibernation
- Drag-and-drop programming via USB
- 26 GPIO-Pins (3.3V)
- 2 × SPI, 2 × I2C, 2 × UART, 3 × 12-bit ADC, 16 × controllable PWM channels
- RTC and timer on the chip
- Temperature sensor
- On-chip floating-point libraries
- 8 × programmable I/O state machines (PIO) for user-defined peripheral support
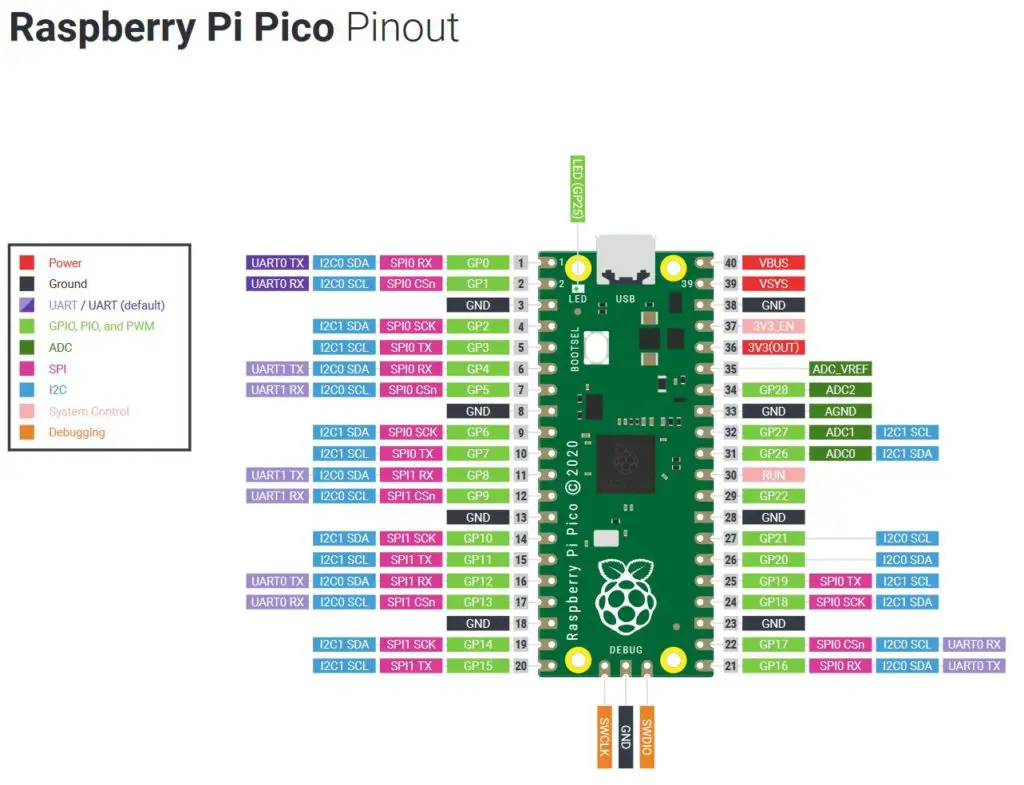
That all sounds very interesting at first. The low price in particular is also a highlight. The 26 programmable pins can be found in the following locations. Some have multiple functions:
Raspberry Pi Pico vs. Model 4B vs. Zero – What are the differences?
The features of the Pico read all very well – but what are the technical differences to a Raspberry Pi 4 Model B or a Raspi Zero?
Firstly, the most important difference: The Pico is a microcontroller and not a mini-computer. This means that the Pico does not have an operating system because its field of activity is somewhat different: a pure microcontroller usually has simpler tasks that it has to carry out quickly. An operating system allows us to run many processes in parallel, but it is slower to execute individual tasks.
So the first question you have to ask yourself is: What is the Raspberry Pi used for? For simple tasks (for instance, collecting measured values, switching circuits, receiving and sending signals), the Pico is a good choice. Moreover, if you want to solve more complex problems (e.g. machine learning) or start desktop applications, then you should use a normal Raspberry Pi. And if you don’t want to spend a lot of money, you can also take the Zero model, which costs similarly (without Wi-Fi).
Whether your project requires an Internet connection or a Bluetooth connection could also be important. The Pico doesn’t bring both of these out-of-the-box.
In other words, you might now ask yourself the question “what do I need a Raspberry Pi Pico for”? There are a couple of reasons for this, the main one being the super low power consumption.
Depending on the program, the Pico can get by with a small Li-Po battery for many days or even weeks. In sleep/standby mode, the Pico needs <0.2mA (= 0.006 watts) and only about 90mA under load (rendering graphics).
What is also practical for many sensors: The integrated analog-to-digital converter (ADC). While we cannot easily read out analog signals with the large models, this is easily possible with the Pico. And that’s not even all: If you have few accessories and just want to get started right away, for example, you can include the integrated temperature sensor in your code (as we will do in a moment).
And of course, size also plays a role. The Pico is significantly smaller than a Model 4B and even smaller than the Zero:
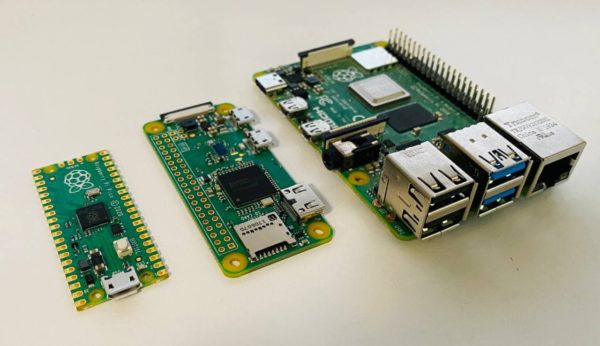
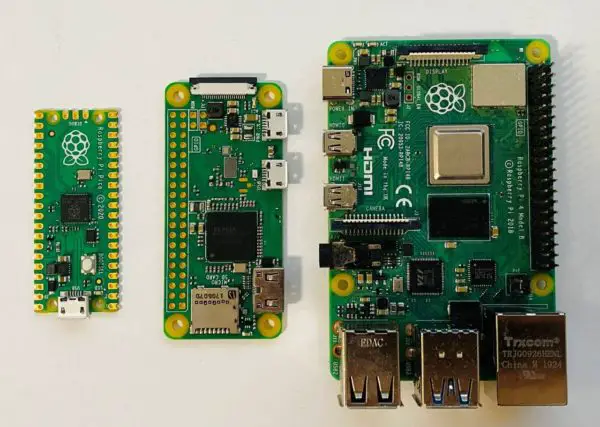
Also, another convincing point is the very good documentation. Getting started with microcontrollers is more difficult for beginners than for experienced people, which is why documentation is very important.
Required Hardware Parts for Our First Test
In the basic version (without cable and pin header) the Pico costs only $5-6. For an (original) Arduino Nano you usually have to lay at least twice as much and the Arduino is a lot slower for that. The situation is similar with the ESP8266. The ESP has other advantages, but a comparable model (ESP32-based) would also be more expensive here (but with WiFi).
In the next step we need the following parts to program the Pico:
- Raspberry Pi Pico (ideally with a pin header)
- Breadboard
- Micro USB cable (no mini or type C)
- optional: battery compartment (3 x 1.5 volts AA)
- LEDs
- optimal: a reference work for MicroPython
You also need a Mac, Windows or Linux computer. By the way, you can also program the Pico using a normal Raspberry Pi, which I recommend and have also done.
For young teenagers who have little or no experience with microcontrollers or programming in general, the Raspberry Pi Pico offers a very nice and easy introduction. Various Raspberry kits and sets with other parts contain everything you need to get started. So also a nice birthday present!
Flash the MicroPython Program on the Raspi Pico
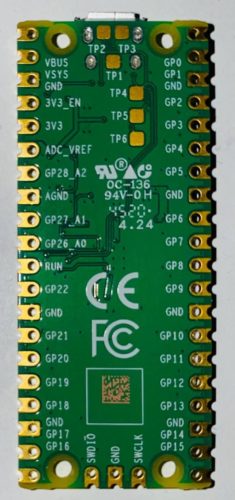
Now you will be wondering how we program the Pico Pi. We can use either MicroPython or C++ as the programming language for this. The compiled program is simply dragged and dropped onto the Pico’s file system. The Pico Pi automatically connects as a mass storage device.
First, we finish the Pico: To do this, we download the MicroPython UF2 file (alternative for C++) from the Raspberry Pi Foundation website. Then follow these steps:
- The Pi must not be supplied with power (no USB connection).
- Hold down the BOOTSEL button.
- Connect the Pico Pi to your Raspberry Pi/PC/Mac via USB.
- Let go of BOOTSEL button.
- Transfer the MicroPython UF2 file using drag & drop.
On our Raspberry Pi Model B we now open a terminal and enter the following:
sudo apt install minicom
Then we just connect to the Pico:
minicom -o -D /dev/ttyACM0
Press Enter a few times or CTRL + D (which will restart the Pico). Then we are in the Python console and can enter commands. For example, you can output a first hello world there
print("Hello, Pico!")
or let the onboard LED flash for one minute:
from machine import Pin
import time

led = Pin(25, Pin.OUT)
for i in range(60):
  led.value(i % 2)
  time.sleep(1)
To learn more, I recommend this tutorial to learn how to program with Python.
Of course, you can also do a lot more: You can also read out (and control) modules via SPI, I2C, UART or analog. You can find tons of other examples in the Foundation’s Github repository.
Let the Python Script Run Permanently on the Pico Pi
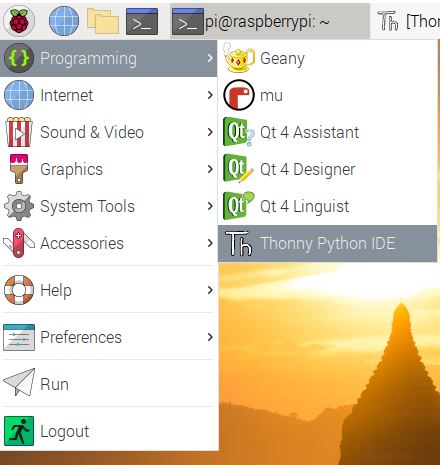
The problem with the previous code is that it does not run permanently and is forgotten after a restart. Therefore we write a Python script which we load onto the Pi. We open the Thonny Python IDE for this:
 Under “Run”> “Select interpreter” you can select “MicroPython (Raspberry Pi Pico)”. Then select “Board in FS Mode” (you may have to restart the Pico).
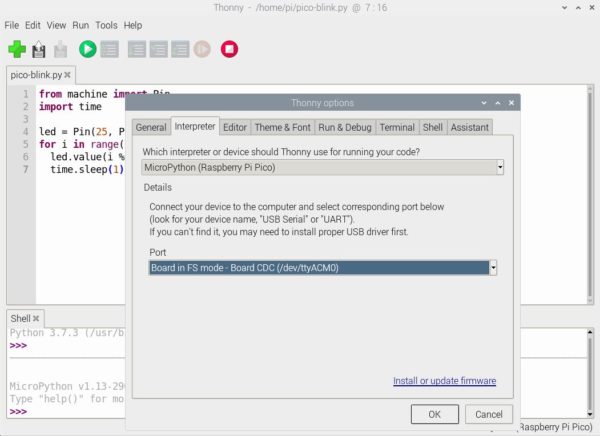 If you don’t see such an entry here, you probably need to update the Thonny IDE:
sudo apt-get update && sudo apt-get upgrade python3-thonny --yes
To save the file on the Pico, select “File”> “Save as”> “Raspberry Pi Pico” and enter a name (e.g. “pico-blink.py”). If you want the file to start automatically on reboot, you’ll need to name it main.py.
By the way: If you prefer to use C++ for programming, this is no problem either. For this, you can follow this guide.
More Project Ideas for the Pico
Of course, much more is possible with the RPi Pico. Here are some spontaneous ideas:
- Retrofit W-LAN with ESP-01: The Pico Pi does not have Wi-Fi, but it has many other advantages. Since the ESP8266 can be addressed via the serial interface, we can let the data transfer run over it.
- W2812 NeoPixel: The popular LED strips can also be controlled with a pico. We can use it to illuminate rooms or present color effects, for example. Since we only need a few GPIOs, we can build a lot more on the side.
- Read out any sensors: Pretty much all sensors that we can read with a Raspberry Pi, Arduino or ESP can also be used with the Pico Pi. The same applies to many modules.
Conclusion
The Pico Pi is the first Raspberry Pi that is not a single-board computer, but a pure microcontroller. Thus, it is super efficient in power consumption and comes with many other features that similar microcontrollers do not have – or only for an extra charge. For very little money there is a more than suitable alternative to Arduino boards with the Pico Pi.
What I also liked: In contrast to the single-board Raspberry Pi’s, the Pico has labelled all pins. This helps when looking for errors and when you don’t want to search for the pin assignment again. I would have liked it better if the top had been labelled as well, but maybe that will come with the next version.
Finally, I am of course interested in which project you are planning or have already built with the Raspberry Pi Pico and on which topics are the tutorials desired?

3 Comments
Seems like a great little board but I think that not having WiFi limits it’s usufulness. I know that WiFi is power hungry but if it was made switchable it would still allow low power working without the WiFi turned on and would not add significantly to the cost.
You explain how to load the UF2 file from a PC, but not how to connect to it afterwards. Is it possible to access the Pico from Windows 10?
Disregard most things you read and just install Thonny on your PC. It works great with the Pico.